Salta al contenuto principale

Motorola Moto X Motherboard Assembly Replacement

Solo Prerequisita
Questa guida รจ destinata a essere usata solo come prerequisito per altre guide. Da sola รจ incompleta.

Cosa ti serve

  1. Motorola Moto X Motherboard Assembly Replacement, Motherboard Assembly: passo 1, immagine 1 di 1
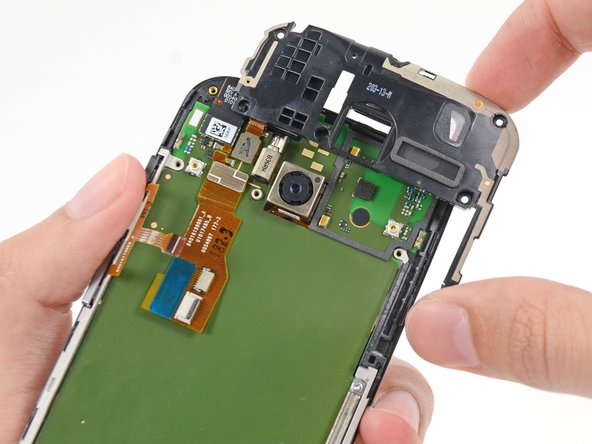
    • Remove the five 3 mm T3 Torx screws from the headphone jack/speaker assembly.

  2. Motorola Moto X Motherboard Assembly Replacement: passo 2, immagine 1 di 3 Motorola Moto X Motherboard Assembly Replacement: passo 2, immagine 2 di 3 Motorola Moto X Motherboard Assembly Replacement: passo 2, immagine 3 di 3
    • Insert a spudger under the panhandle of the headphone jack/speaker assembly and pry it up from its recess.

    • Remove the headphone jack/speaker assembly.

  3. Motorola Moto X Motherboard Assembly Replacement: passo 3, immagine 1 di 2 Motorola Moto X Motherboard Assembly Replacement: passo 3, immagine 2 di 2
    • Push the tip of a spudger under the microphone assembly clip to free it from the earpiece speaker.

    • If the assembly clip seems to be missing, check the speaker assembly that was removed from the previous step.

  4. Motorola Moto X Motherboard Assembly Replacement: passo 4, immagine 1 di 2 Motorola Moto X Motherboard Assembly Replacement: passo 4, immagine 2 di 2
    • Use the flat end of a spudger to free the microphone assembly cable connector.

    • Use tweezers to remove the microphone assembly.

  5. Motorola Moto X Motherboard Assembly Replacement: passo 5, immagine 1 di 2 Motorola Moto X Motherboard Assembly Replacement: passo 5, immagine 2 di 2
    • Disconnect the front-facing camera cable connector.

    • Remove the front-facing camera from its recess with a pair of tweezers.

  6. Motorola Moto X Motherboard Assembly Replacement: passo 6, immagine 1 di 1
    • Remove the final two 3 mm T3 Torx screws from the SIM slot bracket.

  7. Motorola Moto X Motherboard Assembly Replacement: passo 7, immagine 1 di 1
    • Remove the SIM slot bracket from the motherboard.

  8. Motorola Moto X Motherboard Assembly Replacement: passo 8, immagine 1 di 2 Motorola Moto X Motherboard Assembly Replacement: passo 8, immagine 2 di 2
    • Insert the flat end of a spudger under the motherboard above the button assembly cable, and pry it out of the phone.

    • Be careful not to snag any cables.

    • The buttons may pop out of their recesses; take care not to lose them.

  9. Motorola Moto X Motherboard Assembly Replacement: passo 9, immagine 1 di 2 Motorola Moto X Motherboard Assembly Replacement: passo 9, immagine 2 di 2
    • Gently lift the motherboard out of the phone, rotating it from the SIM slot edge of the phone.

    • Do not attempt to separate the motherboard entirely; it is still connected to the display by the display cable.

  10. Motorola Moto X Motherboard Assembly Replacement: passo 10, immagine 1 di 3 Motorola Moto X Motherboard Assembly Replacement: passo 10, immagine 2 di 3 Motorola Moto X Motherboard Assembly Replacement: passo 10, immagine 3 di 3
    • Lay the motherboard down to allow access to the display cable connector.

    • Use the flat end of a spudger to flip the retaining tab on the display cable ZIF connector.

    • Carefully pull the display cable out of its connector as you remove the motherboard from the display assembly.

Conclusione

To reassemble your device, follow these instructions in reverse order.

Sam Goldheart

Membro da: 10/18/12

465.611 Reputazione

538 Guide realizzate

Team

iFixit Membro di iFixit

Staff

135 Membri

16.731 Guide realizzate

0 Commenti

Aggiungi Commento

Visualizza Statistiche:

Ultime 24 Ore: 0

Ultimi 7 Giorni: 0

Ultimi 30 Giorni: 0

Tutti i Tempi: 91