Salta al contenuto principale

Questa versione può contenere modifiche errate. Passa all'ultima istantanea verificata.

Cosa ti serve

  1. , Cover posteriore: passo 1, immagine 1 di 3 , Cover posteriore: passo 1, immagine 2 di 3 , Cover posteriore: passo 1, immagine 3 di 3
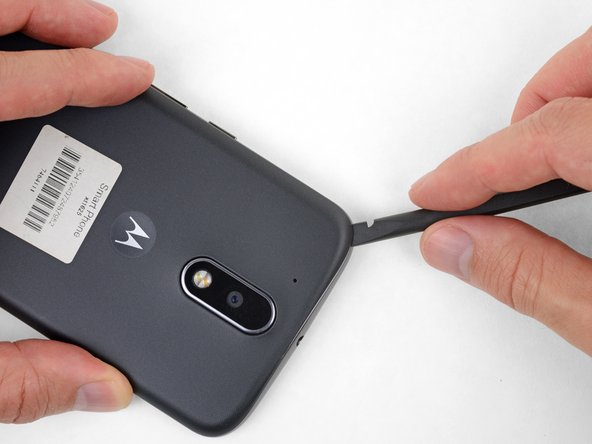
    • Inserisci un'unghia o uno spudger nella cavità del bordo inferiore del telefono, vicino alla porta di ricarica.

    • Torci delicatamente o fai leva per aprire una piccola fessura tra la cover posteriore e il corpo del telefono.

    • Mentre lasci il tuo attrezzo (o la tua unghia) inserito nella fessura tra la cover posteriore e il corpo del telefono, fallo scorrere attorno all'angolo per iniziare a sganciare le clip di plastica che tengono in posizione la cover.

  2. : passo 2, immagine 1 di 2 : passo 2, immagine 2 di 2
    • Fai scorrere il tuo attrezzo lungo il lato del telefono per separare altre clip di fissaggio della cover.

  3. : passo 3, immagine 1 di 3 : passo 3, immagine 2 di 3 : passo 3, immagine 3 di 3
    • Mantieni il tuo attrezzo inserito appena sotto la cover posteriore e fallo scorrere attorno all'angolo superiore.

    • Se necessario, continua a far leva attorno ai lati rimasti del telefono finché la cover posteriore non si stacca.

  4. : passo 4, immagine 1 di 2 : passo 4, immagine 2 di 2
    • Rimuovi la cover posteriore.

    • Per installare la cover posteriore, posizionala con cura sopra il telefono e poi premila delicatamente attorno a tutti i bordi finché non senti che tutte le clip sono scattate in posizione di bloccaggio.

  5. , Telaio centrale: passo 5, immagine 1 di 3 , Telaio centrale: passo 5, immagine 2 di 3 , Telaio centrale: passo 5, immagine 3 di 3
    • Fai scorrere fuori i vassoi delle schede microSD e SIM (se non l'avevi già fatto).

  6. : passo 6, immagine 1 di 2 : passo 6, immagine 2 di 2
    • Usa uno spudger per sollevare la cover di gomma del connettore del flash della fotocamera.

  7. : passo 7, immagine 1 di 1
    • Togli la cover di gomma.

  8. : passo 8, immagine 1 di 2 : passo 8, immagine 2 di 2
    • Usa uno spudger per scollegare, facendo leva da sotto, il connettore del flash della fotocamera.

  9. : passo 9, immagine 1 di 1
    • Usa un cacciavite Torx T3 per rimuovere le 19 viti tutte uguali che fissano il telaio centrale.

  10. : passo 10, immagine 1 di 1
    • Inserisci uno spudger sotto il telaio centrale nel suo angolo superiore sinistro e torci con delicatezza l'attrezzo per separare questa parte dalla scocca del telefono.

  11. : passo 11, immagine 1 di 1
    • Rimuovi il telaio centrale.

  12. Questo passaggio è privo di traduzione. Aiuta a tradurlo

    : passo 12, immagine 1 di 2 : passo 12, immagine 2 di 2
    • Insert a thin tool (such as one of your tweezer tips) under the red and black battery wires, and slide it underneath the battery connector.

    • Gently pry straight up to disconnect the battery.

    • Pry only from the side where the wires attach to the connector—if you pry anywhere else, you may break the socket.

    • During reassembly, align the connector in its socket and then press straight down to reconnect it, wiggling slightly as you press to help it seat correctly.

  13. Questo passaggio è privo di traduzione. Aiuta a tradurlo

    : passo 13, immagine 1 di 3 : passo 13, immagine 2 di 3 : passo 13, immagine 3 di 3
    • Strong adhesive secures the earpiece speaker. If necessary, apply heat or a few drops of isopropyl alcohol to help weaken the adhesive and make it easier to remove.

    • Pry up the speaker with a pry tool or a pair of tweezers. Be careful not to damage any surrounding components.

    • If you plan to re-use the speaker, be careful not to pry at it anywhere other than on its black plastic frame, as the speaker is easily damaged.

    • Check the condition of the adhesive around the bottom of the earpiece speaker when you reinstall it. A little heat from a hair dryer or iOpener can help soften the adhesive and make it sticky again.

    • The back of the speaker is magnetic. Be careful to not touch it to other parts of the motherboard.

Linea Traguardo

Altre 6 persone hanno completato questa guida.

Kierra Schau

Membro da: 09/28/17

1.511 Reputazione

4 Guide realizzate

Team

USF Tampa, Team S11-G2, Passmore Fall 2017 Membro di USF Tampa, Team S11-G2, Passmore Fall 2017

USFT-PASSMORE-F17S11G2

3 Membri

13 Guide realizzate

4 Commenti

i have problem with speaker. no sound. tried direct connecting external speaker . still no sound. so seems like its not sending signal. i checked all the settings

SHAIK Rahman - Replica

You should have clearly told us not to use the tweezers in such a way as to touch the bottom side of that speaker box. I accidentally touched the other side with my tweezer while removing which caused a hole in the thin metal membrane. Now my speaker works but has an incredible amount of distortion. You MUST put a warning for these things. Now I have to buy a new speaker module.

The warning should have told us to touch only the plastic black parts with the pointy end of the tweezers

Anu S - Replica

will use on my other phone, people can hear me, I can’t hear them after a drop. Now I know how to check the phone speaker. Thanks

gabriel johnson - Replica

Is it essential to disconnect the battery? Or is that more safety protocol?

Andy Morley - Replica

Aggiungi Commento

Visualizza Statistiche:

Ultime 24 Ore: 0

Ultimi 7 Giorni: 3

Ultimi 30 Giorni: 15

Tutti i Tempi: 9,102