Salta al contenuto principale

Questa guida ha delle modifiche più recenti. Passa all'ultima versione non verificata.

Motorola Moto G4 Motherboard Replacement

Cosa ti serve

  1. Motorola Moto G4 Motherboard Replacement, Back Cover: passo 1, immagine 1 di 3 Motorola Moto G4 Motherboard Replacement, Back Cover: passo 1, immagine 2 di 3 Motorola Moto G4 Motherboard Replacement, Back Cover: passo 1, immagine 3 di 3
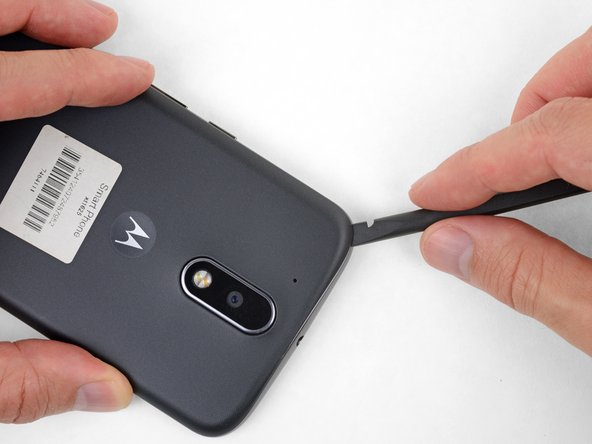
    • Insert a fingernail or a spudger into the notch on the bottom edge of the phone, near the charge port.

    • Gently twist or pry to open a small gap between the back cover and the body of the phone.

    • While keeping your tool (or fingernail) inserted into the gap between the back cover and the body of the phone, slide it around the corner to begin loosening the plastic clips holding the cover in place.

  2. Motorola Moto G4 Motherboard Replacement: passo 2, immagine 1 di 2 Motorola Moto G4 Motherboard Replacement: passo 2, immagine 2 di 2
    • Slide your tool all along the side of the phone to separate more of the clips securing the back cover.

  3. Motorola Moto G4 Motherboard Replacement: passo 3, immagine 1 di 3 Motorola Moto G4 Motherboard Replacement: passo 3, immagine 2 di 3 Motorola Moto G4 Motherboard Replacement: passo 3, immagine 3 di 3
    • Keep your tool inserted slightly under the back cover, and slide it around the top corner.

    • If necessary, continue prying around the remaining edges of the phone until the back cover comes free.

  4. Motorola Moto G4 Motherboard Replacement: passo 4, immagine 1 di 2 Motorola Moto G4 Motherboard Replacement: passo 4, immagine 2 di 2
    • Remove the back cover.

    • To install the back cover, carefully position it over the phone and then press gently all around the edges until you feel the clips snap into place.

  5. Motorola Moto G4 Motherboard Replacement, Midframe: passo 5, immagine 1 di 3 Motorola Moto G4 Motherboard Replacement, Midframe: passo 5, immagine 2 di 3 Motorola Moto G4 Motherboard Replacement, Midframe: passo 5, immagine 3 di 3
    • Push to eject and remove the MicroSD and SIM cards (if installed).

  6. Motorola Moto G4 Motherboard Replacement: passo 6, immagine 1 di 2 Motorola Moto G4 Motherboard Replacement: passo 6, immagine 2 di 2
    • Use a spudger to pry up the rubber cover for the camera flash connector.

  7. Motorola Moto G4 Motherboard Replacement: passo 7, immagine 1 di 1
    • Remove the rubber cover.

  8. Motorola Moto G4 Motherboard Replacement: passo 8, immagine 1 di 2 Motorola Moto G4 Motherboard Replacement: passo 8, immagine 2 di 2
    • Use a spudger to disconnect the camera flash connector by prying it straight up.

  9. Motorola Moto G4 Motherboard Replacement: passo 9, immagine 1 di 1
    • Use a T3 Torx driver to remove the nineteen identical 3.1 mm screws securing the midframe.

  10. Motorola Moto G4 Motherboard Replacement: passo 10, immagine 1 di 1
    • Insert a spudger under the midframe at the top left corner, and gently twist to separate it from the body of the phone.

  11. Motorola Moto G4 Motherboard Replacement: passo 11, immagine 1 di 1
    • Remove the midframe.

  12. Motorola Moto G4 Motherboard Replacement, Battery Disconnection: passo 12, immagine 1 di 2 Motorola Moto G4 Motherboard Replacement, Battery Disconnection: passo 12, immagine 2 di 2
    • Insert a thin tool (such as one of your tweezer tips) under the red and black battery wires, and slide it underneath the battery connector.

    • Gently pry straight up to disconnect the battery.

    • Pry only from the side where the wires attach to the connector—if you pry anywhere else, you may break the socket.

    • During reassembly, align the connector in its socket and then press straight down to reconnect it, wiggling slightly as you press to help it seat correctly.

  13. Motorola Moto G4 Motherboard Replacement, Motherboard: passo 13, immagine 1 di 2 Motorola Moto G4 Motherboard Replacement, Motherboard: passo 13, immagine 2 di 2
    • Peel off any tape securing the battery wires, and then push the battery wires towards the battery to de-route them from the black bracket on the motherboard.

  14. Motorola Moto G4 Motherboard Replacement: passo 14, immagine 1 di 1
    • It's not necessary to remove the battery in order to remove or replace the motherboard. You can safely ignore the fact that the battery is missing in the remaining images in this guide.

    • Peel up and remove the black rubber cover from the charging port and vibration motor connector.

  15. Motorola Moto G4 Motherboard Replacement: passo 15, immagine 1 di 2 Motorola Moto G4 Motherboard Replacement: passo 15, immagine 2 di 2
    • Insert the point of your spudger underneath the vibration motor, and gently pry up to separate it from the frame.

  16. Motorola Moto G4 Motherboard Replacement: passo 16, immagine 1 di 1
    • Peel up the copper tape covering the display connector.

    • This tape provides protection from electromagnetic interference. Keep it in one piece if possible, and carefully fold it back into position when your repair is complete.

  17. Motorola Moto G4 Motherboard Replacement: passo 17, immagine 1 di 2 Motorola Moto G4 Motherboard Replacement: passo 17, immagine 2 di 2
    • Use your spudger to disconnect the display by prying its connector straight up from the motherboard, on the edge nearest the side of the phone.

  18. Motorola Moto G4 Motherboard Replacement: passo 18, immagine 1 di 2 Motorola Moto G4 Motherboard Replacement: passo 18, immagine 2 di 2
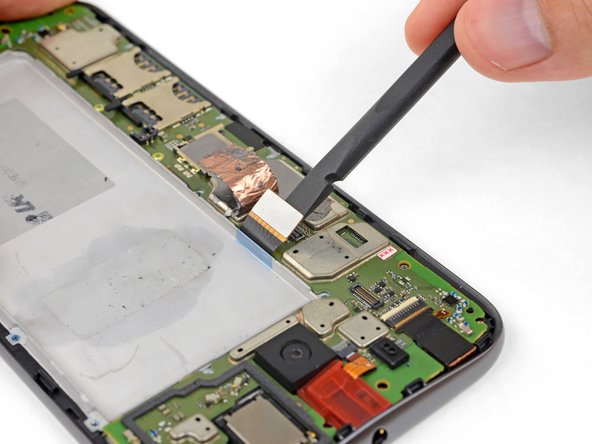
    • Pry up with your spudger to flip open the locking flap on the headphone jack's ZIF connector.

    • It's possible to disconnect the headphone jack at this point by pulling its orange flex cable straight out of the ZIF socket, but it's easy to tear the cable if you're not careful. For a better method, continue with the steps below.

  19. Motorola Moto G4 Motherboard Replacement: passo 19, immagine 1 di 1
    • Use a T3 Torx driver to remove the two bronze-colored, 2.4 mm screws securing the motherboard.

  20. Motorola Moto G4 Motherboard Replacement: passo 20, immagine 1 di 3 Motorola Moto G4 Motherboard Replacement: passo 20, immagine 2 di 3 Motorola Moto G4 Motherboard Replacement: passo 20, immagine 3 di 3
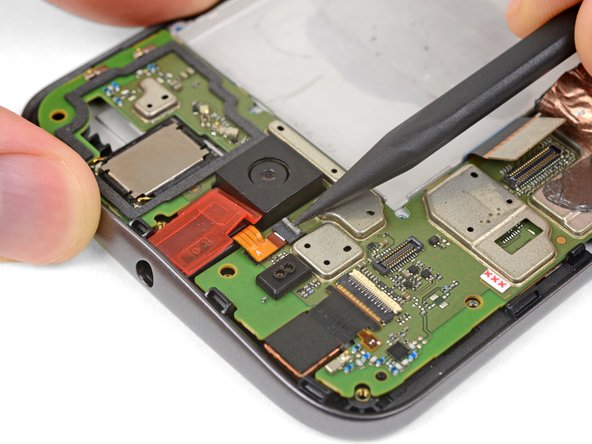
    • Grasping the motherboard by its edges, left the bottom end up at an angle, while keeping the top edge close to the phone.

    • Use your spudger to pry up the front-facing camera and make sure it separates safely from the frame. The camera can remain attached to the motherboard.

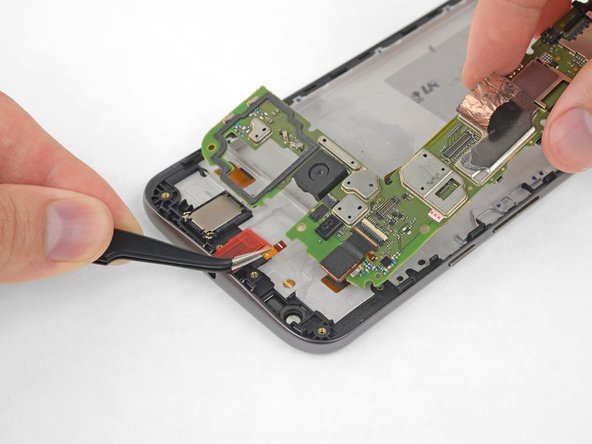
    • Using your tweezers, grasp the headphone jack flex cable and carefully pull it out of its socket as you remove the motherboard.

    • Remove the motherboard.

    • If you feel any resistance, stop. Make sure there are no components still holding the frame to the motherboard.

    • If desired, remove the remaining components from the motherboard (cameras and vibration motor).

Conclusione

To reassemble your device, follow these instructions in reverse order.

Altre 8 persone hanno completato questa guida.

Kierra Schau

Membro da: 09/28/17

1.511 Reputazione

4 Guide realizzate

Team

USF Tampa, Team S11-G2, Passmore Fall 2017 Membro di USF Tampa, Team S11-G2, Passmore Fall 2017

USFT-PASSMORE-F17S11G2

3 Membri

13 Guide realizzate

0 Commenti

Aggiungi Commento

Visualizza Statistiche:

Ultime 24 Ore: 0

Ultimi 7 Giorni: 8

Ultimi 30 Giorni: 19

Tutti i Tempi: 8,637