Questa versione può contenere modifiche errate. Passa all'ultima istantanea verificata.
Cosa ti serve
-
Questo passaggio è privo di traduzione. Aiuta a tradurlo
-
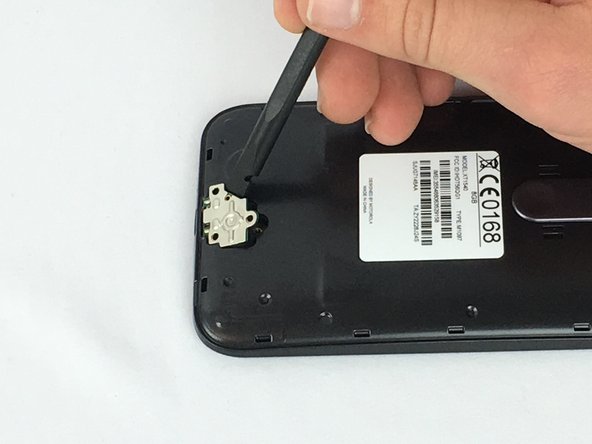
Use your fingernail to pry under the notch on the bottom of the phone and remove the back cover.
-
-
Questo passaggio è privo di traduzione. Aiuta a tradurlo
-
Evenly apply heat to the edges of the touchscreen to loosen the adhesive. Continue to Step 3 once the edge of the screen is warm to the touch.
-
-
Questo passaggio è privo di traduzione. Aiuta a tradurlo
-
As the adhesive loosens, pry up an edge of the screen with a plastic opening tool or an opening pick. A suction cup may also be useful here.
-
Use an opening pick to hold that edge in place and continue this process around the entire screen, applying more heat as necessary.
-
-
Questo passaggio è privo di traduzione. Aiuta a tradurlo
-
Use a plastic opening tool to flip up the lock on the display cable ZIF connector.
-
Pull the display cable from its socket on the motherboard.
-
-
-
Questo passaggio è privo di traduzione. Aiuta a tradurlo
-
Remove the ten 2.4 mm T4 screws from the sides of the motherboard.
-
Remove the four 4.5 mm T4 screws from the top and bottom of the motherboard.
-
-
Questo passaggio è privo di traduzione. Aiuta a tradurlo
-
If adhesive residue is holding the motherboard in place, use a Jimmy to cut the adhesive between the motherboard and the back of the phone.
-
Carefully lift the right edge of the motherboard from the phone.
-
-
Questo passaggio è privo di traduzione. Aiuta a tradurlo
-
Use a plastic opening tool to disconnect the battery wires from the motherboard.
-
-
Questo passaggio è privo di traduzione. Aiuta a tradurlo
-
Remove the three 3.0 mm T4 screws from the charging port cover.
-
Remove the charging port cover.
-
-
Questo passaggio è privo di traduzione. Aiuta a tradurlo
-
If the charging port is secured with adhesive, use a heat gun around the charging port for ten seconds to loosen the adhesive.
-
-
Questo passaggio è privo di traduzione. Aiuta a tradurlo
-
Use a spudger to push out the charging port from the inside of the case and pry it off from the outside of the case.
-


Annulla: non ho completato questa guida.
Altre 16 persone hanno completato questa guida.
Team

USF Tampa, Team 1-3, Nance Spring 2016 Membro di USF Tampa, Team 1-3, Nance Spring 2016
USFT-NANCE-S16S1G3
4 Membri
21 Guide realizzate
21 Commenti
Is all this necessary? There is a youtube teardown that states the usb port should be replaceable from just the 3 screws, so no glue gun, no screen removal etc. So just step 9.
So is this repair accurate?
Step 10 tells you to push out the charging port from inside the case, which would require first removing the screen. Maybe it's possible to just remove the charging port from outside the case like in the video, but it may require a lot of force and pushing it out from inside is just easier.
I mean I replace my charging port every 6 months now and I the only thing I do is unscrew the charging port area and get a tiny flathead bit after applying heat and pull off the metal plate. After that, I insert the flathead into the bottom of the charging port from where it plugs and push it outwards.
No, it’s not I did sucesfullz replaced microusb port in mz G3 simplz bz removing screws, pulling port from the outside with ?a?little? more force, replacing it and screwing back. 5 minutes, nothing but T4 torx screwdriver.
MarcinEs -
strange issue
my phone doesnt charge..
it always show charging symbol.
now im charging by switching off phone then connecting charger, after it shows charging then i will turn on phone..
it will charge slowly.and it will discontinue if charging cord is moved...
tried using different chargers,cords but still same issue.
cant able to decide wheiter it is a charging port problem or battery or software..
any suggestions???
please mail me...
hamedliar@gmail.com