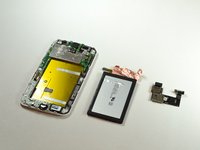
Salta al contenuto principale

Motorola Moto G 2nd Generation Motherboard Replacement

Cosa ti serve

  1. Motorola Moto G 2nd Generation Motherboard Replacement, Battery: passo 1, immagine 1 di 3 Motorola Moto G 2nd Generation Motherboard Replacement, Battery: passo 1, immagine 2 di 3 Motorola Moto G 2nd Generation Motherboard Replacement, Battery: passo 1, immagine 3 di 3
    • Make sure your Moto G is turned off and that any SIM or SD cards are removed before beginning disassembly.

    • Starting at the USB port on the bottom, remove the rear cover by prying it off with your finger.

    • Work your way down the sides to avoid cracking the rear cover.

  2. Motorola Moto G 2nd Generation Motherboard Replacement: passo 2, immagine 1 di 3 Motorola Moto G 2nd Generation Motherboard Replacement: passo 2, immagine 2 di 3 Motorola Moto G 2nd Generation Motherboard Replacement: passo 2, immagine 3 di 3
    • Remove the eight 4.2 mm screws at the top and bottom of the phone using a T5 Torx screwdriver.

    • Using the same screwdriver, remove the six 3.2 mm screws on the sides.

    • Remove the next layer of the phone by prying it off with your fingers.

  3. Motorola Moto G 2nd Generation Motherboard Replacement: passo 3, immagine 1 di 3 Motorola Moto G 2nd Generation Motherboard Replacement: passo 3, immagine 2 di 3 Motorola Moto G 2nd Generation Motherboard Replacement: passo 3, immagine 3 di 3
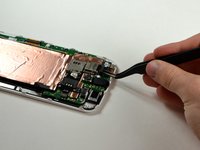
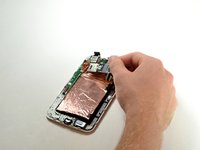
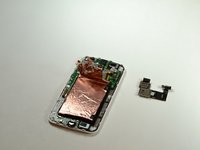
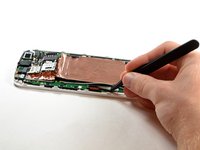
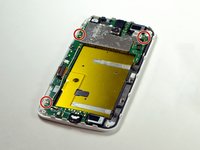
    • Using a plastic opening tool or tweezers, disconnect the SIM/SD card reader at the top of the phone.

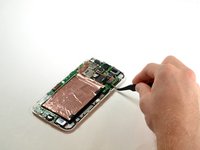
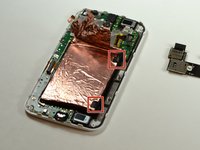
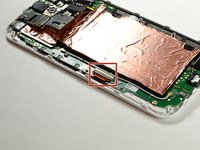
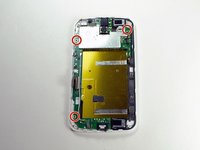
    • Disconnect the battery connector by prying it off of the motherboard.

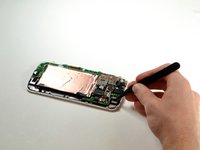
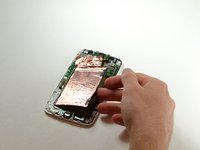
    • Disconnect the vibration motor by prying its connector off of the motherboard.

  4. Motorola Moto G 2nd Generation Motherboard Replacement: passo 4, immagine 1 di 3 Motorola Moto G 2nd Generation Motherboard Replacement: passo 4, immagine 2 di 3 Motorola Moto G 2nd Generation Motherboard Replacement: passo 4, immagine 3 di 3
    • Using a plastic opening tool, carefully pry off the entire SIM/SD card reader component.

    • Don't worry about ripping the copper foil a little bit, it is easy to put back on.

    • When reassembling the device, do not attempt to smooth the foil down with your finger. Metal foil can become sharp if folded in a certain way, and you may be cut.

    • The battery may be removed without removing the SIM/SD card reader. Simply peel back the copper foil from the opposite end of the device, stopping just before you reach the SIM/SD card reader.

  5. Motorola Moto G 2nd Generation Motherboard Replacement: passo 5, immagine 1 di 3 Motorola Moto G 2nd Generation Motherboard Replacement: passo 5, immagine 2 di 3 Motorola Moto G 2nd Generation Motherboard Replacement: passo 5, immagine 3 di 3
    • Peel off the two black stickers on the right side of the battery using your fingers.

    • Remove the battery by pulling the right side of it upwards.

    • The black stickers are the protruding ends of the two parallel adhesive strips which hold the battery in place. You can see the adhesive strips in the third image. Focus your effort on these regions.

    • If you did not remove the SIM/SD card reader in the previous step, you will need to carefully slide the battery ribbon cable out from under it once you have freed the battery from the adhesive strips.

  6. Motorola Moto G 2nd Generation Motherboard Replacement, Motherboard: passo 6, immagine 1 di 3 Motorola Moto G 2nd Generation Motherboard Replacement, Motherboard: passo 6, immagine 2 di 3 Motorola Moto G 2nd Generation Motherboard Replacement, Motherboard: passo 6, immagine 3 di 3
    • Remove LCD connector by lifting the black plastic flap.

  7. Motorola Moto G 2nd Generation Motherboard Replacement: passo 7, immagine 1 di 3 Motorola Moto G 2nd Generation Motherboard Replacement: passo 7, immagine 2 di 3 Motorola Moto G 2nd Generation Motherboard Replacement: passo 7, immagine 3 di 3
    • Using a T5 Torx screwdriver, unscrew the three 2.2 mm screws holding the motherboard in place.

  8. Motorola Moto G 2nd Generation Motherboard Replacement: passo 8, immagine 1 di 2 Motorola Moto G 2nd Generation Motherboard Replacement: passo 8, immagine 2 di 2
    • Carefully remove the motherboard.

Conclusione

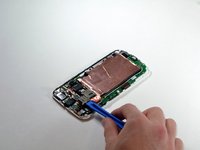
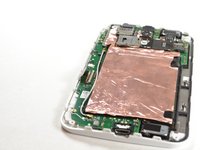
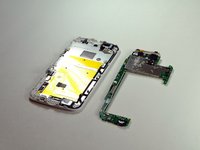
To reassemble your device, follow these instructions in reverse order.

Altre 30 persone hanno completato questa guida.

Team

Cal Poly, Team 1-19, Maness Fall 2015 Membro di Cal Poly, Team 1-19, Maness Fall 2015

CPSU-MANESS-F15S1G19

4 Membri

15 Guide realizzate

4 Commenti

What about Android, it comes already flashed on a new motherboard or I need to flash it myself?

marcelmaximo - Replica

Where can i buy mother board for moto g 2nd gen lte. Any idea?

kasi balaji - Replica

Please give me moto g2 motherboard

Kvasu - Replica

hi ...great guide thanks...Ihave a question Can a Motherboard from a Motorola Moto G2 XT1068 fit into a G2 XT1072 phone Thanks

Paul - Replica

Aggiungi Commento

Visualizza Statistiche:

Ultime 24 Ore: 0

Ultimi 7 Giorni: 3

Ultimi 30 Giorni: 13

Tutti i Tempi: 17,713