Introduzione
I decided to write this guide halfway through doing the repair. The initial steps to disassembling the device are not shown but feel free to comment if you have any questions.
WARNING: This repair is very difficult. Considerable repair and soldering experience may be required. Please read entire guide before attempting. Materials needed are not items you can pick up at your local hobby shop .
Cosa ti serve
-
-
After removing the board you will see a cover on one side of the chargerport (i had already done it before i decided to take pictures). Highly recomend using a smd rework heat gun for this step as the cover is soldered to the motherboard. ( did not know this at the time and you can see that from the pictures.
-
REMOVE BATTERY IF USING HEAT GUN. Also remember to be careful of other components around the cover. Using heat resistant tape is highly recommended to cover components.
-
-
-
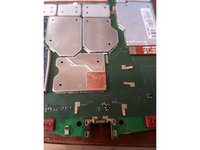
If you have seen the hard black epoxy stuff that Apple (and other man.) uses to glue their components in place, easily viewable underneath the black cover thing around the connectors for an iphone 5 or something. You will know what you are up against, if not take a look...(ifixit has plenty of awesome pictures)
-
Use a IC Adhesive debonder and a razor blade to slowly and tediously scrap away the black glue on the under side of the motherboard. This covers the connections and must be removed.
-
Be very careful with the razor blade while removing the black epoxy like adhesive. Scrapping to deep can cause damage to the motherboard and sever important copper traces under the surface.
-
You have to remove all of the epoxy on top of and around the pins (there are 5 in total). you must get into the cracks and slightly under the metal of the charger port. Failure to do so may result in irreparable board damage.
-
Be sure to remove any extra adhesve on the top side of the board as well, if this is not removed it will still glue the port to the board.
-
-
-
Attrezzo utilizzato in questo passaggio:Tweezers$4.99
-
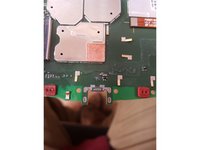
I prefer to use normal soldering iron combined with a solder that has a very low melting temperature to remove ports when ever possible.
-
Apply Flux to all connections and use your soldering iron to evenly distribute the alloy solder to the connections on the top and bottom of the board. Use a temperature around 360-380 degrees to and after about a minute you should start to feel the port release.
-
Do not pull to agresssivly on the port or it will rip the board, go very slow and let the board release the port. Use tweezers to hold the port while using your other hand to control soldering iron.
-
-
-
Use a copper braid and soldering iron to remove all of the solder from the contacts and holes. It is soooo important to remove ALL solder before proceeding. If you are having trouble removing solder, clean with 99% isopropyl alcohol, reapply flux and try again. Sometimes it is helpful to ADD more low heat solder and then remove it.
-
After you remove the solder you will be left with a brownish gunk/sludge from caramelized flux. This needs to be removed. Use 99% isopropyl and a qtip. When you are finished your board should look like the one in the second picture and you should be able to see clearly right through the holes.
-


To reassemble your device, follow these instructions in reverse order.
Annulla: non ho completato questa guida.
Altre 14 persone hanno completato questa guida.

4Commenti sulla guida
Rusty, you can get them on ebay for 7 bucks for a set of two (I guess because they assume you might break one reinstalling). I'm tempted to attempt this repair as the chargeport on my droid 2 turbo has lost all retention and I can get it on the right angle/tension to charge about 1% of the time, but the heat gun and scraping are a bit frightening.
Where is the Mic at ? Mine stopped working and need to replace /repair
Kind of strange to select difficulty as moderate then say late it's very difficult. I read your description. It seems like it's very difficult and not moderate. Moderate I may have considered doing. You even mentioned you need things you can't just buy at a hobby store. You really should change it to very difficult so normal people like me won't even consider it. I can maneuver a semi with a 53 foot trailer in big cities and some of the smallest back roads you've ever seen and back it in almost anywhere but this looks like its something I'm not going to try.