Questa versione può contenere modifiche errate. Passa all'ultima istantanea verificata.
Cosa ti serve
-
Questo passaggio è privo di traduzione. Aiuta a tradurlo
-
Tools that are needed to replace the battery and the hard drive
-
small Phillips screwdriver
-
small jewelers flat head screwdriver
-
case opening tool, I use my trusty Ipod opener :)
-
definitely glasses if you are supposed to have them. Some of this stuff is really small.
-
-
Questo passaggio è privo di traduzione. Aiuta a tradurlo
-
Start off by removing the spacer from the bottom dock port. It is just pushed in, so all you need is a small jeweler's screwdriver to pry it out. Use the smaller ends of the port as the pry point so you don't break the spacer.
-
-
-
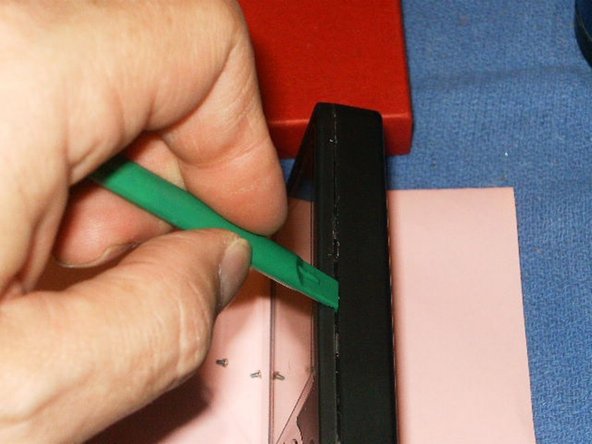
Questo passaggio è privo di traduzione. Aiuta a tradurlo
-
Now it is time to open the case. I used my trusty Ipod opening tools and started on the longer side of the Zune. Just like the Ipod, take your time and carefully open the case. Sometimes it works better if you use two tools. Once it opens, be CAREFUL around the headphone jack when you lift up the case. Lift it slwoly at the port end and then the headphone end. The headphone seems to extend a little into the case and you DO NOT want to break it of the board....
-
-
Questo passaggio è privo di traduzione. Aiuta a tradurlo
-
Now with the backing off we have free access to the battery and the hard drive caddy.
-
-
Questo passaggio è privo di traduzione. Aiuta a tradurlo
-
Disconnect the battery by lifting the brown slide gently up, freeing the cable. You can now safely remove the battery. Disconnect the clickwheel cable afterwards.
-
-
Questo passaggio è privo di traduzione. Aiuta a tradurlo
-
Now remove the 4 screws holding the drive case as well as the clip for the battery on the board .
-
-
Questo passaggio è privo di traduzione. Aiuta a tradurlo
-
With the battery and the four screws for for the hard drive caddy removed, lift the caddy up and flip it toward the headphone end of the Zune. Remove the hard drive cable clip by opening the black clip on the connector. Use your fingernails or the iPod tool to move the clip carefully to the open position. Take off the sticky tape to reveal the hard drive bumpers. Remove them to free the hard drive. Now replace the hard drive and reassemble the Zune.
-


Annulla: non ho completato questa guida.
Altre 8 persone hanno completato questa guida.

Team
