Salta al contenuto principale

Microsoft Surface Pro 5 Power, Volume Button, and Left Speaker Assembly Replacement

Guida Archiviata
Questa guida è mantenuta solo per scopi storici. Usa la versione aggiornata della guida per eseguire la riparazione.

Cosa ti serve

  1. Microsoft Surface Pro 5 Power, Volume Button, and Left Speaker Assembly Replacement, Disconnect the display board: passo 1, immagine 1 di 3 Microsoft Surface Pro 5 Power, Volume Button, and Left Speaker Assembly Replacement, Disconnect the display board: passo 1, immagine 2 di 3 Microsoft Surface Pro 5 Power, Volume Button, and Left Speaker Assembly Replacement, Disconnect the display board: passo 1, immagine 3 di 3
    • Use a spudger to flip up the small locking flaps on the display cable ZIF connectors.

  2. Microsoft Surface Pro 5 Power, Volume Button, and Left Speaker Assembly Replacement: passo 2, immagine 1 di 3 Microsoft Surface Pro 5 Power, Volume Button, and Left Speaker Assembly Replacement: passo 2, immagine 2 di 3 Microsoft Surface Pro 5 Power, Volume Button, and Left Speaker Assembly Replacement: passo 2, immagine 3 di 3
    • Use tweezers to slide the display cables straight out of their sockets on the display board.

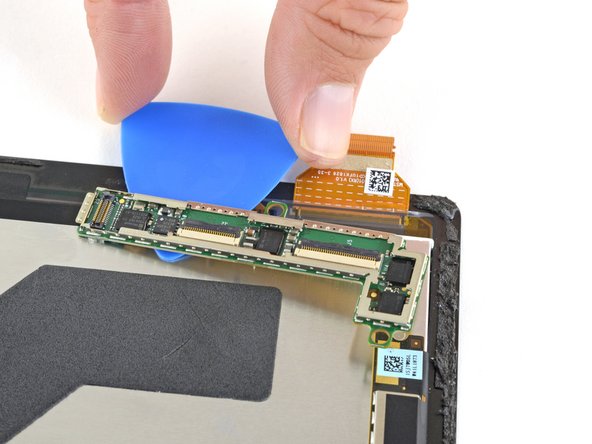
  3. Microsoft Surface Pro 5 Power, Volume Button, and Left Speaker Assembly Replacement, Remove the display board: passo 3, immagine 1 di 3 Microsoft Surface Pro 5 Power, Volume Button, and Left Speaker Assembly Replacement, Remove the display board: passo 3, immagine 2 di 3 Microsoft Surface Pro 5 Power, Volume Button, and Left Speaker Assembly Replacement, Remove the display board: passo 3, immagine 3 di 3
    • Slide an opening pick under the display board to separate the adhesive holding it onto the back of the screen.

  4. Microsoft Surface Pro 5 Power, Volume Button, and Left Speaker Assembly Replacement: passo 4, immagine 1 di 1
    Attrezzo utilizzato in questo passaggio:
    Tesa 61395 Tape
    $5.99
    Compra
    • Remove the display board.

    • During reassembly, use a strong double-sided tape or a precut adhesive card to secure the display board. Clean off the old adhesive before applying new adhesive.

    • To ensure correct positioning, plug in both display connectors before adhering the board to the display.

  5. Microsoft Surface Pro 5 Power, Volume Button, and Left Speaker Assembly Replacement: passo 5, immagine 1 di 1
    • Only the screen remains.

    Note, on the flex connectors of the new screen are blue strips of protective plastic covering factory applied conductive adhesive. These must be removed and the adhesive must bond to the display board in order for the touch screen digitizer to function reliably.

    Bill Mills - Replica

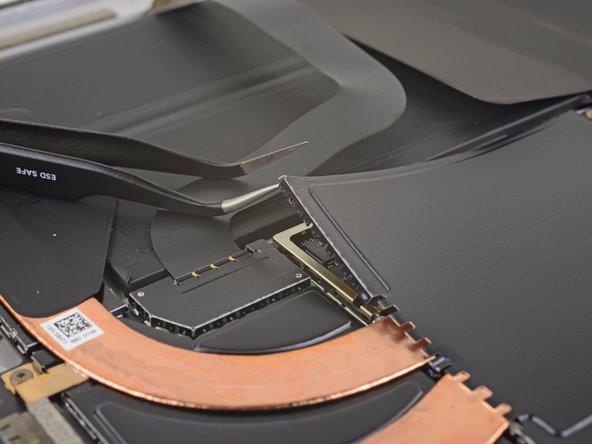
  6. Microsoft Surface Pro 5 Power, Volume Button, and Left Speaker Assembly Replacement, Remove the heat sink shield: passo 6, immagine 1 di 2 Microsoft Surface Pro 5 Power, Volume Button, and Left Speaker Assembly Replacement, Remove the heat sink shield: passo 6, immagine 2 di 2
    • Insert one point of a pair of pointed tweezers into a gap in the corner of the EMI shield covering the heat sink.

    • Use the tweezers to pry the EMI shield away from the motherboard as much as you can without bending it. Do not remove it yet.

    • Try not to deform the shield too much—you will need to reinstall it during reassembly.

    • Take care not to puncture the battery with the tweezers while working on this shield.

    Black spudger worked best to get the emu shields out without damaging them.

    Randall Takahashi - Replica

  7. Microsoft Surface Pro 5 Power, Volume Button, and Left Speaker Assembly Replacement: passo 7, immagine 1 di 3 Microsoft Surface Pro 5 Power, Volume Button, and Left Speaker Assembly Replacement: passo 7, immagine 2 di 3 Microsoft Surface Pro 5 Power, Volume Button, and Left Speaker Assembly Replacement: passo 7, immagine 3 di 3
    • Repeat the last step for each corner of the EMI shield covering the heat sink.

  8. Microsoft Surface Pro 5 Power, Volume Button, and Left Speaker Assembly Replacement: passo 8, immagine 1 di 1
    • Remove the heat sink shield.

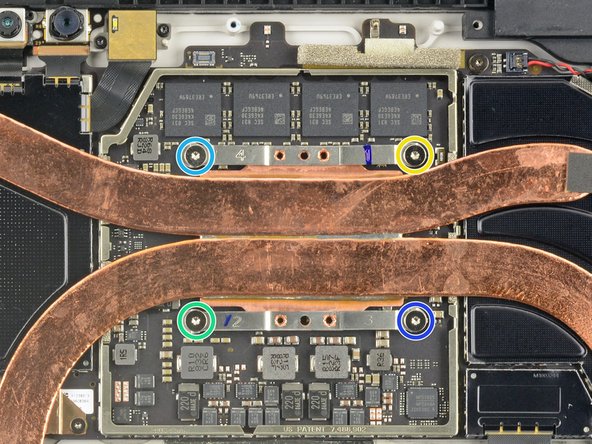
  9. Microsoft Surface Pro 5 Power, Volume Button, and Left Speaker Assembly Replacement, Remove the heat sink: passo 9, immagine 1 di 2 Microsoft Surface Pro 5 Power, Volume Button, and Left Speaker Assembly Replacement, Remove the heat sink: passo 9, immagine 2 di 2
    • Remove the ten Torx screws securing the heat sink:

    • Five 2.6 mm-long T3 screws

    • Four 3.3 mm-long T5 screws

    • During reassembly, tighten the heat sink screws in the following criss-cross pattern, one turn at a time, until they're tight:

    • Screw 1

    • Screw 2

    • Screw 3

    • Screw 4

    Just like to add, on my i7, there is a fan in the top left corner and the heat sink is glued to the cover. The cover must be removed using a ph0 x 3 and one T3 (I think that is the sizes)

    Richard Wellesley - Replica

    As the other person commented, mine also had a fan connected to the heatsink. This is present in the version with an Intel Core i7-7660U. It requires removing a T3 and T5 screw and the fan connector. Below is a link to an image showing this step.

    Surface Pro 5 with fan

    Brian T - Replica

    While I do not have the fan present in my i5 version, the copper heat pipe does extend further down on the far left side (as oriented in the picture). There is an additional T3 screw on this arm as well as a small dab of adhesive on the very end.

    Emma Strainis - Replica

  10. Microsoft Surface Pro 5 Power, Volume Button, and Left Speaker Assembly Replacement: passo 10, immagine 1 di 3 Microsoft Surface Pro 5 Power, Volume Button, and Left Speaker Assembly Replacement: passo 10, immagine 2 di 3 Microsoft Surface Pro 5 Power, Volume Button, and Left Speaker Assembly Replacement: passo 10, immagine 3 di 3
  11. Microsoft Surface Pro 5 Power, Volume Button, and Left Speaker Assembly Replacement, Camera Tie Bar: passo 11, immagine 1 di 1
    • Remove the Torx T5 x 6mm screw connecting the black tie bar to the power button/volume control/speaker assembly.

  12. Microsoft Surface Pro 5 Power, Volume Button, and Left Speaker Assembly Replacement: passo 12, immagine 1 di 1
    • Remove the remaining three Torx T5 x 4.5mm screws holding down the camera tie bar.

  13. Microsoft Surface Pro 5 Power, Volume Button, and Left Speaker Assembly Replacement: passo 13, immagine 1 di 1
    • Disconnect the small ribbon cable connecting the camera tie bar to the motherboard by pulling up with tweezers.

  14. Microsoft Surface Pro 5 Power, Volume Button, and Left Speaker Assembly Replacement: passo 14, immagine 1 di 1
    • Lift the camera tie bar off of the device.

  15. Microsoft Surface Pro 5 Power, Volume Button, and Left Speaker Assembly Replacement, Power Button, Volume Buttons, and Left Speaker Assembly: passo 15, immagine 1 di 1
    • Use a Torx T5 to remove the two 4.5mm silver screws on the power button/volume control/speaker assembly.

  16. Microsoft Surface Pro 5 Power, Volume Button, and Left Speaker Assembly Replacement: passo 16, immagine 1 di 2 Microsoft Surface Pro 5 Power, Volume Button, and Left Speaker Assembly Replacement: passo 16, immagine 2 di 2
    • Disconnect the small ribbon attaching the assembly to the motherboard by lifting up with tweezers.

    • Disconnect the black and red cable connector by lifting up with tweezers.

  17. Microsoft Surface Pro 5 Power, Volume Button, and Left Speaker Assembly Replacement: passo 17, immagine 1 di 1
    • Pull the assembly to the left with hands and lift up to remove.

Conclusione

To reassemble your device, follow these instructions in reverse order.

Un'altra persona ha completato questa guida.

Kaden Foster

Membro da: 10/02/17

885 Reputazione

3 Guide realizzate

Team

Cal Poly, Team S15-G3, Livingston Fall 2017 Membro di Cal Poly, Team S15-G3, Livingston Fall 2017

CPSU-LIVINGSTON-F17S15G3

3 Membri

17 Guide realizzate

Un commento

Hi,

Where can I purchase the power button assembly in the UK?

junaidpatel - Replica

Aggiungi Commento

Visualizza Statistiche:

Ultime 24 Ore: 0

Ultimi 7 Giorni: 0

Ultimi 30 Giorni: 4

Tutti i Tempi: 2,780