Questa versione può contenere modifiche errate. Passa all'ultima istantanea verificata.
Cosa ti serve
-
Questo passaggio è privo di traduzione. Aiuta a tradurlo
-
There are two versions of the unloader assembly:
-
First image—earlier pressure washers feature an all-in-one assembly (part 8-0631) that’s easy to replace, but gave users the ability to break the pump.
-
Second image—later models use a tamper-proof, harder to remove unloader (part 8-0656), connected by a series of pipe fittings.
-
If you need to remove an all-in-one style unloader, use a large adjustable wrench to unscrew the two large Banjo bolts. This will disconnect the unloader from the pump assembly.
-
-
Questo passaggio è privo di traduzione. Aiuta a tradurlo
-
Grab the plastic housing at the end of the spark plug wire.
-
Pull firmly to disconnect the wire from the spark plug.
-
-
Questo passaggio è privo di traduzione. Aiuta a tradurlo
-
Use a 1/4" socket or a large flathead screwdriver to loosen the hose clamp near the inlet filter.
-
Slide the hose clamp away from the end of the hose.
-
-
Questo passaggio è privo di traduzione. Aiuta a tradurlo
-
Wiggle the hose and pull it off of the brass nipple.
-
-
Questo passaggio è privo di traduzione. Aiuta a tradurlo
-
Slide a 3" tall block underneath the pump assembly to help support the pump.
-
-
Questo passaggio è privo di traduzione. Aiuta a tradurlo
-
Use a 1/2" or adjustable wrench to loosen and twist the return elbow half a turn, so that it faces the opposite direction.
-
-
Questo passaggio è privo di traduzione. Aiuta a tradurlo
-
Use a large adjustable wrench to loosen and unscrew the filter.
-
-
-
Questo passaggio è privo di traduzione. Aiuta a tradurlo
-
Remove the filter with the return elbow attached.
-
-
Questo passaggio è privo di traduzione. Aiuta a tradurlo
-
Use a 1" or large adjustable wrench to loosen and unscrew the pump input elbow.
-
-
Questo passaggio è privo di traduzione. Aiuta a tradurlo
-
Use a 3/4" or adjustable wrench to loosen and disconnect the coupling from the pump assembly.
-
-
Questo passaggio è privo di traduzione. Aiuta a tradurlo
-
Secure the output assembly in a large vise.
-
-
Questo passaggio è privo di traduzione. Aiuta a tradurlo
-
Hold the outlet fitting in place with a 15/16" or large adjustable wrench.
-
Use a 3/4" or adjustable wrench to loosen and unscrew the output elbow from the outlet fitting.
-
-
Questo passaggio è privo di traduzione. Aiuta a tradurlo
-
Remove the output elbow with the quick-connect socket attached to it.
-
-
Questo passaggio è privo di traduzione. Aiuta a tradurlo
-
Use a 3/4" or adjustable wrench to loosen and unscrew the coupling nipple from the unloader.
-
-
Questo passaggio è privo di traduzione. Aiuta a tradurlo
-
Use a 11/16" or adjustable wrench to loosen and unscrew the return hose nipple from the unloader.
-
-
Questo passaggio è privo di traduzione. Aiuta a tradurlo
-
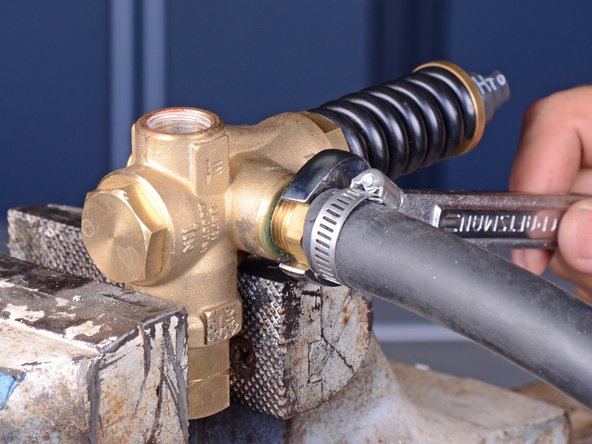
Remove the return hose nipple with the hose attached.
-
-
Questo passaggio è privo di traduzione. Aiuta a tradurlo
-
Only the unloader assembly remains.
-
Compare the original unloader with the replacement part. The replacement part may have a plug installed in the wrong port.
-
Use an 8 mm (5/16" OK) hex key to remove and re-install the plug into the correct port.
-


Annulla: non ho completato questa guida.
Altre 4 persone hanno completato questa guida.

