Salta al contenuto principale

Matsunichi MarquisPad MP977 Front Facing Camera Replacement

Cosa ti serve

  1. Matsunichi MarquisPad MP977 Front Facing Camera Replacement, Front Facing Camera: passo 1, immagine 1 di 1
    • Using the PH #00 Phillips head screwdriver, unscrew the two screws.

  2. Matsunichi MarquisPad MP977 Front Facing Camera Replacement: passo 2, immagine 1 di 3 Matsunichi MarquisPad MP977 Front Facing Camera Replacement: passo 2, immagine 2 di 3 Matsunichi MarquisPad MP977 Front Facing Camera Replacement: passo 2, immagine 3 di 3
    • Place the device face down on a flat surface.

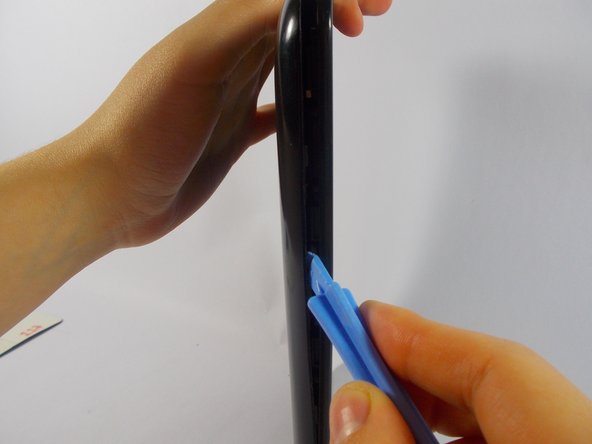
    • Insert the wide-tipped plastic opening tool into the top of the left speaker slot.

    • Be sure not to puncture the covering of the speaker.

    • Pry the back plate open and slide the tool in a clockwise direction, moving it along the opening between the device and the back plate until you reach the power button.

  3. Matsunichi MarquisPad MP977 Front Facing Camera Replacement: passo 3, immagine 1 di 2 Matsunichi MarquisPad MP977 Front Facing Camera Replacement: passo 3, immagine 2 di 2
    • Insert the opening tool into the slot located to the right of the speaker, at the top edge of the device.

    • Then, pry open the back plate of the device , and slide the tool counter clockwise along the device until you reach the charging port.

  4. Matsunichi MarquisPad MP977 Front Facing Camera Replacement: passo 4, immagine 1 di 1
    • Remove the back plate and place it to the side of the device.

  5. Matsunichi MarquisPad MP977 Front Facing Camera Replacement: passo 5, immagine 1 di 1
    • With the same screw driver, PH #00 Phillips head, remove the seven screws holding in the motherboard.

    • Place the screws somewhere safe where they wont fall.

  6. Matsunichi MarquisPad MP977 Front Facing Camera Replacement: passo 6, immagine 1 di 2 Matsunichi MarquisPad MP977 Front Facing Camera Replacement: passo 6, immagine 2 di 2
    • Gently pull the camera optic fiber out of it's slot to release the flap. This will allow the flap to open easily.

    • Be sure not to damage the camera port.

  7. Matsunichi MarquisPad MP977 Front Facing Camera Replacement: passo 7, immagine 1 di 2 Matsunichi MarquisPad MP977 Front Facing Camera Replacement: passo 7, immagine 2 di 2
    • Last, Insert the new camera into the pinhole camera slot.

Conclusione

To reassemble your device, follow these instructions in reverse order.

0 Commenti

Aggiungi Commento

Visualizza Statistiche:

Ultime 24 Ore: 1

Ultimi 7 Giorni: 6

Ultimi 30 Giorni: 7

Tutti i Tempi: 223