Questa versione può contenere modifiche errate. Passa all'ultima istantanea verificata.
Cosa ti serve
-
Questo passaggio è privo di traduzione. Aiuta a tradurlo
-
Orientate the computer right side up and open the display case to reveal the display.
-
Use a plastic opening tool to remove the two small plastic plugs located on the display case just below the display.
-
-
Questo passaggio è privo di traduzione. Aiuta a tradurlo
-
Use a T8 torx screwdriver to remove the two, 7.7mm long screws that were revealed by removing the plastic plugs.
-
Twist counterclockwise to remove the screw.
-
-
Questo passaggio è privo di traduzione. Aiuta a tradurlo
-
Grip the two bottom corners of the plastic display cover and gently pull towards yourself so that the display cover rotates about the top of the display case.
-
The display cover should release from top.
-
Remove the display case.
-
-
-
Questo passaggio è privo di traduzione. Aiuta a tradurlo
-
Locate the black connector on the right of the display. The connector can be identified by the pink, light blue, and white wires protruding from its side.
-
Remove the black connector from the circuit board by pulling it away from its adapter.
-
-
Questo passaggio è privo di traduzione. Aiuta a tradurlo
-
Using a T8 torx screwdriver, remove the four, 10.8mm long screws from the corners of the display.
-
-
Questo passaggio è privo di traduzione. Aiuta a tradurlo
-
Carefully tilt the display downwards and rest it on the keyboard.
-
-
Questo passaggio è privo di traduzione. Aiuta a tradurlo
-
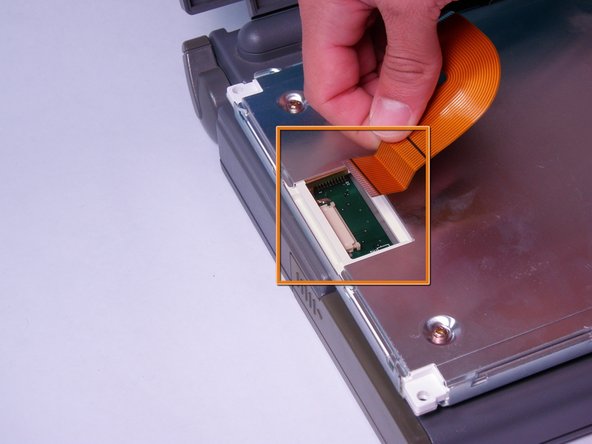
Locate the orange ribbon cable on the back of the display.
-
Open the white tab fastener by pulling it outward.
-
Remove the orange ribbon cable by gently pulling it away from the opened tab fastener.
-


Team

Cal Poly, Team 6-3, Regan Fall 2011 Membro di Cal Poly, Team 6-3, Regan Fall 2011
CPSU-REGAN-F11S6G3
4 Membri
12 Guide realizzate