Salta al contenuto principale

Questa guida ha delle modifiche più recenti. Passa all'ultima versione non verificata.

MacBook Unibody Model A1342 Rear Speaker Replacement

Cosa ti serve

  1. MacBook Unibody Model A1342 Rear Speaker Replacement, Lower Case: passo 1, immagine 1 di 1
    • Remove the eight 4 mm Phillips screws securing the lower case to the MacBook.

  2. MacBook Unibody Model A1342 Rear Speaker Replacement: passo 2, immagine 1 di 3 MacBook Unibody Model A1342 Rear Speaker Replacement: passo 2, immagine 2 di 3 MacBook Unibody Model A1342 Rear Speaker Replacement: passo 2, immagine 3 di 3
    • The lower case is constructed of rubber-coated aluminum. Do not excessively bend the aluminum during removal, as any permanent deformation will cause tolerance issues after reassembly.

    • Slightly lift the lower case near the vent opening.

    • Continue running your fingers between the lower and upper cases until the upper case pops off its retaining clips.

    • The location of these three clips is shown in the third picture.

  3. MacBook Unibody Model A1342 Rear Speaker Replacement, Battery: passo 3, immagine 1 di 1
    • For precautionary purposes, we advise that you disconnect the battery connector from the logic board to avoid any electrical discharge. This step is optional and is not required.

    • Use the flat end of a spudger to lift the battery connector up out of its socket on the logic board.

    • It may be easier to use your fingernails to lift up on both sides of the connector.

  4. MacBook Unibody Model A1342 Rear Speaker Replacement, Rear Vent: passo 4, immagine 1 di 1
    • Remove the following screws from the optical drive side of the rear vent:

    • Two 10 mm T8 Torx

    • Two 5.2 mm Phillips

  5. MacBook Unibody Model A1342 Rear Speaker Replacement: passo 5, immagine 1 di 1
    • Remove the following screws from the port side of rear vent:

    • Two 10 mm T8 Torx

    • Two 5.2 mm Phillips

  6. MacBook Unibody Model A1342 Rear Speaker Replacement: passo 6, immagine 1 di 1
    • Carefully lift the rear vent out of the upper case.

  7. MacBook Unibody Model A1342 Rear Speaker Replacement, Rear Speaker Assembly: passo 7, immagine 1 di 1
    • Use the flat end of a spudger to pry the AirPort/Bluetooth cable connector up off the logic board.

  8. MacBook Unibody Model A1342 Rear Speaker Replacement: passo 8, immagine 1 di 1
    • Remove the following screws securing the right speaker assembly to the upper case:

    • One 12 mm Phillips screw.

    • One 3 mm Phillips screw.

  9. MacBook Unibody Model A1342 Rear Speaker Replacement: passo 9, immagine 1 di 1
    • Remove the single 2.2 mm Phillips screw inserted horizontally into the side of the optical drive.

  10. MacBook Unibody Model A1342 Rear Speaker Replacement: passo 10, immagine 1 di 2 MacBook Unibody Model A1342 Rear Speaker Replacement: passo 10, immagine 2 di 2
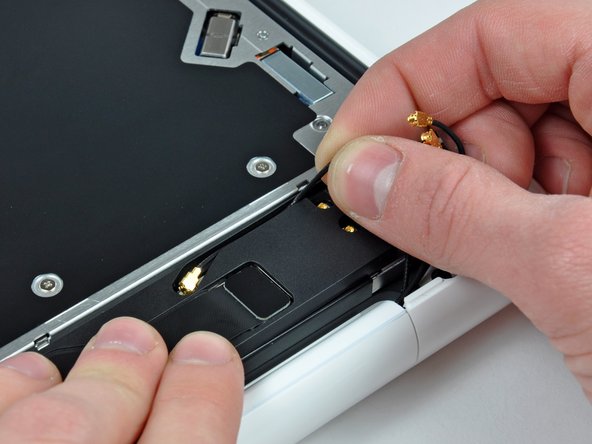
    • Pry the AirPort and Bluetooth antenna connectors (3 total) up off the AirPort/Bluetooth card.

    • De-route the long antenna from its channel in the rear speaker housing.

  11. MacBook Unibody Model A1342 Rear Speaker Replacement: passo 11, immagine 1 di 1
    • Use the flat end of a spudger to pry the rear speaker cable connector up off the logic board.

  12. MacBook Unibody Model A1342 Rear Speaker Replacement: passo 12, immagine 1 di 1
    • Remove the rear speaker assembly from the upper case.

  13. MacBook Unibody Model A1342 Rear Speaker Replacement: passo 13, immagine 1 di 2 MacBook Unibody Model A1342 Rear Speaker Replacement: passo 13, immagine 2 di 2
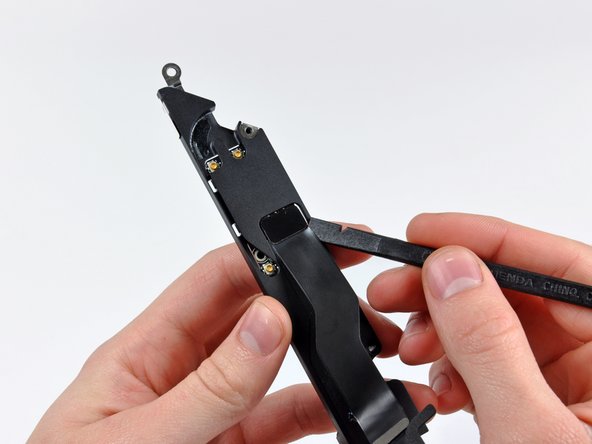
    • Carefully peel the AirPort/Bluetooth cable from its channel within the rear speaker assembly.

    • Use the flat end of a spudger to pry the AirPort/Bluetooth cable up off the rear speaker.

  14. MacBook Unibody Model A1342 Rear Speaker Replacement: passo 14, immagine 1 di 1
    • Remove three 3 mm Phillips screws securing the AirPort/Bluetooth board to the rear speaker assembly.

  15. MacBook Unibody Model A1342 Rear Speaker Replacement: passo 15, immagine 1 di 1
    • Lift the AirPort/Bluetooth board up off the rear speaker assembly.

  16. MacBook Unibody Model A1342 Rear Speaker Replacement, Rear Speaker: passo 16, immagine 1 di 1
    • Rear speaker remains.

Conclusione

To reassemble your device, follow these instructions in reverse order.

Altre 24 persone hanno completato questa guida.

4 Commenti

Nice tuto ! Helped me so fine.

Rudy Pierrat - Replica

Perfect! That helps to keep older gear alive!

W. Scholz - Replica

How did you guys place the rear speaker wire back in place?

Kim Sluyk - Replica

hi everyone! iʻm about to replace the rear speaker on my late 2009 A1342, but i also need to replace both the left and right speakers as well. would someone please help me out? i hope i donʻt have to pull the logic board (i already did that on my mid 2012 A1284, and it was, ok, but i have more gray hairs now . . .).

Kahana - Replica

Aggiungi Commento

Visualizza Statistiche:

Ultime 24 Ore: 4

Ultimi 7 Giorni: 32

Ultimi 30 Giorni: 85

Tutti i Tempi: 32,932