Questa versione può contenere modifiche errate. Passa all'ultima istantanea verificata.
Cosa ti serve
-
-
Con il case chiuso, posizionare l'Unibody capovolto su una superficie piatta.
-
Premere il lato scanalato della chiusura di sgancio dello sportello di accesso, affinché sia possibile prendere l'estremità libera con le mani. Sollevare la chiusura di sgancio finché non è in posizione verticale.
-
-
-
Prendere la linguetta di plastica bianca ed estrarre la batteria, rimuovendola dall'Unibody.
-
-
-
Rimuovere le otto viti seguenti, che fissano il case inferiore al case:
-
Una vite con testa a croce da 3 mm.
-
Tre viti con testa a croce da 13,5 mm.
-
Quattro viti con testa a croce da 3,5 mm.
-
-
Questo passaggio è privo di traduzione. Aiuta a tradurlo
-
Remove the four 10.3 mm Phillips screws securing the mid wall to the upper case.
-
-
-
Questo passaggio è privo di traduzione. Aiuta a tradurlo
-
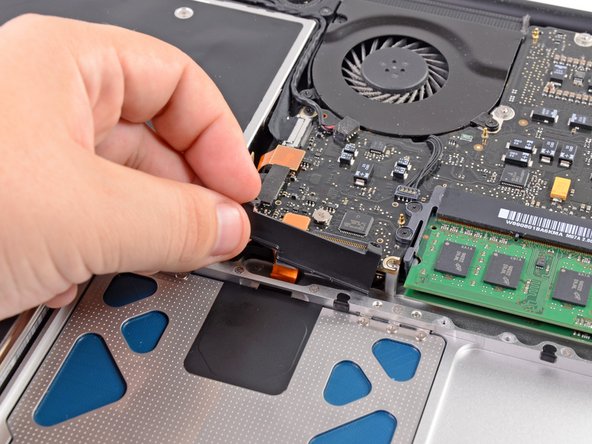
Remove the two 5 mm Phillips screws securing the keyboard flex bracket to the upper case.
-
Lift the keyboard flex bracket out of the upper case.
-
-
Questo passaggio è privo di traduzione. Aiuta a tradurlo
-
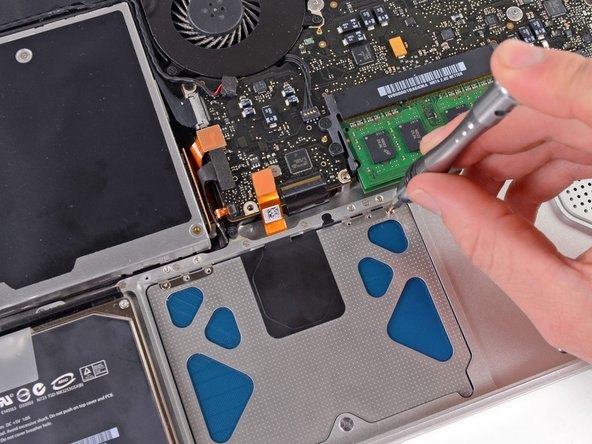
Use the flat end of a spudger to pry the trackpad connector straight up off the logic board.
-
-
Questo passaggio è privo di traduzione. Aiuta a tradurlo
-
Remove the six 1.4 mm Y0 Tri-point screws securing the trackpad to the upper case.
-
-
Questo passaggio è privo di traduzione. Aiuta a tradurlo
-
Carefully dislodge the edge of the trackpad closest to the keyboard from its recess in the upper case by pushing it away from the brackets attached to the upper case.
-
De-route the trackpad cable through its slot cut into the upper case.
-
-
Questo passaggio è privo di traduzione. Aiuta a tradurlo
-
Pull the trackpad away from the outer edge of the upper case.
-
Remove the old trackpad and set it aside.
-
-
Questo passaggio è privo di traduzione. Aiuta a tradurlo
-
Carefully insert the cable from your new trackpad through its slot cut into the upper case.
-
Use one hand to hold the trackpad cable in place as you insert the two retaining tabs on the outer edge of the trackpad under the lip on the upper case.
-
Pull the trackpad cable as you seat the trackpad into its void in the upper case.
-
-
Questo passaggio è privo di traduzione. Aiuta a tradurlo
-
Insert a 1.4 mm Tri-point screw into each of the outer holes drilled into the trackpad (two screws total).
-
-
Questo passaggio è privo di traduzione. Aiuta a tradurlo
-
While continually trying to click your trackpad, gently tighten the Tri-point set screw until the clicks return to their factory "feel".
-
-
Questo passaggio è privo di traduzione. Aiuta a tradurlo
-
Next, flip your upper case over so the keyboard side is facing up.
-
Align the trackpad so it is centered in its hole cut into the upper case.
-
-
Questo passaggio è privo di traduzione. Aiuta a tradurlo
-
Tighten the outer two screws along the inner edge of the trackpad and check the alignment of it on the outer side of the upper case.
-
If its alignment looks good, install the rest of the Tri-point screws along the inner edge of the trackpad.
-
Before reassembling your machine, verify that the set screw is still installed in a position so the mouse will click correctly.
-


Annulla: non ho completato questa guida.
Altre 59 persone hanno completato questa guida.

12 Commenti
The one thing I would be interested in: Where can I get the screwdriver this person is using in step 15? By this I am not referring to the low quality tools that are advertised alongside the tutorial.
--> can answer my own question. This is it: [prodotto collegato mancante o disabilitato: IF145-072]
Before going to the trouble and expense of removing the trackpad make sure you don't just have a problem with the battery. My trackpad was giving me fits by not responding or needing excessive pressure, etc. The only problem was that the battery was swollen and putting pressure up on the trackpad. Replaced the battery and the problem was solved.
I agree with Rich M - check the battery first! Swollen battery will impede the trackpad.
awesome instructions, thank you!