Questa versione può contenere modifiche errate. Passa all'ultima istantanea verificata.
Cosa ti serve
-
-
Svita le seguenti viti che fissano la scocca inferiore a quella superiore:
-
Tre viti a croce Phillips da 13,5 mm.
-
Sette viti a croce Phillips da 3 mm.
-
-
-
Se presente, afferra la linguetta di plastica attaccata al connettore della batteria e tirala verso il lato anteriore del dispositivo. Per i modelli di fine 2011, il connettore non avrà una linguetta ed è semplicemente una spina che si inserisce direttamente nella scheda madre, per rimuoverla tirala verso l'alto.
-
-
Questo passaggio è privo di traduzione. Aiuta a tradurlo
-
Use the tip of a spudger to push the small plastic cable retainer away from the camera cable socket for enough clearance to remove the camera cable.
-
-
Questo passaggio è privo di traduzione. Aiuta a tradurlo
-
Pull the camera cable toward the optical drive opening to disconnect it from the logic board.
-
-
-
Questo passaggio è privo di traduzione. Aiuta a tradurlo
-
Carefully pull the Bluetooth cable toward the fans to disconnect it from the Bluetooth board.
-
-
Questo passaggio è privo di traduzione. Aiuta a tradurlo
-
Use the flat end of a spudger to peel the thin plastic cover off the top and sides of the Bluetooth board housing.
-
-
Questo passaggio è privo di traduzione. Aiuta a tradurlo
-
Use the flat end of a spudger to pry the Bluetooth antenna connector up and off its socket on the Bluetooth board.
-
-
Questo passaggio è privo di traduzione. Aiuta a tradurlo
-
If present, remove the small piece of EMI foam near the Bluetooth board.
-
De-route the camera cable from the slot molded into the Bluetooth board housing.
-
-
Questo passaggio è privo di traduzione. Aiuta a tradurlo
-
Use the flat end of a spudger to pry the optical drive connector up and out of its socket on the logic board.
-
-
Questo passaggio è privo di traduzione. Aiuta a tradurlo
-
Remove the three 3.5 mm Phillips screws securing the optical drive to the upper case.
-
-
Questo passaggio è privo di traduzione. Aiuta a tradurlo
-
Remove the optical drive from the upper case, minding any cables that may get caught.
-
-
Questo passaggio è privo di traduzione. Aiuta a tradurlo
-
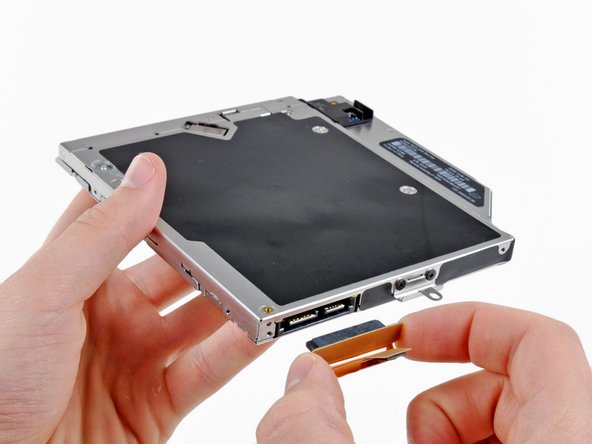
Grab the optical drive cable by its connector and pull it away from the body of the hard drive.
-
Remove the two black Phillips #0 screws securing the small metal mounting bracket. Transfer this bracket to your new optical drive or hard drive enclosure.
-
-
Questo passaggio è privo di traduzione. Aiuta a tradurlo
-
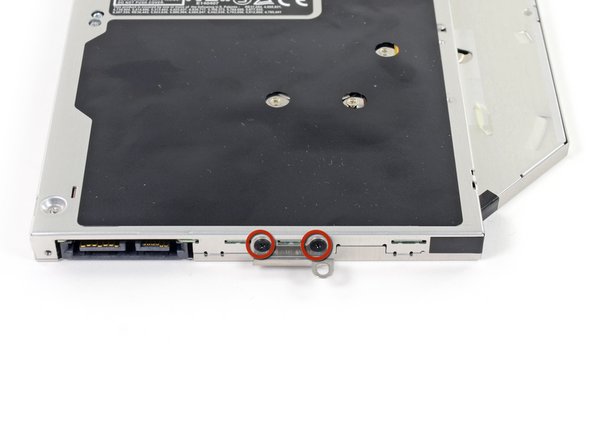
Remove the two 2.2 mm Phillips screws securing the Bluetooth board to the side of the optical drive.
-
-
Questo passaggio è privo di traduzione. Aiuta a tradurlo
-
Remove the Bluetooth board from the optical drive.
-
Optical drive remains.
-


Annulla: non ho completato questa guida.
Altre 59 persone hanno completato questa guida.

7 Commenti
Not sure which Unibody model is pictured, but my Late 2011 17” looks entirely different from this one.
I’m attempting to replace the internal optical drive with optical bay hard drive enclosure on a Model A1297 MacBook Pro 17" Unibody, but the interior looks a lot different from this guide. Have you had any luck getting a correct guide for your model?
Andrew/iFixit Team,
Do you know of any third-party blu-ray player/burner that can be used to replace the standard DVD Burner/Player? Thanks so much for any advise? All the best. - emil
I have installed a Matshita UJ167AM DVDRW/BDROM which is a direct replacement.
Working fine with MacGo Bluray player.
Haven’t got around to a Bluray burner yet, I just wanted to play bluray.