Questa guida ha delle modifiche più recenti. Passa all'ultima versione non verificata.
Introduzione
Replacing a defective fan is pretty easy and will keep your laptop running cool.
Cosa ti serve
-
-
Use your fingers to push both battery release tabs away from the battery and lift the battery out of the computer.
-
-
-
Remove the four identical Phillips 3.4 mm screws from the memory door. These screws have 4 mm diameter heads rather than the 3 mm heads on the body screws.
-
-
-
Remove the three Phillips screws in the battery compartment near the latch. Apple was nice enough to tilt these screws at a slight angle to make them easier to remove. On the A1261 these screws have 4 mm diameter heads rather than the 3 mm heads on the body screws.
To Damon - possibly the thread on the bottom of the upper case is obstructed.
I found that I needed to fight the latch magnet with the right-most screw in the photo. The screw was pulled away from the hole so a magnetized screwdriver was not enough to place it. I needed tweezers to hold the screw in place until it bit.
No, these screws won’t bite going back in — struggled for an hour. Lost hope of success.
Case screw holes perfectly lined-up, neatly closed body, screw threads/head are fine (Apple quality screws), perfect screwdriver.
The left one is in, other two simply will not bite whatsoever. Slightly irritating eventually turned to madly infuriating. I have a similar, earlier model and that was smooth to replace these exact, slightly angled screws (so I have experience).
Q: Are the centre and right-hand screws absolutely essential — or can I give up and leave them out?
(By the time you read this, that’s what I’ll have done)(out of sheer frustration)
-
-
-
Remove the following six screws:
-
Two 14.5 mm T6 Torx screws on either side of the RAM slot.
-
Four 3.4 mm Phillips screws along the hinge.
These instructions are actually wrong. The 14.5 mm screws are for along the hinge, the 2 on either side of the RAM slot are about 10 mm.
-
-
-
Remove the four 3.4 mm Phillips screws on the port side of the computer.
When reassembling, please be careful not to screw into the wrong spot. I accidentally screwed into the DVI port and it was hard to remove the screw after that. I had to disassemble the whole thing again, only to find that I couldn't remove the screw from within as it was encased. After much scraping and prodding with a sewing needle, I was able to get that screw out. Phew!
-
-
-
-
Lift up the back of the case and work your fingers along the sides, freeing the case as you go. Once you have freed the sides, you may need to rock the case up and down to free the front of the upper case.
Be very careful not to bend the screw tabs on the top case the perimeter screws attach to. Bending them causes them to quickly fatigue and potentially break off. When reassembling the top case, be sure the tabs are all *inside* the case before reseating it. If you get resistance, pull the case back up, check the tabs and reseat the top case again.
-
-
-
Disconnect the trackpad and keyboard ribbon cable from the logic board.
-
Remove the upper case.
Disconnecting this cable is optional, if instead you tip up the top case ~75 degrees, propping it up with something non-metalic (wedged in or by the battery compartment). Unplugging a connector from the main circuit board always carries slight additional risk.
It's not really necessary to disconnect the trackboard/keyboard ribbon cable. You can simply lean the upper case against the LCD.
After having successfully removed/reattached the ribbon cable several times while trying to revive this computer for back-up use the securing/release tabs on the connector broke. The connector then will not hold the cable properly and connecting fails. Tried various methods of propping the cable in the connector to get full contact but eventually all efforts failed, too. Result: essentially a dead motherboard as no replacement for the connector seems available. Sadly, not worth the extra effort to try further repairs.
-
-
-
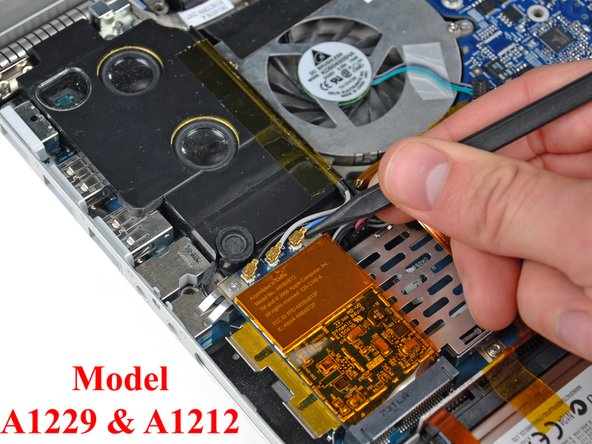
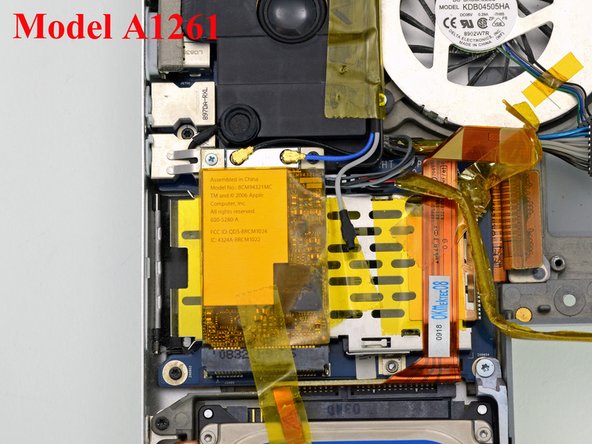
Disconnect the two antenna cables attached to the AirPort Extreme card.
-
-
-
Remove the two silver T6 Torx screws from the top left and bottom right corners of the left speaker assembly.
-
-
-
Lift up the left speaker assembly with one hand and deroute the inverter cable from the top right corner of the speaker assembly.
sgianetti is right! As I was surprised that the speaker is held down by two screws.
So, the manual should be updated I have according pictures if anyone needs them. Also, I didn't follow steps after 11 as I just pulled a bit the speaker and removed #6 Torx screw under it. Afterward I removed last two #6 Torx screws that held the fan and replaced it with new one!
Thanks for the manual! I was not able to make it without iFixIt.
-
-
-
Disconnect the pink and black left speaker assembly cable from the left I/O board. Be sure to pull only on the white connector and not on the speaker wires.
-
Disconnect the microphone cable connector from the left I/O board.
-
Remove the left speaker/microphone assembly from the lower case.
I didn't completely remove the entire speaker assembly or unplug any of the connections. Just unscrewing the torx screws allowed me to lift the speaker out of the way to access the screw to remove the fan.
-
-
-
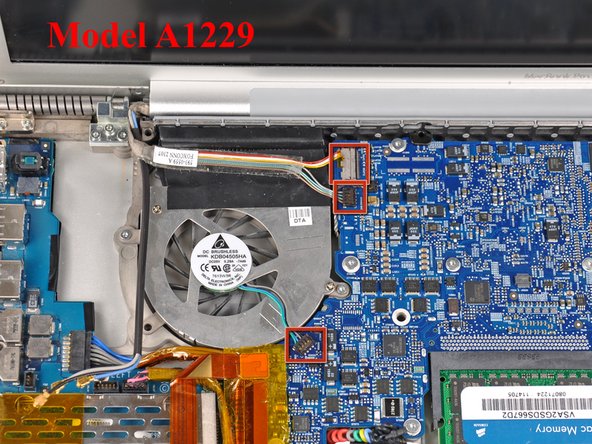
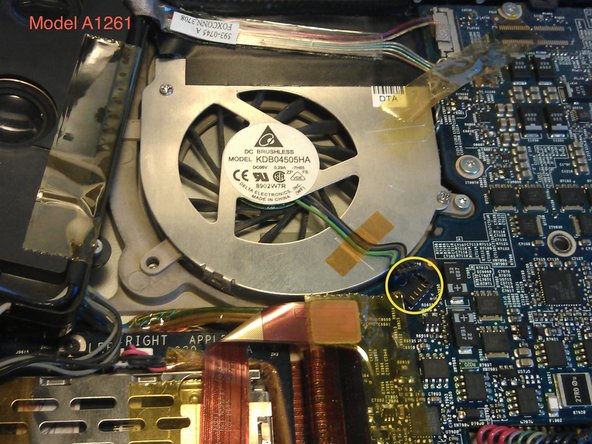
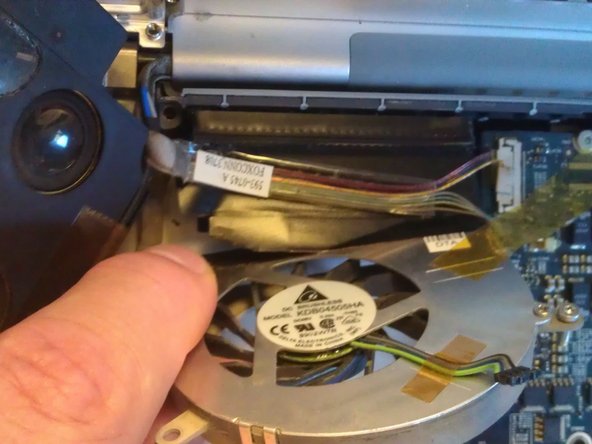
Disconnect the iSight, inverter, and left fan cables from the left side of the logic board.
ATTENTION for MacBook Pro 17" Model A1212:
If the 2 connectors shown in step 17 are black instead of white: They have to be disconnected by lifting them up, not by sliding them to the left side, as it looks like they would plug off! I used a spudger to go under the 4 cables close to the connector and lifted the cables with the connector gently up. No force needed.
Be extremely careful with the step 17 disconnecting the cable if the connecto is at 5 from the fun and black. Very weak and easy to break. Tell me about it... Now, I have no idea of how to fix this connector...
I too broke off the connector, thinking that it lifted up. Has anyone fixed this? I want to get a soldering iron to try and resolder it back to the board, but have little experience doing this. My laptop still works, but the left fan is non functional now. Does ifixit sell a replacement part for that? I'm gonna try to repair it as the macbook is pretty old and I'm due for a new comp, but I'll wait until I buy a replacement before I try and fix this one.
I too, with A1261, broke off 4 small pieces of wire that connector attached to, unlike picture shown. It appears several other connectors are similarly made, so I will have a non-functioning left fan until I find how to repair or replace. Was going to repair right fan also, but now am putting back together until find better info. or way to repair the connection.
Appears to fix will have to replace complete logic board, at the very least completely disassembled to be able to replace and re-solder the 4 small wires for connection to board.
-
-
-
Peel up the iSight and inverter cables which are attached with a mild adhesive above the left fan.
The adhesive on a couple of MacBook Pros I've worked on were far from mild. Perhaps age makes the adhesive more aggressive, but be careful pulling it up. I worked mine from both ends.
-
-
-
Lift the left fan and its metal bracket out of the computer.
At this stage it is possible to dis-assemble the fan into 3 pieces and clean and lube it thus removing the need of having to buy a new one! I recommend the following site for advice -
YES!!! I just did that. works perfectly.
fanclub -
There is black tape holding the fan to the exhaust fins. Use a razor knife to cut this tape at the seam between the exhaust and the fins.
When replacing the new fan use 1.5cm Kapton tape to seal the fan to the housing. DO NOT USE ELECTRICAL TAPE. Electrical tape's adhesive composition is not suitable for the high-temp environment of the inside of a MacBook.
Alternatively the tape can be carefully peeled back from the fan and reused, but it gets a bit stretched out.
My A1229 laptop's black tape would not reseal. 3M sells double sided copper adhesive tape as part #1182. The tape also improves thermal transfer to the heat sink. Slip a piece between the new fan and the old black tape.
-


To reassemble your device, follow these instructions in reverse order.
To reassemble your device, follow these instructions in reverse order.
Annulla: non ho completato questa guida.
Altre 81 persone hanno completato questa guida.

6 Commenti
incredibly difficult. easy times unscrewing things but no guide as to "disconnecting.. cables..". used a jewelers loop & a flash light to see "push" on the connector, but that's it. Push down to connect? ..or up to disconnect.. slide it out- squeeze the something. nothing. I ended up breaking it off the logic board accidentally, rendering my computer irreparable, unless i could solder the wires to the board. yeah right. My advise do do it.
Sorry to hear that, I made almost the same experience as you. I was lucky to find out by my own, how to disconnect the cables on my A1212 and added a comment to step 17.
MBPTom -
Instead of replacing the fans completly, you may be able to repair them.
Once you removed the fan, there is a screw that you not yet have to touch. Unscrew it and carefuly open the housing. After that, you can pull the fan wheel with the shaft out. Clean everything (avoid water), including the hole that holds the shaft. Put a drop of oil (10W-40 syntetic motoroil works pretty well) on a piece of tissue and oil the shaft. Reasseble the whole thing and check that it moves.
This may not work if the mechanical damage is too extensive or when the electronic is broken. If it works, you spared 50 bucks, otherwise the nice folks at ifix can help you out ... I did this to both of the fans after they got rather noisy, and they worked another two years since.
While disassembling my A1261 to replace the right speaker I decided to keep going and give the computer a thorough cleaning. The fans and heat sink had collected a lot of dust. As I was removing one of the fans from its motor two of the blades fell off in my hand. Does anyone know if there is somewhere can get just the fan without the motor?
not sure if my LunchTrayDeluxe A1229 is the last one running. I found that instead of doing the complete disassembly of the airport card and speakers, i could unscrew the fan cover after disconnecting the fan cable and the inverter (not the iSight cable ) and I ran a spudger under the black tape and cut the yellow tape attaching the fan cover to the speaker. I could then pull the fan cover off and I had the fan in my hand! I was able to clean out the grill with compressed air, clean out the fan assembly with alcohol and air, then lubricate the whole thing with graphite lubricant. Put it back in, fire her up and smc-it to 6K and it sounds like a dream! All those cables, not sure if its worth the risk on this old baby to lose airport, iSight and speakers. I wish the right fan made less noise, but a complete removal and cleaning only solved about half the noise (and the speed won’t get up to 2K) so it probably needs to be replaced.
Before upgrading to a larger HD, you'll want to "clone" your original HD using the donation-ware program "Carbon Copy Cloner" (http://www.bombich.com/). Put the new HD in an external case; clone the original; test the clone (by starting up with it), then take apart the MacBook to put the new HD in the MacBook, and the original in the external case for use as a backup, etc. (You can't just drag the contents of the original HD to the new HD, and expect it to work; not since the days of OS 9 and before.)
amiller770 - Replica
Can I put more than two gigabytes of RAM in?
Noah Nsangou - Replica
mine has 2g*2=4 gb ram in. you should be fine
on mac forum it suggested to put 4gb and a 2gb in a1261.
david -
I made the mistake of wanting to do a clean install of OS and start fresh after installing a SSD. Now I can't install most browsers on OSX Leopard. Does anyone know what is the most current version of OS I can put on this system? (disk or download) Can I get to Snow or Lion?
2006 17" MackBook Pro Model#A1151
2.16 GHz Intel Core Duo
Memory: Two 1GB 667 MHz
Hard Drive: Corsair Force GS: SSD 128GB
scannon - Replica
You can install OS X 10.7 LION and no later version. Although LION runs ok with 2GB RAM it does help to get 1GB + 2GB = 3GB. Even if you install 2 X 4GB you will only utilize 3GB. Installing a SSD seems to make no difference since the SATA bus is only 1.5GB/s. A good 5400rpm disk is good enough. I even run BootCamp and Windows 7. Works fine. Not fast but fine. My A1212 refuses to die :-)
asle -
There seems to be some discrepancy about whether or not installing a SSD will help. See Phil's earlier comment from October 2015: there, *he* claims that having an SSD increases the load times significantly, (even though -- of course -- 1.5Gbps is not ideal)...
His quotation, (re-)cited integrally:
Just replaced my old HD with a Corsair Force LX SSD (which is SATA 1-3 compatible as required by this model) with success now my old 'outdated' laptop has super fast loading times and is postively flying faster than the speed of 'sound'. Thanks for the guide. Only problem I faced was replacing the top panel which after a few minutes of panic realised the rubber mounted Mic next to the left speaker had risen up when I had removed the top panel so after carefully pushing it back into place the panel fitted back how it should, so beware of this possible problem.
Phil - 10/07/2015
at0gjm -
Bonjour j'ai besoin de cette bactérie que dois-je faire ?
basile kouamé YAO - Replica