Questa versione può contenere modifiche errate. Passa all'ultima istantanea verificata.
Cosa ti serve
-
-
Rimuovi le dieci viti seguenti, che fissano il case inferiore a quello superiore:
-
Tre viti con testa a croce Phillips da 13,5 (14,1) mm.
-
Sette viti con testa a croce da 3 mm.
-
-
-
Usa l'estremità di uno spudger per rimuovere il connettore della batteria dal suo zoccolo sulla scheda logica.
-
-
-
Svita le tre viti Torx T6 da 3,4 mm che fissano la ventola sinistra alla scheda madre.
-
-
-
Usa la parte piatta di uno spudger per scollegare il connettore della ventola destra dalla sua presa sulla scheda madre.
-
-
-
-
Solleva attentamente il gruppo della scheda madre dal suo bordo sinistro per rimuoverla dal case superiore, stando attento al cavo del lettore CD e le porte I/O che possono impigliarsi durante la rimozione.
-
Se necessario, usa la parte piatta di uno spudger per separare il microfono dal case superiore.
-
Tira via il lato delle porte I/O dal bordo del case superiore e rimuovi il gruppo della scheda madre.
-
-
Questo passaggio è privo di traduzione. Aiuta a tradurlo
-
Remove the two 7.5 mm ( 7.2 mm )Tri-point screws securing the battery to the upper case.
-
-
Questo passaggio è privo di traduzione. Aiuta a tradurlo
-
Carefully peel the battery warning label off the upper case between the battery and the optical drive to reveal an additional Tri-point screw.
-
Remove the last 7.5 mm ( 7.2 mm ) Tri-point screw securing the battery to the upper case.
-
-
Questo passaggio è privo di traduzione. Aiuta a tradurlo
-
Use the attached plastic pull tab to remove the battery from the upper case.
-
-
Questo passaggio è privo di traduzione. Aiuta a tradurlo
-
Remove the two Phillips screws securing the hard drive bracket to the upper case.
-
Remove the hard drive bracket from the upper case.
-
-
Questo passaggio è privo di traduzione. Aiuta a tradurlo
-
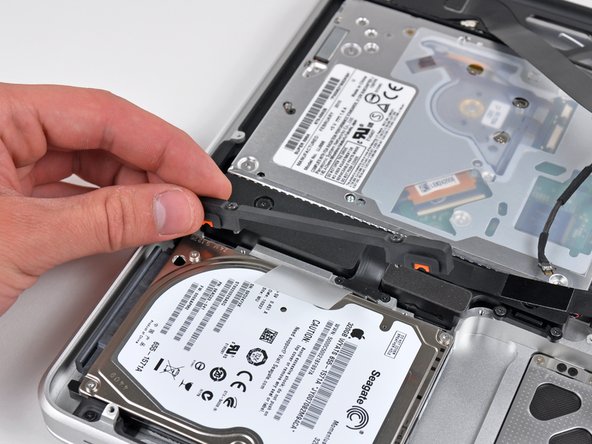
Using its attached pull tab, lift the hard drive out of the upper case.
-
-
Questo passaggio è privo di traduzione. Aiuta a tradurlo
-
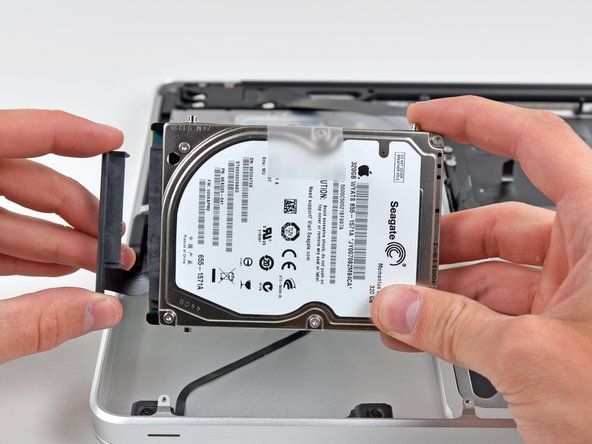
Pull the hard drive connector out of its socket on the hard drive.
-
Remove the hard drive and set it aside.
-
-
Questo passaggio è privo di traduzione. Aiuta a tradurlo
-
Remove the following four screws securing the hard drive/IR sensor cable to the upper case:
-
Two 2.5 mm ( 2.9 mm ) Phillips screws
-
Two 10 mm ( 9.6 mm ) Phillips screws
-
-
Questo passaggio è privo di traduzione. Aiuta a tradurlo
-
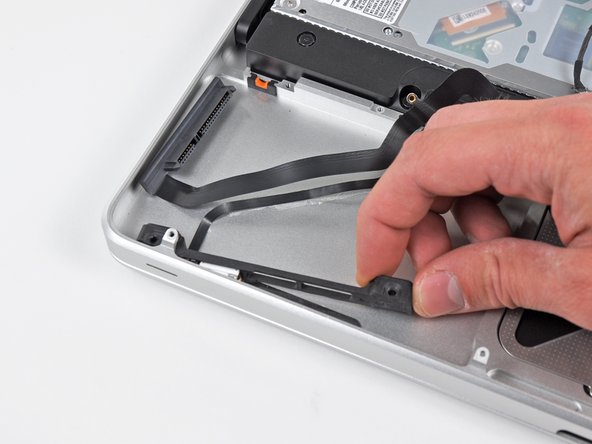
Carefully peel the IR sensor cable off the adhesive securing it to the upper case.
-
Pull the hard drive bracket/IR sensor housing away from the side of the upper case.
-
Remove the hard drive/IR sensor cable from the upper case.
-
-
Questo passaggio è privo di traduzione. Aiuta a tradurlo
-
Use the tip of a spudger to pry the four antenna connectors up from their sockets on the AirPort/Bluetooth board.
-
-
Questo passaggio è privo di traduzione. Aiuta a tradurlo
-
De-route all four antenna cables from their channels in the AirPort/Bluetooth housing.
-
De-route the camera cable from its channel in the AirPort/Bluetooth housing.
-
-
Questo passaggio è privo di traduzione. Aiuta a tradurlo
-
Remove the following two screws:
-
One 8.6 mm ( 8.4 mm ) Phillips screw
-
One 3.9 mm Phillips screw
-
Remove the AirPort/Bluetooth assembly from the upper case, minding any cables that may get caught.
-
-
Questo passaggio è privo di traduzione. Aiuta a tradurlo
-
Remove the three 3.5 mm ( 3.3 mm ) T6 Torx screws securing the optical drive to the upper case.
-
Lift the optical drive near its connector and pull it away from the upper case to remove it from the computer.
-
-
Questo passaggio è privo di traduzione. Aiuta a tradurlo
-
Remove the following six screws securing the subwoofer and right speaker to the upper case:
-
Two 3.2 mm ( 3.0 mm ) Phillips screws.
-
Two 12.3 mm Phillips screws.
-
One 2.5 mm Phillips screw.
-
One 8.3 mm ( 8.1 mm ) Phillips screw.
-
Lift the subwoofer and right speaker assembly out of the upper case.
-
-
Questo passaggio è privo di traduzione. Aiuta a tradurlo
-
Remove the 8.6 mm Phillips screw securing the antenna/camera cable retainer to the top left portion of the upper case.
-
Remove the antenna/camera cable retainer from the upper case.
-
-
Questo passaggio è privo di traduzione. Aiuta a tradurlo
-
Remove the 8.6 mm ( 7.0 mm ) Phillips screw securing the display data cable retainer to the top right portion of the upper case.
-
Remove the display data cable retainer from the upper case.
-
-
Questo passaggio è privo di traduzione. Aiuta a tradurlo
-
Remove two of the three 6 mm T6 Torx screws securing the right side of the display to the upper case.
-
-
Questo passaggio è privo di traduzione. Aiuta a tradurlo
-
Remove two of the three 6 mm T6 Torx screws securing the left side of the display to the upper case.
-
-
Questo passaggio è privo di traduzione. Aiuta a tradurlo
-
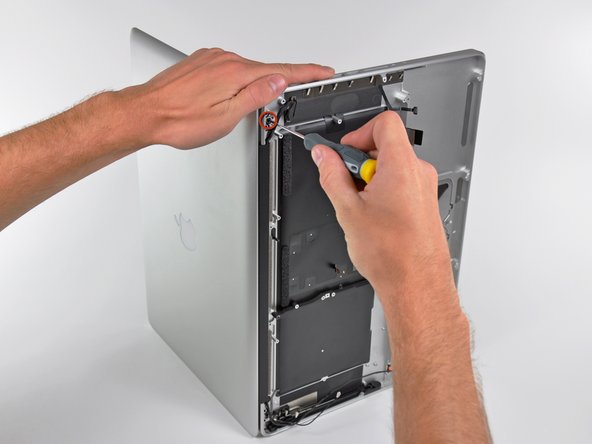
Open your MacBook Pro so the display is perpendicular to the upper case.
-
Place your opened MacBook Pro on a table as pictured.
-
While holding the display and upper case together with your left hand, remove the remaining T6 Torx screw from the upper display bracket.
-
-
Questo passaggio è privo di traduzione. Aiuta a tradurlo
-
Remove the last remaining T6 Torx screw securing the display to the upper case.
-
-
Questo passaggio è privo di traduzione. Aiuta a tradurlo
-
Grab the upper case with your right hand and rotate it slightly toward the top of the display so the upper display bracket clears the edge of the upper case.
-
Rotate the display slightly away from the upper case.
-
Lift the display up and away from the upper case, minding any brackets or cables that may get caught.
-
-
Questo passaggio è privo di traduzione. Aiuta a tradurlo
-
If your replacement includes the battery level indicator, stop here.
-
Remove three 2.0 mm Phillips #00 screws securing the battery level indicator to the upper case.
-
-
Questo passaggio è privo di traduzione. Aiuta a tradurlo
-
Use the tip of a spudger to gently pry up the edge of the metal shield covering the battery level indicator cable.
-


Annulla: non ho completato questa guida.
Altre 34 persone hanno completato questa guida.
