Salta al contenuto principale
Unisciti alla Community delle riparazioni - Crea un account

MacBook Pro 15" Unibody Early 2011 Trackpad Replacement

Cosa ti serve

  1. MacBook Pro 15" Unibody Early 2011 Trackpad Replacement, Lower Case: passo 1, immagine 1 di 1
    • Remove the following ten screws securing the lower case to the upper case:

    • Three 13.5 mm (14.1 mm) Phillips screws.

    • Seven 3 mm Phillips screws.

    • When removing these screws, note how they come out at a slight angle. They must be reinstalled the same way.

    Chiedi a FixBot

    Aggiungi Commento

  2. MacBook Pro 15" Unibody Early 2011 Trackpad Replacement: passo 2, immagine 1 di 1
    • Using both hands, lift the lower case near the vent to pop it off two clips securing it to the upper case.

    • Remove the lower case and set it aside.

    Chiedi a FixBot

    Aggiungi Commento

  3. MacBook Pro 15" Unibody Early 2011 Trackpad Replacement, Battery Connector: passo 3, immagine 1 di 2 MacBook Pro 15" Unibody Early 2011 Trackpad Replacement, Battery Connector: passo 3, immagine 2 di 2
    • For certain repairs (e.g. hard drive), disconnecting the battery connector is not necessary but is recommended as it prevents any accidental shorting of electronics on the motherboard. If you do not disconnect the battery connector, please be careful as parts of the motherboard might be electrified.

    • Use the edge of a spudger to pry the battery connector upwards from its socket on the logic board.

    • It is useful to pry upward on both short sides of the connector to "walk" it out of its socket.

    Chiedi a FixBot

    Aggiungi Commento

  4. MacBook Pro 15" Unibody Early 2011 Trackpad Replacement: passo 4, immagine 1 di 1
    • Bend the battery cable slightly away from its socket on the logic board so it does not accidentally connect itself while you work.

    Chiedi a FixBot

    Aggiungi Commento

  5. MacBook Pro 15" Unibody Early 2011 Trackpad Replacement, Left Fan: passo 5, immagine 1 di 1
    • Remove the following three screws securing the left fan to the logic board:

    • Two 3.5 mm T6 Torx screws.

    • One 4.2 mm T6 Torx screw.

    Chiedi a FixBot

    Aggiungi Commento

  6. MacBook Pro 15" Unibody Early 2011 Trackpad Replacement: passo 6, immagine 1 di 3 MacBook Pro 15" Unibody Early 2011 Trackpad Replacement: passo 6, immagine 2 di 3 MacBook Pro 15" Unibody Early 2011 Trackpad Replacement: passo 6, immagine 3 di 3
    • Use the flat end of a spudger to disconnect the left fan connector from the logic board.

    • It is useful to twist the spudger axially from beneath the fan cable wires to release the connector.

    • The fan socket and the fan connector can be seen in the second and third pictures. Be careful not to break the plastic fan socket off the logic board as you use your spudger to lift the fan connector straight up and out of its socket.

    • The layout of the logic board shown in the second picture may look slightly different than your machine but the fan socket is the same.

    Chiedi a FixBot

    Aggiungi Commento

  7. MacBook Pro 15" Unibody Early 2011 Trackpad Replacement: passo 7, immagine 1 di 1
    • Lift the left fan out of the upper case.

    Chiedi a FixBot

    Aggiungi Commento

  8. MacBook Pro 15" Unibody Early 2011 Trackpad Replacement, Logic Board: passo 8, immagine 1 di 1
    • Use the flat end of a spudger to lift the right fan connector out of its socket on the logic board.

    • It is useful to twist the spudger axially from beneath the fan cable wires to release the connector.

    Chiedi a FixBot

    Aggiungi Commento

  9. MacBook Pro 15" Unibody Early 2011 Trackpad Replacement: passo 9, immagine 1 di 2 MacBook Pro 15" Unibody Early 2011 Trackpad Replacement: passo 9, immagine 2 di 2
    • Remove the three 3.4 mm (3.1 mm) T6 Torx screws securing the right fan to the logic board.

    • Lift the right fan out of its opening in the logic board.

    Chiedi a FixBot

    Aggiungi Commento

  10. MacBook Pro 15" Unibody Early 2011 Trackpad Replacement: passo 10, immagine 1 di 1
    • Pull the camera cable out of its socket on the logic board.

    • Don't lift upward on the camera cable as you disconnect it. Pulling upward on the cable may damage both the cable and the logic board. Pull the cable parallel to the face of the logic board.

    Chiedi a FixBot

    Aggiungi Commento

  11. MacBook Pro 15" Unibody Early 2011 Trackpad Replacement: passo 11, immagine 1 di 1
    • Use the flat end of a spudger to pry the AirPort/Bluetooth connector up from its socket on the logic board.

    Chiedi a FixBot

    Aggiungi Commento

  12. MacBook Pro 15" Unibody Early 2011 Trackpad Replacement: passo 12, immagine 1 di 1
    • Use the flat end of a spudger to lift the optical drive connector out of its socket on the logic board.

    Chiedi a FixBot

    Aggiungi Commento

  13. MacBook Pro 15" Unibody Early 2011 Trackpad Replacement: passo 13, immagine 1 di 1
    • Disconnect the hard drive/IR sensor cable from its socket on the logic board by lifting up from beneath its connector.

    Chiedi a FixBot

    Aggiungi Commento

  14. MacBook Pro 15" Unibody Early 2011 Trackpad Replacement: passo 14, immagine 1 di 1
    • Use the flat end of a spudger to lift the subwoofer/right speaker connector out of its socket on the logic board.

    • Pry up from beneath the wires.

    Chiedi a FixBot

    Aggiungi Commento

  15. MacBook Pro 15" Unibody Early 2011 Trackpad Replacement: passo 15, immagine 1 di 2 MacBook Pro 15" Unibody Early 2011 Trackpad Replacement: passo 15, immagine 2 di 2
    • Remove the two 1.5 mm ( 1.2 mm ) Phillips screws securing the keyboard/trackpad cable cover to the logic board.

    • Lift the cover off the logic board and set it aside.

    Chiedi a FixBot

    Aggiungi Commento

  16. MacBook Pro 15" Unibody Early 2011 Trackpad Replacement: passo 16, immagine 1 di 1
    • Use the flat end of a spudger to pry the trackpad connector up and out of its socket on the logic board.

    Chiedi a FixBot

    Aggiungi Commento

  17. MacBook Pro 15" Unibody Early 2011 Trackpad Replacement: passo 17, immagine 1 di 2 MacBook Pro 15" Unibody Early 2011 Trackpad Replacement: passo 17, immagine 2 di 2
    • Use your fingernail to flip up the retaining flap on the keyboard ribbon cable ZIF socket.

    • Be sure you are prying up on the hinged retaining flap, not the socket itself.

    • Use the tip of a spudger to pull the keyboard ribbon cable out of its socket.

    Chiedi a FixBot

    Aggiungi Commento

  18. MacBook Pro 15" Unibody Early 2011 Trackpad Replacement: passo 18, immagine 1 di 1
    • Use the flat end of a spudger to lift the battery indicator connector up and out of its socket on the logic board.

    Chiedi a FixBot

    Aggiungi Commento

  19. MacBook Pro 15" Unibody Early 2011 Trackpad Replacement: passo 19, immagine 1 di 2 MacBook Pro 15" Unibody Early 2011 Trackpad Replacement: passo 19, immagine 2 di 2
    • Grab the plastic pull tab secured to the display data cable lock and rotate it toward the DC-In side of the computer.

    • Pull the display data cable straight out of its socket on the logic board.

    • Do not lift up on the display data cable, as its socket is very fragile. Pull the cable parallel to the face of the logic board.

    Chiedi a FixBot

    Aggiungi Commento

  20. MacBook Pro 15" Unibody Early 2011 Trackpad Replacement: passo 20, immagine 1 di 2 MacBook Pro 15" Unibody Early 2011 Trackpad Replacement: passo 20, immagine 2 di 2
    • Use the tip of a spudger to flip up the retaining flap on the keyboard backlight ribbon cable ZIF socket.

    • Be sure you are flipping up the hinged retaining flap, not the socket itself.

    • Pull the keyboard backlight ribbon cable out of its socket.

    Chiedi a FixBot

    Aggiungi Commento

  21. MacBook Pro 15" Unibody Early 2011 Trackpad Replacement: passo 21, immagine 1 di 1
    • Remove the following nine screws:

    • Seven 3.4 mm ( 3.1 mm) T6 Torx screws on the logic board

    • Two 8 mm T6 Torx screws on the DC-In board

    Chiedi a FixBot

    Aggiungi Commento

  22. MacBook Pro 15" Unibody Early 2011 Trackpad Replacement: passo 22, immagine 1 di 3 MacBook Pro 15" Unibody Early 2011 Trackpad Replacement: passo 22, immagine 2 di 3 MacBook Pro 15" Unibody Early 2011 Trackpad Replacement: passo 22, immagine 3 di 3
    • Carefully lift the logic board assembly from its left side and work it out of the upper case, minding the optical drive cable and the I/O ports that may get caught during removal.

    • If necessary, use the flat end of a spudger to separate the microphone from the upper case.

    • Pull the I/O port side of the logic board away from the side of the upper case and remove the logic board assembly.

    Chiedi a FixBot

    Aggiungi Commento

  23. MacBook Pro 15" Unibody Early 2011 Trackpad Replacement, Battery: passo 23, immagine 1 di 1
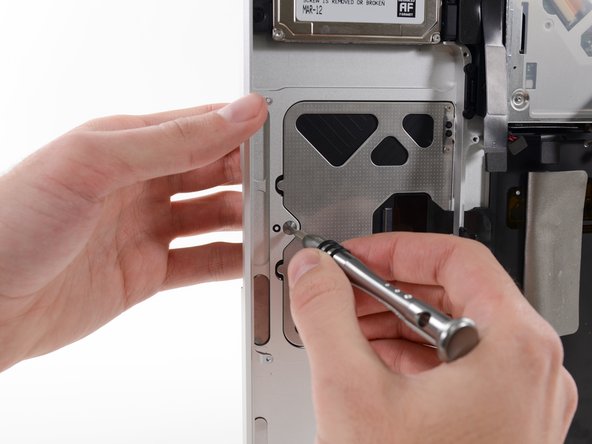
    • Remove the two 7.5 mm ( 7.2 mm )Tri-point screws securing the battery to the upper case.

    Chiedi a FixBot

    Aggiungi Commento

  24. MacBook Pro 15" Unibody Early 2011 Trackpad Replacement: passo 24, immagine 1 di 1
    • Carefully peel the battery warning label off the upper case between the battery and the optical drive to reveal an additional Tri-point screw.

    • Remove the last 7.5 mm ( 7.2 mm ) Tri-point screw securing the battery to the upper case.

    • Do not remove the label from the battery.

    Chiedi a FixBot

    Aggiungi Commento

  25. MacBook Pro 15" Unibody Early 2011 Trackpad Replacement: passo 25, immagine 1 di 1
    • Use the attached plastic pull tab to remove the battery from the upper case.

    Chiedi a FixBot

    Aggiungi Commento

  26. MacBook Pro 15" Unibody Early 2011 Trackpad Replacement, Trackpad: passo 26, immagine 1 di 2 MacBook Pro 15" Unibody Early 2011 Trackpad Replacement, Trackpad: passo 26, immagine 2 di 2
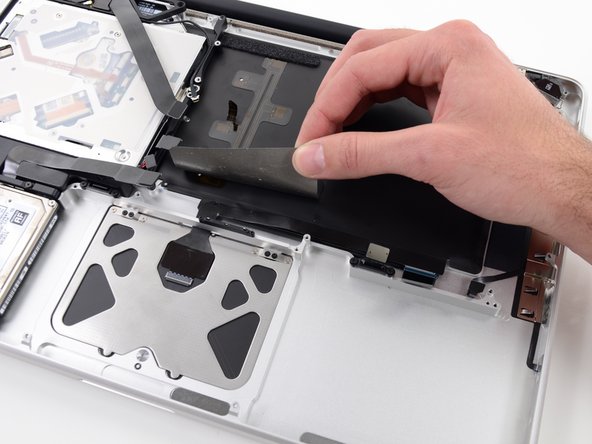
    • Use the flat end of a spudger to peel up the edge of the large piece of black tape covering the trackpad cable.

    • Peel the tape up and fold it back out of the way of the trackpad cable. Leaving it in place on the upper case will make it easier to reapply it during reassembly.

    Chiedi a FixBot

    Aggiungi Commento

  27. MacBook Pro 15" Unibody Early 2011 Trackpad Replacement: passo 27, immagine 1 di 1
    • Open your MacBook Pro about 90 degrees and set it on its side on a table.

    • Remove the four silver 1.3 mm Phillips #00 screws from the trackpad spring brackets.

    Chiedi a FixBot

    Aggiungi Commento

  28. MacBook Pro 15" Unibody Early 2011 Trackpad Replacement: passo 28, immagine 1 di 2 MacBook Pro 15" Unibody Early 2011 Trackpad Replacement: passo 28, immagine 2 di 2
    • While keeping a hold on the trackpad ribbon cable with one hand to keep it from tearing or creasing, ease the trackpad out of the upper case.

    • Move the trackpad back and to the right.

    Chiedi a FixBot

    Aggiungi Commento

  29. MacBook Pro 15" Unibody Early 2011 Trackpad Replacement: passo 29, immagine 1 di 2 MacBook Pro 15" Unibody Early 2011 Trackpad Replacement: passo 29, immagine 2 di 2
    • Once the trackpad is free of the upper case, guide the ribbon cable through the slot cut in the upper case.

    Chiedi a FixBot

    Aggiungi Commento

  30. MacBook Pro 15" Unibody Early 2011 Trackpad Replacement: passo 30, immagine 1 di 2 MacBook Pro 15" Unibody Early 2011 Trackpad Replacement: passo 30, immagine 2 di 2
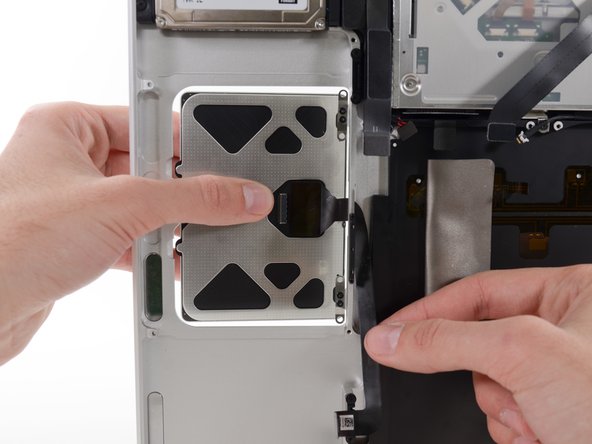
    • When reinstalling the trackpad, loosely replace the four Phillips screws and check the alignment of the trackpad on the keyboard side of the upper case.

    • Once you have centered the trackpad in the upper case, tighten the Phillips screws all the way.

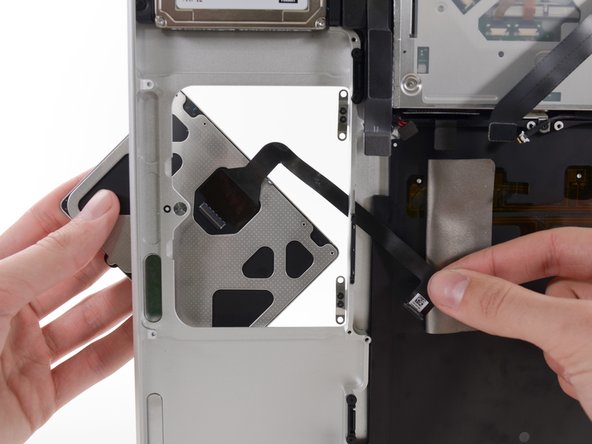
    • Use the large Tri-point screw at the bottom of the trackpad to adjust the click stroke.

    Chiedi a FixBot

    Aggiungi Commento

Conclusione

To reassemble your device, follow these instructions in reverse order.

Annulla: non ho completato questa guida.

Altre 73 persone hanno completato questa guida.

Team

iFixit Membro di iFixit

Staff

122 Membri

25.849 guide realizzate

26Commenti sulla guida

Used this guide for a mid-2010 chassis, which seems the same. I'd recommend moving steps 23-25 to happen between steps 3 and 4. Basically, take the battery out first, immediately after removing the bottom cover. Also, replace it as a last step in reassembly prior to placing the bottom cover back on. What I found was that placing the logic board back into the machine (reversing step 22) was difficult with the fairly stiff battery connector cable. If you have better mojo than I do with a spudger, good on ya mate.

Nick - Rispondi Condividi

Definitely follow the advice about battery out first and the tip regarding double sided tape and corrugated board is really good. Easy to follow steps and worked perfectly.

John Bannister - Rispondi Condividi

Do I have to follow all the steps? My battery blew up; shattered the trackpad. Took battery out. Laptop works perfectly but need to replace trackpad. So since the battery is out, do I need to take everything else out, too? I do better with videos than still pictures. Dyslexia rules.

PB Ford - Rispondi Condividi

Is it necessary to follow all the steps? My battery blew up; shattered the trackpad. Took battery out. Laptop works perfectly but need to replace trackpad. So since the battery is out, do I need to take everything else out, too? I do better with videos than still pictures. Dyslexia rules.

PB Ford - Rispondi Condividi

I have followed the steps, now my keyboard and trackpad is not recognised by mac os............ i have checked the cables, everything is connected......

I'm fed up.

mbouchet42 - Rispondi Condividi

Aggiungi Commento

Visualizza statistiche:

Ultime 24 ore: 2

Ultimi 7 giorni: 26

Ultimi 30 giorni: 129

Tutti i Tempi: 84,906