Questa versione può contenere modifiche errate. Passa all'ultima istantanea verificata.
Cosa ti serve
-
-
Premere con le dita entrambe le linguette di sgancio della batteria verso l'esterno e sollevare la batteria dal computer.
-
-
-
Rimuovere le tre viti con testa a croce da 2 mm dallo sportello della memoria.
-
Sollevare lo sportello della memoria affinché sia possibile prenderlo e farlo scorrere verso di sé, estraendolo dall'alloggiamento.
-
-
-
Rimuovere le due viti con testa a croce da 2,8 mm nello scomparto della batteria in prossimità della chiusura.
-
-
-
-
Sollevare il case dalla parte posteriore e, mediante le dita, liberarlo progressivamente dai lati. Dopo aver liberato i fianchi, potrebbe essere necessario inclinare il case verso l'alto e verso il basso per liberare la parte anteriore del case superiore.
-
Sono presenti quattro levette di plastica sopra lo slot del DVD e in alto e a sinistra del sensore infrarossi. Queste levette potrebbero essere difficili da sganciare senza fare leva. Inoltre, potrebbe essere difficile riagganciarle durante il riassemblaggio.
-
-
Questo passaggio è privo di traduzione. Aiuta a tradurlo
-
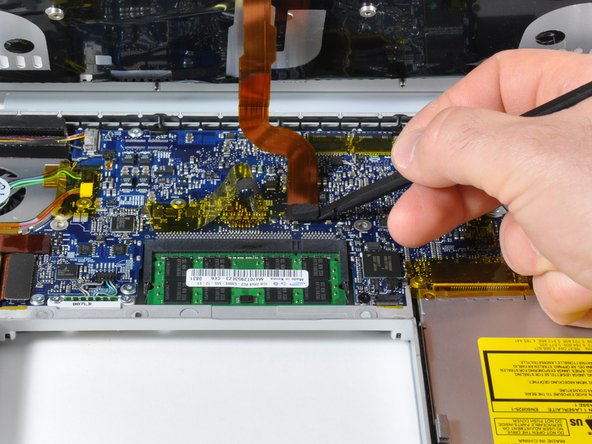
Disconnect the right fan cable from the logic board by placing a spudger beneath the cable and lifting up. Be sure to lift up on the right side as shown.
-
-
Questo passaggio è privo di traduzione. Aiuta a tradurlo
-
Remove the three silver T6 Torx screws securing the right fan to the logic board and lower case.
-
Lift the right fan up and carefully peel up the tape securing the fan to the heat sink as you go.
-
Annulla: non ho completato questa guida.
Altre 254 persone hanno completato questa guida.
8 Commenti
Excellent guide and pictures. I took the advise of several others and cleaned and lubed the fans, and had super results.
ok, so i started hearing a grinding noise from my computer and i thought it was just dirty and i went online to out how to do that. i came upon this website and found out that here you can find out about anything when i came to DIY. well the grinding noise was got worse and worse and found out that the right fan was the cause and it was a common issue to this version of the macbook pro. so ig ot the part and just put it in. its so quiet now as it was when i bought it. thank you for being here. i love this website. this is so user friendly and am already recommending this website to all my friends.
Thanks for the awesome feedback, nfleisher! Glad to hear your repair was a success.
Complete success, I downloaded a fan control app after I heard the grinding noise that I think most readers of this guide are familiar with. My fan was dropping into the 200rpm range and I had placed a box fan underneath the computer to keep the thing cool while I waited for the new fan unit to arrive. The guide was straightforward and pointed out a few of the problem areas that I might not have noticed without the prior heads up. The one addition that my IT friend pointed out to me is to make sure not to put the screws into the wrong holes during reassembly of step 5. There are two holes on either side of the DVI port and apparently once you mistakenly drop a screw into one of those holes its gone for good. Thank you so much, I could not have done this without this site.
Your guides are amazing! I printed out the PDF, punched tiny holes on the red circles to place removed screws, and just followed along. 10 minutes later, POOF! No more screeching fan, and all the screws went back where they belong! Awesome!


