Salta al contenuto principale

Questa traduzione potrebbe non riflettere gli aggiornamenti più recenti dalla guida originale. Aiuta ad aggiornare la traduzione o visualizza la guida d'origine.

MacBook Pro 15" Core 2 Duo Modelli A1226 e A1260 Scocca Display Frontale

Cosa ti serve

  1. MacBook Pro 15" Core 2 Duo Modelli A1226 e A1260 Scocca Display Frontale, Batteria: passo 1, immagine 1 di 3 MacBook Pro 15" Core 2 Duo Modelli A1226 e A1260 Scocca Display Frontale, Batteria: passo 1, immagine 2 di 3 MacBook Pro 15" Core 2 Duo Modelli A1226 e A1260 Scocca Display Frontale, Batteria: passo 1, immagine 3 di 3
    • Premere con le dita entrambe le linguette di sgancio della batteria verso l'esterno e sollevare la batteria dal computer.

  2. MacBook Pro 15" Core 2 Duo Modelli A1226 e A1260 Scocca Display Frontale, Installazione della schermatura della memoria RAM nel MacBook Pro Core 2 Duo da 15" modelli A1226 e A1260: passo 2, immagine 1 di 2 MacBook Pro 15" Core 2 Duo Modelli A1226 e A1260 Scocca Display Frontale, Installazione della schermatura della memoria RAM nel MacBook Pro Core 2 Duo da 15" modelli A1226 e A1260: passo 2, immagine 2 di 2
    • Rimuovere le tre viti con testa a croce da 2 mm dallo sportello della memoria.

    • Sollevare lo sportello della memoria affinché sia possibile prenderlo e farlo scorrere verso di sé, estraendolo dall'alloggiamento.

  3. MacBook Pro 15" Core 2 Duo Modelli A1226 e A1260 Scocca Display Frontale, Installazione del case superiore nel MacBook Pro Core 2 Duo da 15" modelli A1226 e A1260: passo 3, immagine 1 di 1
    • Rimuovere le due viti con testa a croce da 2,8 mm nello scomparto della batteria in prossimità della chiusura.

  4. MacBook Pro 15" Core 2 Duo Modelli A1226 e A1260 Scocca Display Frontale: passo 4, immagine 1 di 1
    • Rimuovere le 6 viti seguenti:

    • Due viti Torx T6 da 10 mm su entrambi i lati dello slot RAM.

    • Quattro viti con testa a croce da 14,5 mm lungo il cardine.

  5. MacBook Pro 15" Core 2 Duo Modelli A1226 e A1260 Scocca Display Frontale: passo 5, immagine 1 di 1
    • Rimuovere le quattro viti con testa a croce da 3,2 mm dal lato della porta del computer.

  6. MacBook Pro 15" Core 2 Duo Modelli A1226 e A1260 Scocca Display Frontale: passo 6, immagine 1 di 1
    • Ruotare il computer di 90 gradi e rimuovere le viti con testa a croce da 3,2 mm dalla parte posteriore del computer.

  7. MacBook Pro 15" Core 2 Duo Modelli A1226 e A1260 Scocca Display Frontale: passo 7, immagine 1 di 1
    • Ruotare il computer di 90 gradi e rimuovere le viti con testa a croce da 3,2 mm dalla parte laterale del computer.

  8. MacBook Pro 15" Core 2 Duo Modelli A1226 e A1260 Scocca Display Frontale: passo 8, immagine 1 di 3 MacBook Pro 15" Core 2 Duo Modelli A1226 e A1260 Scocca Display Frontale: passo 8, immagine 2 di 3 MacBook Pro 15" Core 2 Duo Modelli A1226 e A1260 Scocca Display Frontale: passo 8, immagine 3 di 3
    • Non rimuovere il case superiore rapidamente, poiché è collegato alla scheda logica tramite un cavo piatto.

    • Sollevare il case dalla parte posteriore e, mediante le dita, liberarlo progressivamente dai lati. Dopo aver liberato i fianchi, potrebbe essere necessario inclinare il case verso l'alto e verso il basso per liberare la parte anteriore del case superiore.

    • Sono presenti quattro levette di plastica sopra lo slot del DVD e in alto e a sinistra del sensore infrarossi. Queste levette potrebbero essere difficili da sganciare senza fare leva. Inoltre, potrebbe essere difficile riagganciarle durante il riassemblaggio.

    • Suggerimento di riassemblaggio: Premere fortemente sulle estremità del case superiore verso il basso fino a sentire un schiocco per mettere le legame nelle corrispondente fessure.

    • Suggerimento di riassemblaggio: le due legame DVD della metà si raramente agganciano senza aiuto.

    • Attenzione non di distorcere il quadro attorno il DVD fianco con una pressione al ribasso. Sostenere il quadro: inserire una spatola di plastica negli i fianchi di DVD direttamente sotto la locazione delle legame fino è sicuro. Doppo, premere verso il basso fino a sentire un schiocco.

  9. MacBook Pro 15" Core 2 Duo Modelli A1226 e A1260 Scocca Display Frontale: passo 9, immagine 1 di 2 MacBook Pro 15" Core 2 Duo Modelli A1226 e A1260 Scocca Display Frontale: passo 9, immagine 2 di 2
    • Scollegare il cavo piatto della tastiera e del trackpad dalla scheda logica, rimuovendo il nastro secondo necessità.

    • Nota: è possibile sostituire il disco rigido senza scollegare la tastiera dal case, tuttavia occorre tenerla in posizione sollevata affinché non sia d'intralcio e consenta di rimuovere il disco rigido con entrambe le mani.

    • Fare attenzione durante la rimozione del cavo piatto della tastiera e del trackpad e verificare che la parte posteriore del case superiore sia sganciata dalla zona in prossimità del cardine. I ricettacoli delle viti su entrambi i lati della tastiera sono facilmente soggetti a piegature accidentali.

    • Rimuovere il case superiore.

  10. Questo passaggio è privo di traduzione. Aiuta a tradurlo

    MacBook Pro 15" Core 2 Duo Modelli A1226 e A1260 Scocca Display Frontale: passo 10, immagine 1 di 1
    • Disconnect the two or three antenna cables attached to the Airport Extreme card. Depending on your model, one of the three cables may be unused and capped with a black shrink tube.

    • Apple was kind enough to include a label showing where each color antenna cable plugs in - just make sure to look at this when reconnecting the antenna cables.

  11. Questo passaggio è privo di traduzione. Aiuta a tradurlo

    MacBook Pro 15" Core 2 Duo Modelli A1226 e A1260 Scocca Display Frontale: passo 11, immagine 1 di 1
    • Deroute the Airport antenna cables from their channel in the left speaker.

  12. Questo passaggio è privo di traduzione. Aiuta a tradurlo

    MacBook Pro 15" Core 2 Duo Modelli A1226 e A1260 Scocca Display Frontale: passo 12, immagine 1 di 1
    • Disconnect the iSight cable from the logic board by sliding the cable to the left and out of its connector.

  13. Questo passaggio è privo di traduzione. Aiuta a tradurlo

    MacBook Pro 15" Core 2 Duo Modelli A1226 e A1260 Scocca Display Frontale: passo 13, immagine 1 di 1
    • Support the display with one hand while removing the following screws:

    • One 9.5 mm silver T6 Torx screw with threads on only 3 mm of the shaft on the inside of the display hinges.

    • One 9.5 mm silver T6 Torx screw with threads on the entire shaft on the outside of the left hinge.

    • One 9.2 mm full thread T6 Torx screw securing the iSight cable ground loop to the fan.

  14. Questo passaggio è privo di traduzione. Aiuta a tradurlo

    MacBook Pro 15" Core 2 Duo Modelli A1226 e A1260 Scocca Display Frontale: passo 14, immagine 1 di 1
    • Disconnect the inverter cable from the left I/O board by placing a spudger beneath the cable and lifting up.

  15. Questo passaggio è privo di traduzione. Aiuta a tradurlo

    MacBook Pro 15" Core 2 Duo Modelli A1226 e A1260 Scocca Display Frontale: passo 15, immagine 1 di 2 MacBook Pro 15" Core 2 Duo Modelli A1226 e A1260 Scocca Display Frontale: passo 15, immagine 2 di 2
    • Disconnect the display data cable from the logic board.

    • Remove the foam bumper from the top of the right hinge of the display.

  16. Questo passaggio è privo di traduzione. Aiuta a tradurlo

    MacBook Pro 15" Core 2 Duo Modelli A1226 e A1260 Scocca Display Frontale: passo 16, immagine 1 di 1
    • Remove the silver 9.2 mm T6 Torx securing the ground loop in the display data cable to the casing.

  17. Questo passaggio è privo di traduzione. Aiuta a tradurlo

    MacBook Pro 15" Core 2 Duo Modelli A1226 e A1260 Scocca Display Frontale: passo 17, immagine 1 di 1
    • Support the display with one hand while removing the following screw:

    • One 9.5 mm silver T6 Torx screw with threads on only 3 mm of the shaft on the inside of the display hinges.

  18. Questo passaggio è privo di traduzione. Aiuta a tradurlo

    MacBook Pro 15" Core 2 Duo Modelli A1226 e A1260 Scocca Display Frontale: passo 18, immagine 1 di 1
    • Grasp the display assembly on both sides and lift it up and out of the computer.

  19. Questo passaggio è privo di traduzione. Aiuta a tradurlo

    MacBook Pro 15" Core 2 Duo Modelli A1226 e A1260 Scocca Display Frontale: passo 19, immagine 1 di 2 MacBook Pro 15" Core 2 Duo Modelli A1226 e A1260 Scocca Display Frontale: passo 19, immagine 2 di 2
    • Remove the 4.5 mm Phillips screws from the lower left and right corners of the display (two screws total). These screws have a .8 mm thick head.

  20. Questo passaggio è privo di traduzione. Aiuta a tradurlo

    MacBook Pro 15" Core 2 Duo Modelli A1226 e A1260 Scocca Display Frontale: passo 20, immagine 1 di 3 MacBook Pro 15" Core 2 Duo Modelli A1226 e A1260 Scocca Display Frontale: passo 20, immagine 2 di 3 MacBook Pro 15" Core 2 Duo Modelli A1226 e A1260 Scocca Display Frontale: passo 20, immagine 3 di 3
    • Insert the flat end of a spudger perpendicular to the face of the display between the plastic strip attached to the rear bezel and the front bezel.

    • Do not insert your spudger between the plastic strip and the rear bezel.

    • With the spudger still inserted, rotate it away from the display to separate the front and rear bezels.

    • Work along the right edge of the display until the rear bezel is evenly separated from the front bezel.

  21. Questo passaggio è privo di traduzione. Aiuta a tradurlo

    MacBook Pro 15" Core 2 Duo Modelli A1226 e A1260 Scocca Display Frontale: passo 21, immagine 1 di 2 MacBook Pro 15" Core 2 Duo Modelli A1226 e A1260 Scocca Display Frontale: passo 21, immagine 2 di 2
    • Insert your spudger between the front and rear display bezels at the lower right corner of the display.

    • Pry the rear bezel away from the front bezel to slightly separate the bottom edge of the rear display bezel.

  22. Questo passaggio è privo di traduzione. Aiuta a tradurlo

    MacBook Pro 15" Core 2 Duo Modelli A1226 e A1260 Scocca Display Frontale: passo 22, immagine 1 di 2 MacBook Pro 15" Core 2 Duo Modelli A1226 e A1260 Scocca Display Frontale: passo 22, immagine 2 di 2
    • Insert the flat end of a spudger into the gap between the rear display bezel and the clutch cover.

    • Twist the spudger to separate the lower edge of the rear display bezel from the clutch cover.

    • Work along the lower edge of the rear bezel until it is evenly separated from the clutch cover.

  23. Questo passaggio è privo di traduzione. Aiuta a tradurlo

    MacBook Pro 15" Core 2 Duo Modelli A1226 e A1260 Scocca Display Frontale: passo 23, immagine 1 di 3 MacBook Pro 15" Core 2 Duo Modelli A1226 e A1260 Scocca Display Frontale: passo 23, immagine 2 di 3 MacBook Pro 15" Core 2 Duo Modelli A1226 e A1260 Scocca Display Frontale: passo 23, immagine 3 di 3
    • Now that the right and bottom edges of the rear bezel are slightly separated from the front bezel, use a spudger to pop the rear bezel off the tabs near the lower right corner of the display.

  24. Questo passaggio è privo di traduzione. Aiuta a tradurlo

    MacBook Pro 15" Core 2 Duo Modelli A1226 e A1260 Scocca Display Frontale: passo 24, immagine 1 di 2 MacBook Pro 15" Core 2 Duo Modelli A1226 e A1260 Scocca Display Frontale: passo 24, immagine 2 di 2
    • Insert the flat end of a spudger between the front bezel and the plastic strip attached to the rear bezel near the screw holes at the bottom corners of the display.

    • Rotate your spudger toward the rear bezel to separate it from the front bezel.

    • If necessary, continue separating the left edge of the rear bezel off the tabs on the front display bezel.

  25. Questo passaggio è privo di traduzione. Aiuta a tradurlo

    MacBook Pro 15" Core 2 Duo Modelli A1226 e A1260 Scocca Display Frontale: passo 25, immagine 1 di 1
  26. Questo passaggio è privo di traduzione. Aiuta a tradurlo

    MacBook Pro 15" Core 2 Duo Modelli A1226 e A1260 Scocca Display Frontale: passo 26, immagine 1 di 1
    • Use the tip of a spudger to lift the LED driver board out of the clutch cover.

  27. Questo passaggio è privo di traduzione. Aiuta a tradurlo

    MacBook Pro 15" Core 2 Duo Modelli A1226 e A1260 Scocca Display Frontale: passo 27, immagine 1 di 1
    • Disconnect the backlight cable by pulling its connector away from the socket on the LED driver board.

  28. Questo passaggio è privo di traduzione. Aiuta a tradurlo

    MacBook Pro 15" Core 2 Duo Modelli A1226 e A1260 Scocca Display Frontale: passo 28, immagine 1 di 1
    • Do not put any excessive strain on the LED driver cable ground loop. It is a very thin and delicate wire that is easily broken.

    • Disconnect the LED driver cable by pulling its connector away from the socket on the inverter board.

    • Remove the LED driver board and set it aside.

  29. Questo passaggio è privo di traduzione. Aiuta a tradurlo

    MacBook Pro 15" Core 2 Duo Modelli A1226 e A1260 Scocca Display Frontale: passo 29, immagine 1 di 2 MacBook Pro 15" Core 2 Duo Modelli A1226 e A1260 Scocca Display Frontale: passo 29, immagine 2 di 2
    • Remove the two pieces of kapton tape covering the display data cable.

    • Remove the strip of tape securing the iSight cable to the LCD.

    • Peel the three antenna straps off the lower edge of the LCD.

  30. Questo passaggio è privo di traduzione. Aiuta a tradurlo

    MacBook Pro 15" Core 2 Duo Modelli A1226 e A1260 Scocca Display Frontale: passo 30, immagine 1 di 1
    • Disconnect the display data cable by pulling its connector toward the bottom edge of the display, away from the socket on the LCD.

  31. Questo passaggio è privo di traduzione. Aiuta a tradurlo

    MacBook Pro 15" Core 2 Duo Modelli A1226 e A1260 Scocca Display Frontale: passo 31, immagine 1 di 1
    • Remove the two Phillips screws securing the ground straps for the display data cable and LED driver board cable to the clutch cover.

  32. Questo passaggio è privo di traduzione. Aiuta a tradurlo

    MacBook Pro 15" Core 2 Duo Modelli A1226 e A1260 Scocca Display Frontale: passo 32, immagine 1 di 1
    • Remove the Phillips screw hidden behind the display data cable.

  33. Questo passaggio è privo di traduzione. Aiuta a tradurlo

    MacBook Pro 15" Core 2 Duo Modelli A1226 e A1260 Scocca Display Frontale: passo 33, immagine 1 di 1
    • Remove the three Phillips screws behind antenna straps along the bottom edge of the display.

  34. Questo passaggio è privo di traduzione. Aiuta a tradurlo

    MacBook Pro 15" Core 2 Duo Modelli A1226 e A1260 Scocca Display Frontale: passo 34, immagine 1 di 1
    • To remove the clutch assembly, first insert the flat end of a spudger into the gap between the clutch hinge and the clutch cover where the cables exit.

    • While prying the clutch assembly away from the clutch hinge with your spudger, use a plastic opening tool to increase the gap between the clutch cover and the front display bezel.

    • Work your way along the length of the clutch cover to fully separate the adhesive.

  35. Questo passaggio è privo di traduzione. Aiuta a tradurlo

    MacBook Pro 15" Core 2 Duo Modelli A1226 e A1260 Scocca Display Frontale: passo 35, immagine 1 di 2 MacBook Pro 15" Core 2 Duo Modelli A1226 e A1260 Scocca Display Frontale: passo 35, immagine 2 di 2
    • Push the clutch assembly off each of the clutch hinges and remove it from the display.

  36. Questo passaggio è privo di traduzione. Aiuta a tradurlo

    MacBook Pro 15" Core 2 Duo Modelli A1226 e A1260 Scocca Display Frontale: passo 36, immagine 1 di 1
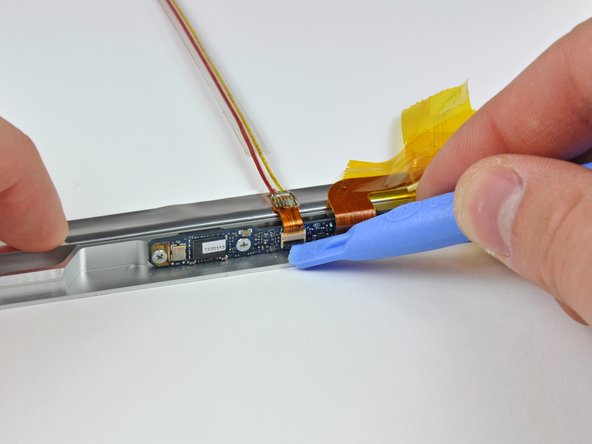
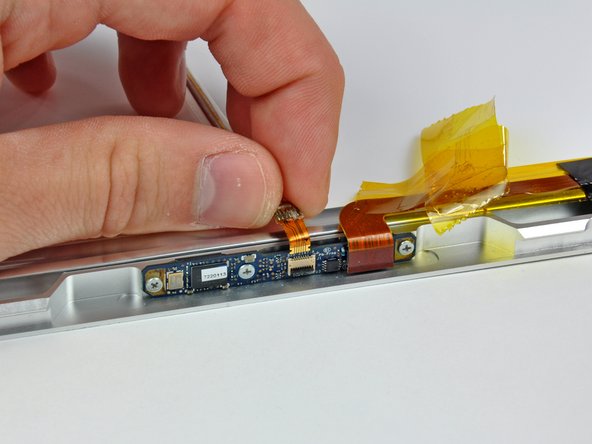
    • Peel back the pieces of tape covering the iSight cable.

    • Hold the iSight cable down as you peel back the tape. It is not necessary to completely remove the tape.

  37. Questo passaggio è privo di traduzione. Aiuta a tradurlo

    MacBook Pro 15" Core 2 Duo Modelli A1226 e A1260 Scocca Display Frontale: passo 37, immagine 1 di 3 MacBook Pro 15" Core 2 Duo Modelli A1226 e A1260 Scocca Display Frontale: passo 37, immagine 2 di 3 MacBook Pro 15" Core 2 Duo Modelli A1226 e A1260 Scocca Display Frontale: passo 37, immagine 3 di 3
    • Use the edge of a plastic opening tool to flip up the ZIF cable lock.

    • Slide the iSight cable out of its socket.

  38. Questo passaggio è privo di traduzione. Aiuta a tradurlo

    MacBook Pro 15" Core 2 Duo Modelli A1226 e A1260 Scocca Display Frontale: passo 38, immagine 1 di 1
    • Remove the iSight cable from the display.

  39. Questo passaggio è privo di traduzione. Aiuta a tradurlo

    MacBook Pro 15" Core 2 Duo Modelli A1226 e A1260 Scocca Display Frontale: passo 39, immagine 1 di 1
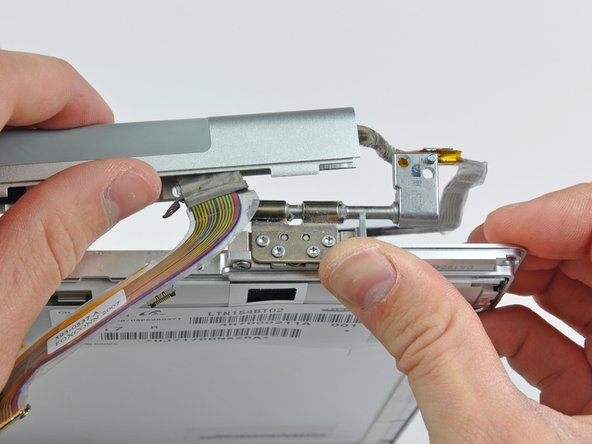
    • Remove the four T6 Torx screws securing the left clutch hinge to the front display bezel.

  40. Questo passaggio è privo di traduzione. Aiuta a tradurlo

    MacBook Pro 15" Core 2 Duo Modelli A1226 e A1260 Scocca Display Frontale: passo 40, immagine 1 di 1
    • Remove the left clutch hinge from the front display bezel.

  41. Questo passaggio è privo di traduzione. Aiuta a tradurlo

    MacBook Pro 15" Core 2 Duo Modelli A1226 e A1260 Scocca Display Frontale, Cornice pannello frontale: passo 41, immagine 1 di 1
    • De-route the display data cable from the right clutch hinge and set it aside.

  42. Questo passaggio è privo di traduzione. Aiuta a tradurlo

    MacBook Pro 15" Core 2 Duo Modelli A1226 e A1260 Scocca Display Frontale: passo 42, immagine 1 di 2 MacBook Pro 15" Core 2 Duo Modelli A1226 e A1260 Scocca Display Frontale: passo 42, immagine 2 di 2
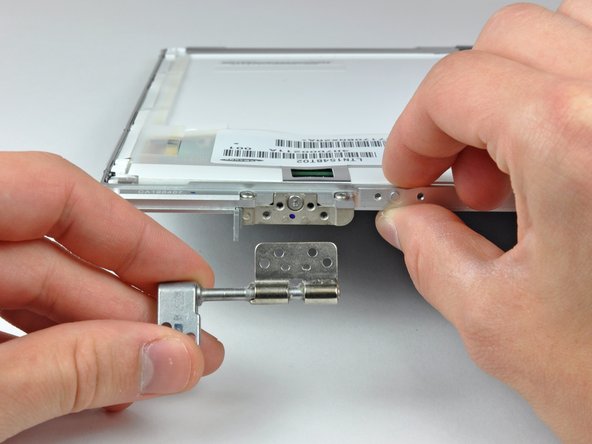
    • Remove the four T6 Torx screws securing the right clutch hinge to the front display bezel.

    • Remove the right clutch hinge and set it aside.

  43. Questo passaggio è privo di traduzione. Aiuta a tradurlo

    MacBook Pro 15" Core 2 Duo Modelli A1226 e A1260 Scocca Display Frontale: passo 43, immagine 1 di 2 MacBook Pro 15" Core 2 Duo Modelli A1226 e A1260 Scocca Display Frontale: passo 43, immagine 2 di 2
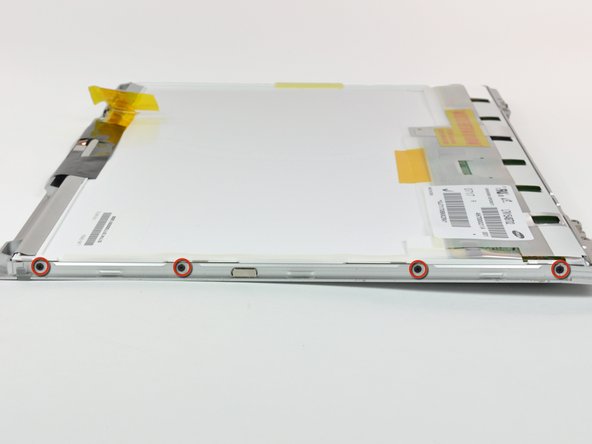
    • Remove the four Phillips screws from each side of the display (eight screws total).

  44. Questo passaggio è privo di traduzione. Aiuta a tradurlo

    MacBook Pro 15" Core 2 Duo Modelli A1226 e A1260 Scocca Display Frontale: passo 44, immagine 1 di 2 MacBook Pro 15" Core 2 Duo Modelli A1226 e A1260 Scocca Display Frontale: passo 44, immagine 2 di 2
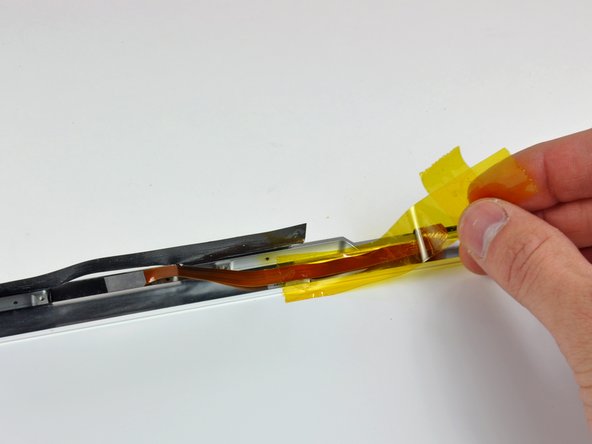
    • Peel the large piece of tape near the display latch off the top edge of the LCD.

    • It is not necessary to completely remove this piece of tape.

    • Remove the pieces of tape securing the camera ribbon cable to the display.

  45. Questo passaggio è privo di traduzione. Aiuta a tradurlo

    MacBook Pro 15" Core 2 Duo Modelli A1226 e A1260 Scocca Display Frontale: passo 45, immagine 1 di 1
    • The next few steps will require you to separate the LCD from the adhesive applied to the upper and lower edges of the front bezel.

    • The adhesive is applied such that it sticks to a thin steel strip around the perimeter of the LCD. When prying your LCD away from the front panel, be sure you are separating the front panel from the steel strip on the LCD.

    • Use the flat end of a spudger to gently lift one of the top corners of the LCD out of the front bezel.

  46. Questo passaggio è privo di traduzione. Aiuta a tradurlo

    MacBook Pro 15" Core 2 Duo Modelli A1226 e A1260 Scocca Display Frontale: passo 46, immagine 1 di 1
    • Work your way along the top edge of the LCD, slowly prying the attached steel strip away from the front bezel.

    • Continue prying the LCD off the front bezel along the left side of the display.

  47. Questo passaggio è privo di traduzione. Aiuta a tradurlo

    MacBook Pro 15" Core 2 Duo Modelli A1226 e A1260 Scocca Display Frontale: passo 47, immagine 1 di 1
    • Now that the top edge is free, slightly lift the LCD out of the front bezel for enough room to pry the steel strip along the lower edge of the LCD away from the front bezel.

    • Pry along the lower edge of the LCD until it is freed from the adhesive on the front bezel.

  48. Questo passaggio è privo di traduzione. Aiuta a tradurlo

    MacBook Pro 15" Core 2 Duo Modelli A1226 e A1260 Scocca Display Frontale: passo 48, immagine 1 di 2 MacBook Pro 15" Core 2 Duo Modelli A1226 e A1260 Scocca Display Frontale: passo 48, immagine 2 di 2
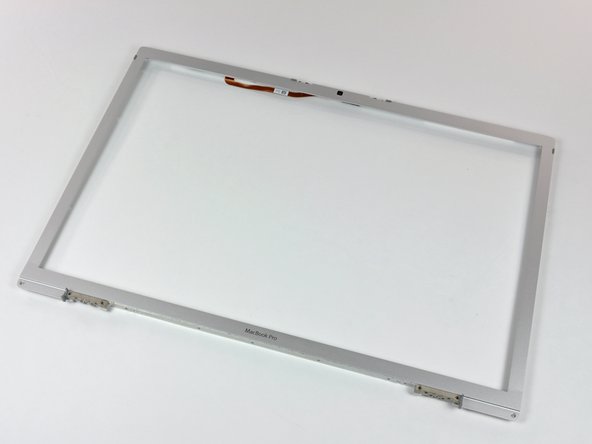
    • Lift the LCD out of the front bezel, minding any cables that may get caught.

    • Front bezel remains.

Conclusione

Per riassemblare il tuo dispositivo, segui le istruzioni al contrario.

Altre 31 persone hanno completato questa guida.

Un ringraziamento speciale a questi traduttori:

en it

33%

Questi traduttori ci stanno aiutando ad aggiustare il mondo! Vuoi partecipare?
Inizia a tradurre ›

Un commento

Some advice on re-threading some of the wires would be helpful when putting things back together. Or when you are taking the display off, pay attention to how the cables are threaded through the hinges.

kunalrambhia - Replica

Aggiungi Commento

Visualizza Statistiche:

Ultime 24 Ore: 0

Ultimi 7 Giorni: 4

Ultimi 30 Giorni: 15

Tutti i Tempi: 35,397