Introduzione
Segui questa guida per riaprare il trackpad danneggiato.
Cosa ti serve
-
-
Rimuovi le dieci viti seguenti, che fissano il case inferiore al MacBook Pro Unibody da 13":
-
Sette viti con testa a croce da 3 mm.
-
Tre viti con testa a croce da 13,5 mm.
-
-
-
Solleva leggermente il case inferiore e spingilo verso la parte posteriore del computer per liberare le linguette di montaggio.
-
-
-
Svita le seguenti viti tri-point che fissano la batteria al case posteriore:
-
Una vite tri-point da 5,5 mm
-
Una vite tri-point da 13,5 mm
-
-
-
-
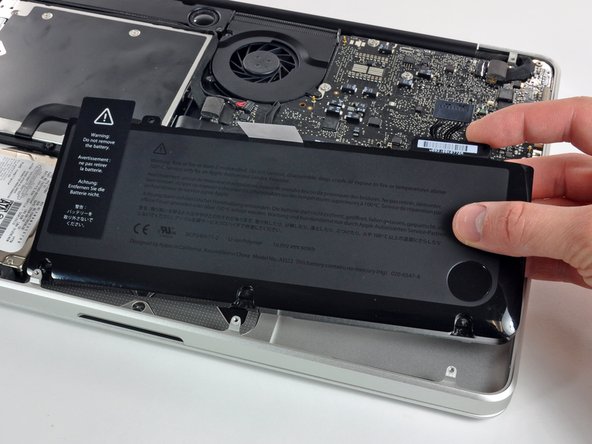
Solleva la batteria dal case superiore.
-
Carica al 100% e poi tieni sotto carica almeno altre due ore. Quindi stacca l'alimentazione e usa il laptop normalmente per farlo scaricare. All'avviso di batteria in esaurimento, salva il lavoro corrente e tieni acceso il MacBook finché non si iberna perché è scarico. Aspetta almeno altre 5 ore, poi carica il laptop ininterrottamente fino al 100%.
-
Se noti qualsiasi problema o comportamento inusuale dopo l'installazione di una nuova batteria, può essere necessario resettare l'SMC del tuo MacBook.
-
-
-
Usa la parte piatta di uno spudger per scollegare attentamente il connettore del trackpad dalla sua presa sulla scheda madre.
-
-
-
Se necessario, solleva il bordo del trackpad più vicino alla tastiera dal suo alloggio nella copertura superiore spingendolo via dal supporto attaccato alla copertura superiore.
-
Spingi attentamente il cavo del trackpad e il suo connettore attraverso l'apertura nella copertura superiore.
-
Potrebbe essere necessario usare uno spudger per aiutare il connettore del trackpad a superare il bordo della scheda madre.
-
Una volta sfilato del tutto il cavo dalla sua apertura nella copertura superiore, tira il trackpad via dal bordo anteriore della copertura superiore e rimuovilo dal portatile.
-
-
-
Per rimuovere il cavo a nastro dal trackpad originale, prima apri l'aletta sul connettore ZIF, dalla parte opposta al cavo. Quindi scalda l'adesivo che fissa il cavo al trackpad con un asciugacapelli o un iOpener per ammorbidirlo, separa delicatamente l'adesivo e rimuovi il cavo.
-
-
-
Infine riavvita le quattro viti a croce Phillips da 1,2 mm sul bordo interno interno del trackpad.
-
Controlla che il trackpad sia allineato dalla parte della tastiera della copertura superiore. Una volta centrato il trackpad nella copertura superiore, stringi del tutto le quattro viti a croce Phillips.
-
Per riassemblare il dispositivo, segui le istruzioni nell'ordine inverso.
Per riassemblare il dispositivo, segui le istruzioni nell'ordine inverso.
Annulla: non ho completato questa guida.
Altre 149 persone hanno completato questa guida.
Un ringraziamento speciale a questi traduttori:
100%
Acn0w ci sta aiutando ad aggiustare il mondo! Vuoi partecipare?
Inizia a tradurre ›
10 Commenti
Bought a new trackpad, installed it, fiddled with centering it, loosened the click adjuster screw and it would hardly click if I pressed real hard, just like the old trackpad. Problem solved by putting two 1/32" thick sticky pads under battery where the battery sits on the macbook frame near the lower bottom edge. The battery was new and not swollen but is was still too thick. Didn't need the new trackpad but now I have a spare.
The removal and installation went exactly as described, and the new trackpad worked correctly the first time. The toughest part - truly, not all that difficult - was manipulating the four screws that hold the trackpad in place. I don't think I've seen such small threaded fasteners since I went to a watch museum!
Would a swollen battery cause the track pad to seemingly pop out of the top of my 2010 MBP? Right side of trackpad is lifted the worst, top is slightly raised. The four corners and left side are seemingly flush with the rest of the computer. Trackpad works fine, other than no click...still has perfect movement.
That is indeed a common symptom of a swollen battery, you can pop the rear case off of your laptop and peek at the battery, and even take it out for a moment, if it looks swollen, you should probably replace it.


