Questa versione può contenere modifiche errate. Passa all'ultima istantanea verificata.
Cosa ti serve
-
-
Rimuovi le dieci viti seguenti, che fissano il case inferiore al MacBook Pro Unibody da 13":
-
Sette viti con testa a croce da 3 mm.
-
Tre viti con testa a croce da 13,5 mm.
-
-
-
Solleva leggermente il case inferiore e spingilo verso la parte posteriore del computer per liberare le linguette di montaggio.
-
-
-
Mediante l'estremità piatta di uno spudger, sollevare il connettore del cavo della batteria dal connettore femmina sulla scheda logica staccandolo da questa.
-
-
-
Rimuovi le due viti con testa a croce che fissano la staffa del disco rigido al case superiore.
-
-
-
Questo passaggio è privo di traduzione. Aiuta a tradurlo
-
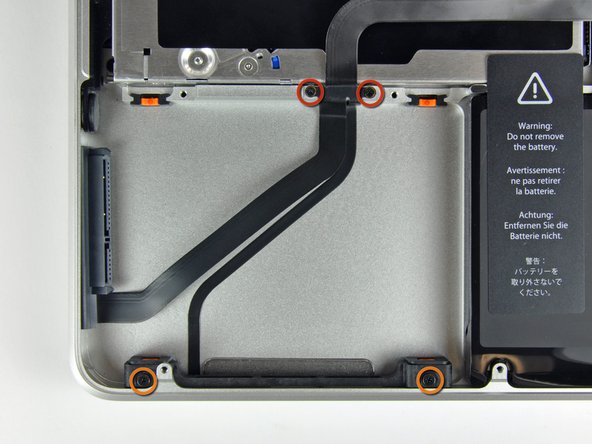
Remove the following four screws securing the hard drive and IR sensor cable to the upper case:
-
Two 1.5 mm Phillips screws.
-
Two 9.5 mm Phillips screws.
-
-
Questo passaggio è privo di traduzione. Aiuta a tradurlo
-
Slide the hard drive and IR sensor bracket away from the edge of the upper case.
-
Carefully peel the hard drive and IR sensor cable from the upper case.
-
-
Questo passaggio è privo di traduzione. Aiuta a tradurlo
-
Use the flat end of a spudger to pry the hard drive cable connector up off the logic board.
-
-
Questo passaggio è privo di traduzione. Aiuta a tradurlo
-
Lift the hard drive/IR sensor cable assembly out of the upper case.
-


Annulla: non ho completato questa guida.
Altre 292 persone hanno completato questa guida.

7 Commenti
Used a Phillips #00 and a creditcard. It's an easy job, takes about 10 minutes. :)
In step #8 the two small screws were very tight in my computer. The Phillips #00 was too large and damaging the screws. I changed to a Phillips #000 applied substantial pressure and voila, the screws came off.
Reassembly: placing the IR sensor cable (the one you"peeled off" in step #9) is a bit tricky. Start from the side opposite the IR sensor (the side with the two small screws of step 8) and press first along the short vertical side and then across towards the IR section. There should be a little left for a vertical section at the IR sensor end.
if i change the HDD cable and get the same results what could be the the real problem , because the original problem as we all know was the we were getting the question mark on the white screen .