Salta al contenuto principale

MacBook Pro 13" Retina Display Mid 2014 Right Speaker Replacement

Cosa ti serve

  1. MacBook Pro 13" Retina Display Mid 2014 Right Speaker Replacement, Lower Case: passo 1, immagine 1 di 1
    Attrezzo utilizzato in questo passaggio:
    Magnetic Project Mat
    $19.95
    Compra
    • Remove the following ten screws securing the lower case to the upper case:

    • Two 2.3 mm P5 Pentalobe screws

    • Eight 3.0 mm P5 Pentalobe screws

    • Throughout this repair, keep track of each screw and make sure it goes back exactly where it came from to avoid damaging your device.

  2. MacBook Pro 13" Retina Display Mid 2014 Right Speaker Replacement: passo 2, immagine 1 di 1
    • Wedge your fingers between the upper case and the lower case.

    • Gently pull the lower case away from the upper case to remove it.

  3. MacBook Pro 13" Retina Display Mid 2014 Right Speaker Replacement: passo 3, immagine 1 di 2 MacBook Pro 13" Retina Display Mid 2014 Right Speaker Replacement: passo 3, immagine 2 di 2
    • The lower case is connected to the upper case with two plastic clips near its center.

    • During reassembly, gently push down the center of the lower case to reattach the two plastic clips.

  4. MacBook Pro 13" Retina Display Mid 2014 Right Speaker Replacement, Battery Connector: passo 4, immagine 1 di 1
    • If necessary, remove the plastic cover adhered to the battery contact board.

  5. MacBook Pro 13" Retina Display Mid 2014 Right Speaker Replacement: passo 5, immagine 1 di 2 MacBook Pro 13" Retina Display Mid 2014 Right Speaker Replacement: passo 5, immagine 2 di 2
    • Use the flat end of a spudger to lift the battery connector straight up out of its socket on the logic board.

    • Be sure you lift up only on the connector itself, not the socket, or you risk permanent damage to the logic board.

  6. MacBook Pro 13" Retina Display Mid 2014 Right Speaker Replacement: passo 6, immagine 1 di 1
    • Bend the battery connector up out of the way to prevent accidental contact with its socket during your repair.

  7. MacBook Pro 13" Retina Display Mid 2014 Right Speaker Replacement, Right Speaker: passo 7, immagine 1 di 1
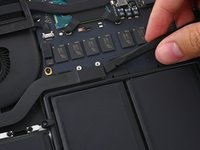
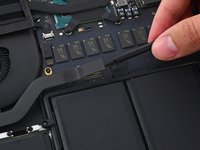
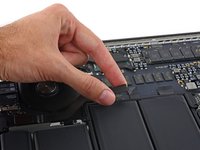
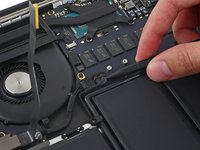
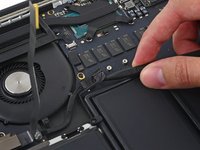
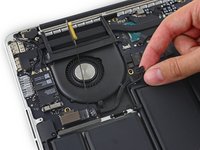
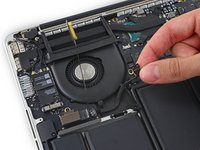
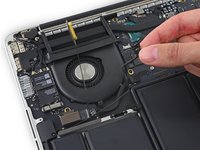
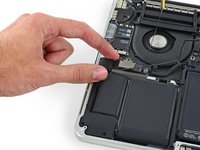
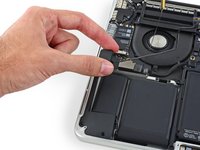
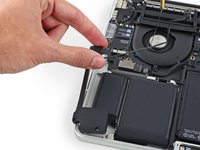
    • Remove the two 2.1 mm T5 Torx screws securing the logic board end of the I/O board cable bracket.

  8. MacBook Pro 13" Retina Display Mid 2014 Right Speaker Replacement: passo 8, immagine 1 di 1
    • Grasp the I/O board cable bracket with a pair of tweezers and remove it from the MacBook.

  9. MacBook Pro 13" Retina Display Mid 2014 Right Speaker Replacement: passo 9, immagine 1 di 2 MacBook Pro 13" Retina Display Mid 2014 Right Speaker Replacement: passo 9, immagine 2 di 2
    • Use the flat end of a spudger to pop the I/O board connector straight up off its socket on the logic board.

    • Be careful to only pry up on the I/O board cable, not on the socket itself or you risk damaging your logic board.

  10. MacBook Pro 13" Retina Display Mid 2014 Right Speaker Replacement: passo 10, immagine 1 di 2 MacBook Pro 13" Retina Display Mid 2014 Right Speaker Replacement: passo 10, immagine 2 di 2
    • Lift the logic board end of the I/O board cable straight up to bend it out of the way.

    • To avoid damage to the cable, fold only at the bend in the I/O board end of the cable.

  11. MacBook Pro 13" Retina Display Mid 2014 Right Speaker Replacement: passo 11, immagine 1 di 2 MacBook Pro 13" Retina Display Mid 2014 Right Speaker Replacement: passo 11, immagine 2 di 2
    • Carefully tuck the tip of a spudger under the right speaker cable near the connector and lift it up out of its socket on the logic board.

  12. MacBook Pro 13" Retina Display Mid 2014 Right Speaker Replacement: passo 12, immagine 1 di 3 MacBook Pro 13" Retina Display Mid 2014 Right Speaker Replacement: passo 12, immagine 2 di 3 MacBook Pro 13" Retina Display Mid 2014 Right Speaker Replacement: passo 12, immagine 3 di 3
    • Carefully peel the right speaker cable off the upper case.

  13. MacBook Pro 13" Retina Display Mid 2014 Right Speaker Replacement: passo 13, immagine 1 di 1
    • Remove the following screws securing the right speaker to the upper case:

    • One 5.7 mm T5 Torx screw

    • One 6.5 mm T5 Torx screw

    • One 3.8 mm T5 Torx screw

  14. MacBook Pro 13" Retina Display Mid 2014 Right Speaker Replacement: passo 14, immagine 1 di 3 MacBook Pro 13" Retina Display Mid 2014 Right Speaker Replacement: passo 14, immagine 2 di 3 MacBook Pro 13" Retina Display Mid 2014 Right Speaker Replacement: passo 14, immagine 3 di 3
    • Lift the right speaker from the cable end and pull it free from the case.

Conclusione

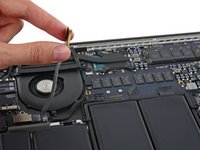
To reassemble your device, follow these instructions in reverse order.

Altre 45 persone hanno completato questa guida.

Sam Goldheart

Membro da: 10/18/12

465.243 Reputazione

538 Guide realizzate

Team

iFixit Membro di iFixit

Staff

136 Membri

16.566 Guide realizzate

Un commento

Ottima guida. La sostituzione dello speaker destro nel MacBook Mid Pro 2014 è semplice. Direi che non occorrono più di 20 minuti.

Grazie all'autore!

flavio - Replica

Aggiungi Commento

Visualizza Statistiche:

Ultime 24 Ore: 10

Ultimi 7 Giorni: 62

Ultimi 30 Giorni: 239

Tutti i Tempi: 34,787