Salta al contenuto principale

Questa versione può contenere modifiche errate. Passa all'ultima istantanea verificata.

Cosa ti serve

  1. , Case inferiore: passo 1, immagine 1 di 1
    Attrezzo utilizzato in questo passaggio:
    Magnetic Project Mat
    $19.95
    Compra
    • Rimuovi le 10 viti seguenti che fissano il coperchio inferiore al case superiore:

    • Due viti Pentalobe da 2,3 mm

    • Otto viti Pentalobe da 3,0 mm

    • Nel corso dell'intera procedura, tieni traccia di ogni vite e accertati che ritorni esattamente al suo posto per evitare di danneggiare il dispositivo.

  2. : passo 2, immagine 1 di 1
    • Infila le tue dita tra il case superiore e quello inferiore.

    • Con delicatezza, tira il coperchio inferiore per staccarlo da quello superiore.

    • Rimuovi il case inferiore e mettilo da parte.

  3. : passo 3, immagine 1 di 3 : passo 3, immagine 2 di 3 : passo 3, immagine 3 di 3
    • Durante il rimontaggio, spingi con delicatezza il centro del case inferiore per riattaccare le due clip in plastica.

    • Il case inferiore è collegato a quello superiore con due clip di plastica in posizione centrale.

  4. , Connettore batteria: passo 4, immagine 1 di 1
    • Rimuovi la copertura in plastica attaccata alla scheda dei contatti della batteria.

  5. : passo 5, immagine 1 di 1
    • Rimuovi le seguenti viti che fissano la scheda del connettore della batteria alla scheda logica:

    • Due viti Torx T6 da 2,8 mm

    • Una vite a colletto Torx T6 da 7,0 mm

  6. : passo 6, immagine 1 di 2 : passo 6, immagine 2 di 2
    • Usa delle pinzette per rimuovere il piccolo coperchio in plastica posizionato vicino alla parte inferiore destra della scheda del connettore della batteria.

  7. : passo 7, immagine 1 di 1
    • Rimuovi la vite a testa larga Torx T6 da 6,4 mm che fissa il connettore della batteria al gruppo della scheda logica.

  8. : passo 8, immagine 1 di 2 : passo 8, immagine 2 di 2
    • Solleva con delicatezza dalla scheda logica la scheda del connettore della batteria.

    • Si raccomanda di piegare poco i cavi della batteria, quanto basta per tenere la scheda sospesa sopra alla scheda logica, dove non dà fastidio.

    • Non ribaltate completamente la scheda e non piegati i cavi, perché questo potrebbe danneggiare la batteria.

  9. , Scheda contatti batteria: passo 9, immagine 1 di 2 , Scheda contatti batteria: passo 9, immagine 2 di 2
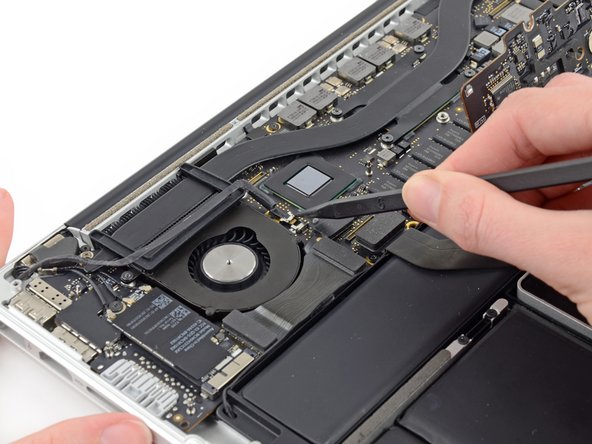
    • Afferra con delle pinzette l'interposer.

    • Interposer è il nome di un'interfaccia elettrica che collega una connessione elettrica ad un'altra. In questa riparazione è la scheda che connette la batteria alla scheda logica.

    • Solleval'interposer dalla scheda logica e rimuovilo.

    • La rimozione di questa scheda assicura che la batteria resti disconnesso durante la tua riparazione, evitando del tuo computer possa accidentalmente accendersi. È anche una buona idea allontanarlo in modo che non possa ricadere inaspettatamente.

  10. Questo passaggio è privo di traduzione. Aiuta a tradurlo

    : passo 10, immagine 1 di 2 : passo 10, immagine 2 di 2
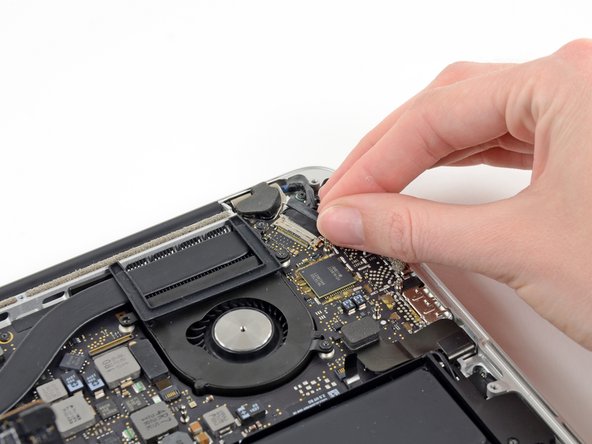
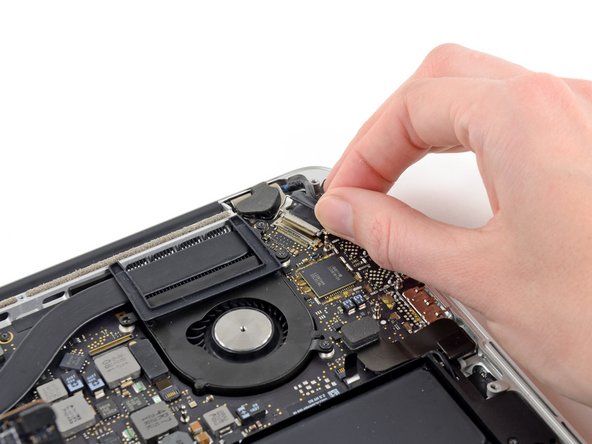
    • Use the tip of a spudger to push the iSight camera cable connector straight away from its socket on the logic board.

    • It is recommended to carefully push on both sides of the connector to "walk" it out of its socket.

  11. Questo passaggio è privo di traduzione. Aiuta a tradurlo

    : passo 11, immagine 1 di 1
    • Move the iSight camera cable aside.

  12. Questo passaggio è privo di traduzione. Aiuta a tradurlo

    : passo 12, immagine 1 di 3 : passo 12, immagine 2 di 3 : passo 12, immagine 3 di 3
    • Use the flat end of a spudger to pry and disconnect the three antenna cable connectors from the AirPort board.

    • The three cables are coded with black sleeves of different lengths. During reassembly:

    • Connect the long-sleeved cable to the socket closest to the ports.

    • The short-sleeved cable connects next to the screw.

    • The remaining cable has no sleeve, and connects in the last empty socket, next to the fan.

  13. Questo passaggio è privo di traduzione. Aiuta a tradurlo

    : passo 13, immagine 1 di 1
    • Move the antenna cables aside, clear of the AirPort board.

  14. Questo passaggio è privo di traduzione. Aiuta a tradurlo

    : passo 14, immagine 1 di 3 : passo 14, immagine 2 di 3 : passo 14, immagine 3 di 3
    • Grab the black pull tab secured to the display data cable lock and rotate it toward the DC-In side of the computer.

    • Pull the display data cable straight out of its socket on the logic board.

    • Do not lift up on the display data cable, as its socket is very fragile. Pull the cable parallel to the face of the logic board.

  15. Questo passaggio è privo di traduzione. Aiuta a tradurlo

    : passo 15, immagine 1 di 2 : passo 15, immagine 2 di 2
    • Use a pair of tweezers to lift the rubber hinge covers up off the right and left display hinges.

  16. Questo passaggio è privo di traduzione. Aiuta a tradurlo

    : passo 16, immagine 1 di 2 : passo 16, immagine 2 di 2
    • Remove the two 3.1 mm T5 Torx screws securing the aluminum hinge brackets.

  17. Questo passaggio è privo di traduzione. Aiuta a tradurlo

    : passo 17, immagine 1 di 2 : passo 17, immagine 2 di 2
    • Use a pair of tweezers to lift aluminum hinge brackets off the right and left display hinges.

  18. Questo passaggio è privo di traduzione. Aiuta a tradurlo

    : passo 18, immagine 1 di 2 : passo 18, immagine 2 di 2
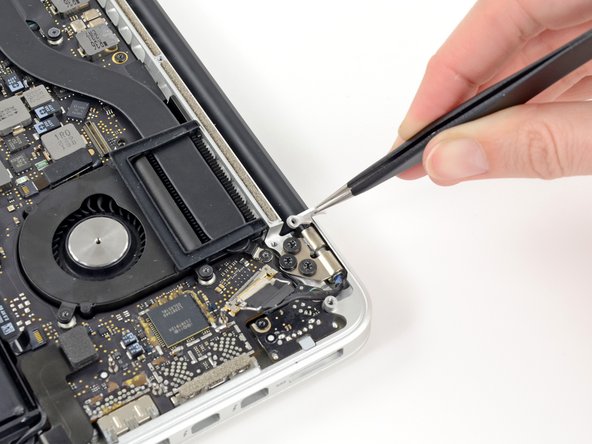
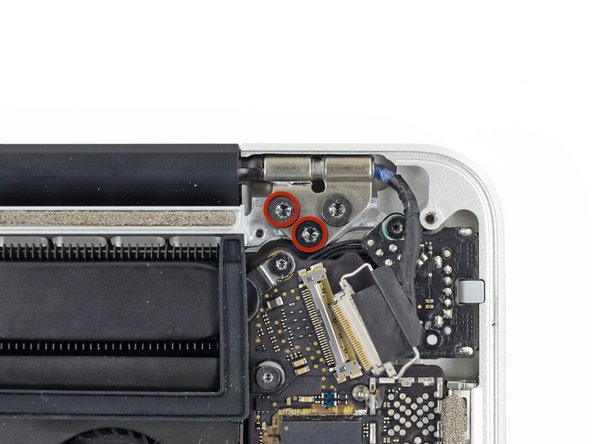
    • Remove the four inner 5.3 mm T8 Torx screws (two on each side) securing the display to the upper case.

  19. Questo passaggio è privo di traduzione. Aiuta a tradurlo

    : passo 19, immagine 1 di 2 : passo 19, immagine 2 di 2
    • Open the MacBook Pro approximately 110 degrees, and place it sideways on the table, as shown.

    • While holding the display and upper case together with your left hand, remove the remaining T8 Torx screw from the upper display bracket.

    • Be sure to hold the display and upper case together with your left hand. Failure to do so may cause the freed display/upper case to fall, potentially damaging each component.

    • Remove the last remaining T8 Torx screw securing the display to the upper case.

  20. Questo passaggio è privo di traduzione. Aiuta a tradurlo

    : passo 20, immagine 1 di 3 : passo 20, immagine 2 di 3 : passo 20, immagine 3 di 3
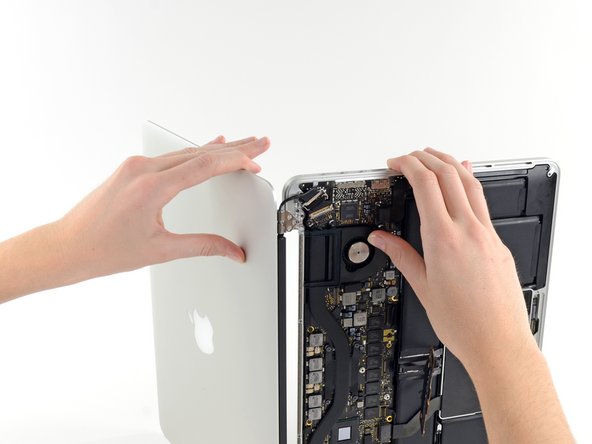
    • Grip both halves of the device, one in each hand.

    • Gently push forward on the bottom half of the device to detach it from the display assembly.

    • Carefully set each component aside, making sure to set down the lower half keyboard-side down.

Linea Traguardo

Altre 34 persone hanno completato questa guida.

Sam Goldheart

Membro da: 10/18/12

465.869 Reputazione

538 Guide realizzate

Team

iFixit Membro di iFixit

Staff

135 Membri

17.214 Guide realizzate

8 Commenti

perfect tutorial! I fixed my screen completely destroyed falling down from my hands while a was falling asleep. Bought a new one on eBay (not original but perfect with the exception of the case slightly different in color and "texture".

Thanks iFix IT!

Ciao

Ciro

Ciro - Replica

This walkthrough/guide is PERFECT! I barely tinker with electronics, but the high cost of repair made me want to try to install a new display assembly myself. Bless you, Sam Lionheart!

Virgil - Replica

This worked really well. The only issue I had was uninstalling the camera. The instructions to pull the data display cable parallel to logic board made sense in step 14. Unfortunately I didn't understand the similarities in step 10. Is it possible to repair the camera now that the slot is completely broken?

D Sh - Replica

Walk through worked perfect. Did it twice. The first time was just to make sure that wasn’t anything disconnect or any wires damage. The second time was to replace the screen. Works perfect.

Cody Milliron - Replica

Hi,

can I replace an damaged display of a MacBook Pro 13” late 2013 with a display from the early 2013 version?

I compared the high-def pictures of each cable connection and they seem to be identical, or am I wrong?

Thanks for the help.

Cheers

L

Hans Wurst - Replica

Aggiungi Commento

Visualizza Statistiche:

Ultime 24 Ore: 1

Ultimi 7 Giorni: 27

Ultimi 30 Giorni: 122

Tutti i Tempi: 55,868