Questa versione può contenere modifiche errate. Passa all'ultima istantanea verificata.
Cosa ti serve
-
-
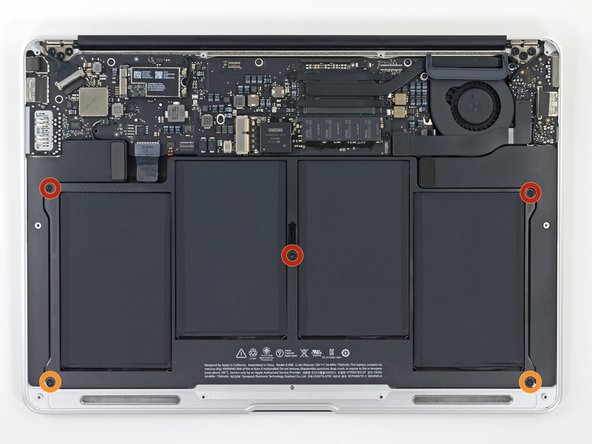
Usa un cacciavite P5 Pentalobe per rimuovere le dieci viti che tengono in posizione il case inferiore, delle seguenti lunghezze:
-
Due viti da 9 mm
-
Otto viti da 2,6 mm
-
-
-
Afferra la piccola striscia di plastica trasparente attaccata al connettore della batteria e tirala parallelamente alla scheda verso il bordo anteriore dell'Air.
-
-
-
Rimuovi le seguenti 5 viti che fissano la batteria al case superiore.
-
Tre viti Torx T5 da 6,9 mm
-
Due viti Torx T5 da 3,0 mm
-
-
-
-
Solleva la batteria dal suo angolo più vicino alla scheda logica e rimuovila dal case superiore.
-
Carica la batteria al 100% e mantienila in carica almeno altre 2 ore. Poi scollega il laptop e usalo fino a scaricare la batteria. Quando vedrai l'avviso di batteria scarica, salva il lavoro e lascia il laptop acceso finché non andrà in stand-by per via della batteria esaurita. Aspetta almeno 5 ore, poi ricarica ininterrottamente fino al 100%.
-
Se dovessi accorgerti di comportamenti inaspettati o di problemi durante l'installazione della nuova batteria, potresti aver bisogno di resettare l'SMC del tuo MacBook.
-
-
Questo passaggio è privo di traduzione. Aiuta a tradurlo
-
Use the flat end of a spudger to pry the left speaker cable connector up and out of its socket on the I/O board.
-
-
Questo passaggio è privo di traduzione. Aiuta a tradurlo
-
Use the flat end of a spudger to pry the left speaker off the adhesive securing it to the upper case.
-
Remove the left speaker from the upper case.
-
-
Questo passaggio è privo di traduzione. Aiuta a tradurlo
-
Use the flat end of a spudger to pry the I/O board cable connector up out of its socket on the I/O board.
-
Carefully peel, but do not remove, the I/O board cable off the adhesive securing it to the top of the fan.
-
-
Questo passaggio è privo di traduzione. Aiuta a tradurlo
-
Use the tip of a spudger to carefully flip up the retaining flap on the microphone ribbon cable ZIF socket.
-
Carefully push the microphone ribbon cable straight out of its socket on the I/O board.
-
-
Questo passaggio è privo di traduzione. Aiuta a tradurlo
-
Use the tip of a spudger to pry the microphone off the adhesive securing it to the left side of the upper case.
-
Remove the microphone from the upper case.
-


Annulla: non ho completato questa guida.
Altre 4 persone hanno completato questa guida.
