Questa versione può contenere modifiche errate. Passa all'ultima istantanea verificata.
Cosa ti serve
-
-
Usa un cacciavite P5 Pentalobe per rimuovere le dieci viti che tengono in posizione il case inferiore, delle seguenti lunghezze:
-
Due viti da 9 mm
-
Otto viti da 2,6 mm
-
-
-
Afferra la piccola striscia di plastica trasparente attaccata al connettore della batteria e tirala parallelamente alla scheda verso il bordo anteriore dell'Air.
-
-
-
Usa la parte piatta di uno spudger per sollevare il connettore del cavo della scheda I/O e scollegarlo dalla presa sulla scheda I/O.
-
-
-
Usa la punta di uno spudger per ruotare attentamente verso l'alto l'aletta di bloccaggio del connettore ZIF del cavo della ventola.
-
-
-
-
Scollega la scheda I/O tirando il suo cavo d'alimentazione via dalla sua presa sulla scheda madre.
-
-
Questo passaggio è privo di traduzione. Aiuta a tradurlo
-
Use the flat end of a spudger to pry each of the antenna connectors up from their sockets on the AirPort/Bluetooth card.
-
-
Questo passaggio è privo di traduzione. Aiuta a tradurlo
-
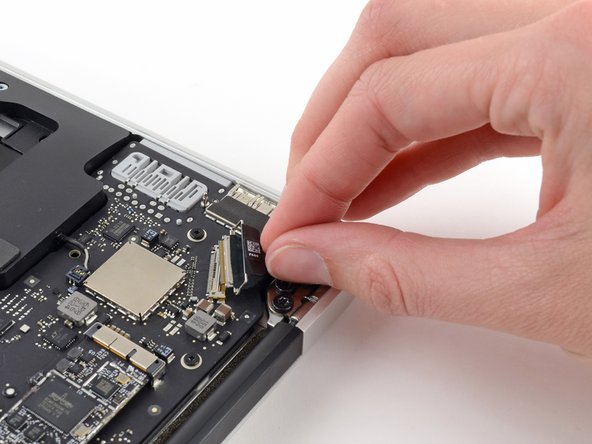
Disconnect the camera cable connector with the tip of a spudger.
-
Pull the camera cable parallel to the face of the I/O board toward the front edge of the Air to disconnect it from its socket.
-
-
Questo passaggio è privo di traduzione. Aiuta a tradurlo
-
Pull the plastic tab on the display data cable connector to unlock it.
-
-
Questo passaggio è privo di traduzione. Aiuta a tradurlo
-
Pull the display data cable connector straight out of its socket.
-
-
Questo passaggio è privo di traduzione. Aiuta a tradurlo
-
Remove the inner four (two on each side) 4.9 mm T8 Torx screws securing the right and left display hinges to the upper case.
-
-
Questo passaggio è privo di traduzione. Aiuta a tradurlo
-
Gently de-route the antenna cables out of the channel cut into the upper case.
-
-
Questo passaggio è privo di traduzione. Aiuta a tradurlo
-
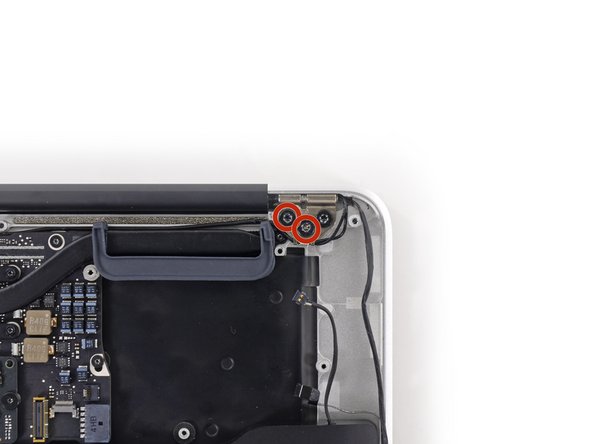
While holding the Air steady, remove the remaining 4.9 mm T8 Torx screw from the left display bracket.
-
-
Questo passaggio è privo di traduzione. Aiuta a tradurlo
-
Remove the last 4.9 mm T8 Torx screw securing the display to the upper case.
-
-
Questo passaggio è privo di traduzione. Aiuta a tradurlo
-
Open the Air slightly to allow room for the hinges to slide out of their notches.
-
Push the upper case slightly toward the display assembly, then push it back from the hinges.
-
Once the two display hinges have cleared the upper case, remove the display and set it aside.
-


Annulla: non ho completato questa guida.
Altre 39 persone hanno completato questa guida.


Un commento
Beware some of the connectors are tiny. I got it apart but broke the left speaker connection trying to get it off. Putting it back together I couldn’t get the microphone connector back together. I could live without those, but then I couldn’t connect the fan ribbon connector–I don’t know if I broke it taking it out but no go. Your mileage might vary but I killed my Mac.