Introduzione
Segui questa guida per rimuovere e sostituire in sicurezza la batteria del tuo MacBook Air di fine 2018.
Per minimizzare il rischio di danneggiamenti, accendi il tuo MacBook e consenti alla batteria di scaricarsi completamente prima di iniziare questa procedura. Una batteria agli ioni di litio carica può creare un incendio pericoloso e incontrollabile se viene forata accidentalmente. Se la tua batteria sembra gonfia o ingrossata, prendi adeguate precauzioni.
Cosa ti serve
-
-
Se il tuo MacBook funziona con Big Sur v11.1 o successive, disattivare l'Auto Boot potrebbe non funzionare. Puoi procedere normalmente, ma assicurati di scollegare la batteria appena sei dentro.
-
Usa un cacciavite pentalobe P5 per rimuovere le viti seguenti:
-
Due viti da 7,9 mm
-
Due viti da 7,1 mm
-
Sei viti da 2,6 mm
-
-
-
Infila le dita tra lo schermo e il case inferiore per sollevare dall'Air la cover stessa.
-
Rimuovi il case inferiore.
Are there any suggestions to removing the pressure fasteners more easily?
-
-
-
Stacca il nastro adesivo che copre il connettore della batteria quanto basta per scoprire lo stesso connettore.
-
-
-
Usa uno spudger per far scorrere il connettore della batteria parallelamente alla scheda logica, tirandolo fuori dal suo zoccolo sulla scheda.
Before the battery can be fully disconnected, the battery disconnect button needs to be held down. There is a gold button just above the battery socket, along with a small LED much like the 12” machines. Once this has been held down and the LED has switched off it is safe to remove the battery.
This seems like an important step?
Also, seems like this should be done after the battery is disconnected, not before? Otherwise, wouldn’t the battery re-charge it?
What if the white LED dosent light up after pressing the yellow button again?
Iron05 -
I just performed this repair on my late 2018 mac air. I did click the gold button but saw no LED illuminated or otherwise. Question- after reassembly does the button get pressed again to connect the battery? Please clarify if this button is to be pressed and if it needs pressing again after the repair.
All said - I pressed again after the battery connector clicked, assembled the back and all worked perfectly. The original issue was one dead port (no charge, no communication). The battery charge lightening bold icon was acting funny too. Genuis bar guy in Naperville said it was likely a logic board too. But it was not. The port was apparently confusing the logic board with regards to the charge function. Thanks Adam for saving me $440 and sending my computer back to Apple. I am 71 yrs young - who says an old dog can’t learn new tricks with good training!!
I didn't see Aaron's comment before completing the battery replacement. Afterwards, the computer would not turn on despite multiple SMC reset procedures. Upon double-checking the comments I see the importance of pressing the gold button. I pressed the gold button before disconnecting the new battery, then pressed it again after reconnecting for good measure. Computer booted!
It would be good of iFixit to add this important step as most people probably don't open up every single comment on (seemingly) simple steps.
Seconding Corey's comment. If paid more attention to the comment section, I would have avoided 15-30 minutes of panic. (BTW I did not notice any LED, but the golden button was easy to find).
Where is the gold button? I replaced my battery and my laptop will not start
-
-
-
Usa delle pinzette per sollevare la linguetta dell'adesivo nero sulla parte inferiore dell'altoparlante destro, quanto basta a poterla afferrare con le dita.
-
Afferra la linguetta della striscia adesiva e, lentamente e con cautela, tira fuori la striscia adesiva da sotto l'altoparlante.
-
Se la striscia adesiva si rompe, lasciala dov'è e procedi con il passo successivo.
What do you do to get the speaker to stick once you put things back together? Are these adhesive strips reusable? If not, where can we get new ones?
The strips will tend to remain edhesive in some cases but if not just use some thin double sided adhesive tape of a similar width. I will not link because I am in Australia but it isn’t hard to find. I used some heat (100°C) and a plastic spudger to aid removal or a hair dryer on lower heat. Slow and steady, it’s not hard. The strips will almost certainly break.
-
-
-
Fai scorrere la punta di uno spudger sotto il cavo dell'altoparlante destro e fai leva verso l'alto per scollegare lo speaker.
Broke both speaker connectors by spudging straight up. Looks like they should slide apart like a normal zif.
Pulled straight up and broke both connectors.
-
-
-
Usa delle pinzette per sollevare la linguetta della striscia adesiva sopra dell'altoparlante destro, quanto basta per poterla afferrare con le dita.
-
Afferra la linguetta della striscia adesiva e, lentamente e con cautela, tira fuori la striscia adesiva da sotto l'altoparlante.
-
Applica del calore sull'altoparlante per ammorbidire l'adesivo sottostante.
-
Fai scorrere con delicatezza uno spudger o un plettro di apertura sotto l'altoparlante per staccare l'adesivo.
This business of pulling the adhesive out (here and with the batteries) - at first it seems impossible, but persevere. Pull it really, really, slowly - it extends to around 30cm before it's all out. I applied a bit of heat with a heat gun (at least with the batteries) and after a few failed attempts got the hang of it. When it works, it's like magic and very satisfying, and much better than giving up and prising the part off with the adhesive in place.
-
-
-
Solleva dal fondo del case l'altoparlante destro e rimuovilo.
Step 5 the right speaker adhesive broken while removing, other end adhesive slipped out ok. But it's extremely hard to now lift up the battery, feels like I break something if I try harder.
This is not as easy as it sounds. Neither adhesive strip broke, but that bugger resists removal, because it is attached with adhesive tape to the bottom. Use different angles of attack to pry it up with steady force.
-
-
-
Usa delle pinzette per sollevare la linguetta dell'adesivo nero sulla parte inferiore dell'altoparlante sinistro, quanto basta a poterla afferrare con le dita.
-
Afferra la linguetta della striscia adesiva e, lentamente e con cautela, tira fuori la striscia adesiva da sotto l'altoparlante.
-
Se la striscia adesiva si rompe, lasciala dov'è e procedi con il passo successivo.
-
-
-
Fai scorrere la punta di uno spudger sotto il cavo dell'altoparlante destro e fai leva verso l'alto per scollegare lo speaker.
-
Una volta scollegato il connettore, fai scorrere l'estremità piatta di uno spudger sotto il cavo per staccare l'adesivo che fissa il cavo alla scheda logica.
-
-
-
Usa delle pinzette per sollevare la linguetta della striscia adesiva sopra dell'altoparlante sinistro, quanto basta per poterla afferrare con le dita.
-
Afferra la linguetta della striscia adesiva e, lentamente e con cautela, tira fuori la striscia adesiva da sotto l'altoparlante.
-
Applica del calore sull'altoparlante per ammorbidire l'adesivo sottostante.
-
Fai scorrere con delicatezza uno spudger o un plettro di apertura sotto l'altoparlante per staccare l'adesivo.
-
-
-
Solleva dal fondo del case l'altoparlante sinistro e rimuovilo.
-
-
-
-
Usa un cacciavite Torx T3 per rimuovere le due viti da 1,4 millimetri che fissano la staffa del connettore del trackpad.
-
Rimuovi la staffa del connettore del trackpad.
My machine used T4 screws
Me too! I tried with T3 and it wasn’t working.
I stripped my screws trying to get them out with a t3 driver...
-
-
-
Fai scorrere l'estremità di uno spudger sotto il cavo dell'altoparlante e fai leva per sollevare il cavo stesso e scollegare l'altoparlante.
-
Con il connettore scollegato, fai scorrere l'estremità piatta di uno spudger sotto il cavo per staccare l'adesivo che fissa il cavo alla scheda logica.
-
-
-
Usa un cacciavite Torx T3 per rimuovere le due viti da 1,3 mm che fissano la staffa del connettore della porta USB-C.
-
Rimuovi la staffa del connettore USB-C.
There is no need to remove the logic board!!
Skip steps 16 through 28 and go to step 29 to release the trackpad cable from the battery. then follow steps to 30 through 33 to release the battery. The battery can be removed by slipping it counter-clockwise under the trackpad cable. The new battery can be slipped in place in the same way.
Much easier!!
Removing a few of the logic board screws allowed me to get the to right screw bracket under the logic board to give enough clearance as w98fxr mentioned.
This can be done, but it's very tight. Still, beats removing the logic board and the possibilities of breaking something in the process.
-
-
-
Usa l'estremità piatta di uno spudger per sollevare il connettore del cavo USB-C fuori dal suo zoccolo sulla scheda logica.
please reconsider removing the logic board and and usb-c connector as is recommended in the prior step. i had a very difficult time reconnecting the usb-c connector
-
-
-
Usa uno spudger per sollevare la piccola aletta di bloccaggio del connettore ZIF del cavo della scheda audio.
-
Fai scorrere il cavo della scheda audio fuori dal connettore ZIF.
-
-
-
Usa l'estremità a punta di uno spudger per sollevare l'aletta di bloccaggio del connettore ZIF del cavo della ventola.
-
Fai scorrere il cavo della ventola fuori dal connettore ZIF.
-
-
-
Usa un cacciavite Torx T3 per rimuovere le due viti da 1,4 mm che bloccano la staffa del cavo di antenna.
-
Rimuovi la staffa del cavo di antenna.
These are T4 screws
The MBA I just finished with were T3. I'm fairly confident with my tools as I recently updated/upgraded nearly my entire set with WiHa. I should also mention the many tools acquired from iFixit over the years have all been were exceptional lasting years. There's no doubt iFixit would have been my source but a close friend went to work for WiHa. His discount(s) & being motivated to help him was a major impact. For anyone not having such an advantage IMHO tools from iFixit are one of the best values anywhere. Let's not forget; buying from iFixit will also help to push "Right to Repair" forward. Here in Minnesota Right to repair ALMOST PASSED. Many believe it will become law during the next session! I can't tell you how proud this would make me. I would obtain as many service manuals as possible and post them all online!!! What a great dream...
-
-
-
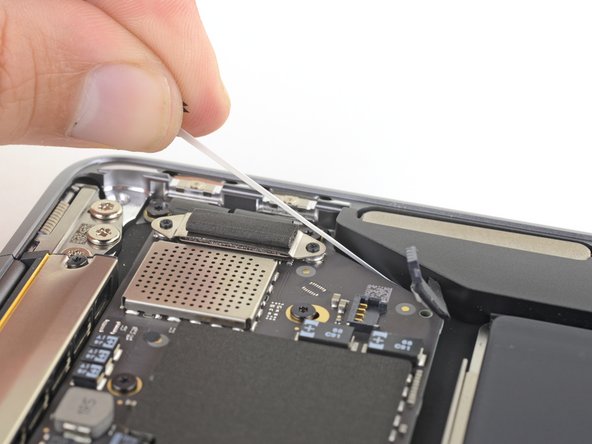
Inserisci l'estremità punta di uno spudger sotto uno dei cavi di antenna vicini al connettore. Fai leva per alzare e scollegare il cavo.
-
Ripeti l'operazione per l'altro cavo di antenna.
Be SUPER SUPER CAREFUL pulling off the gold WiFi antenna connectors! As described, use the spludger to press up the black cable just behind the metal connector. I tried to ping them off from the bottom of the gold connector where it clips into the socket on the motherboard and ended up pulling off the SMD sockets from the motherboard - huge and costly mistake that will probably render it useless.
-
-
-
Usa l'estremità piatta di uno spudger per sollevare il connettore del cavo dello schermo.
How do I reconnect display connector??
Just align the plug section of the display flex with the socket on the logic board and gently press it in until it locks in place. Do not force it but just ensure it’s correctly aligned before pushing it into the socket.
Pro tip: You can remove the two T5 screws on the LCD connector side (located to the right of the display connector and to the left of the heat shield). From there, tilt the whole skinny LCD board towards the logic board connector and gently pinch the connector in to the socket. Before laying the skinny board back down, screw in the shield from Step 15 so it doesn’t pop out of the socket again.
-
-
-
Usa un cacciavite Torx T5 per rimuovere le viti seguenti:
-
Una vite da 5,5 mm
-
Tre viti da 2,6 mm
-
Due viti da 1,9 mm
These are T5 Torx driver screws
Need torx 5 AND torx 4 driver here ;)
During re-assembly be soft when screwing in the logic board because those antenna plugs in Step 14 are quite awkward to pin back into their sockets and there is little leeway in the cables; to make this task a little easier in Step 14, secure the logic board loosely right up against the near outside edge; after re-connecting all the cables in Steps 16-9, return to Step 17 to firm up the logic board screws.
This tip was a huge help, hate these cables lol
The 5.5 mm screw goes into a hexagon standoff which may come off with the logic board being sanswiched beteen the 5.5 mm screw screw and the standoff like happened to me. Just something to be aware of. It also has a black rubber bumper over the screw which was not mentioned at all. It pulls straight off to give access to the screw.
On my board I needed to use T6 for all the screws except the rubber bumper for which I used a T7. I have a full set of small Torx drivers and tried for the best fit.
T5 fit best is all the screws on my machine
-
-
-
Fai scorrere con delicatezza un plettro di apertura sotto il cavo del trackpad per staccare l'adesivo che lo fissa al case superiore.
-
-
-
Usa l'estremità piatta di uno spudger per sollevare la piccola aletta di blocco sul connettore ZIF del trackpad.
-
Fai scorrere il cavo del trackpad fuori dal suo connettore.
-
-
-
Fai scorrere con delicatezza un plettro di apertura sotto il cavo del trackpad per staccare l'adesivo che lo fissa al case superiore.
-
-
-
Usa un cacciavite Torx T3 per rimuovere le quattro viti da 2,5 mm che fissano la batteria.
-
-
-
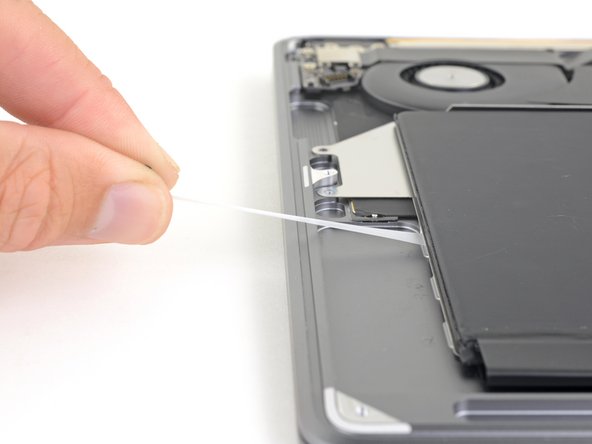
Usa delle pinzette per sollevare la linguetta di estrazione nera dell'adesivo sul lato della batteria, quanto basta per poterla afferrare con le dita.
-
Afferra la linguetta di estrazione e tira fuori la striscia adesiva, lentamente e con delicatezza, da sotto la batteria.
-
Se la striscia adesiva si rompe, lasciala dov'è e procedi con il passo successivo.
-
-
-
Ripeti i due passi precedenti per rimuovere le tre strisce adesive dal lato opposto della batteria.
-
Con cautela, metti alcune gocce di alcol isopropilico su ciascun bordo della batteria, nelle parti incavate del case superiore dove si trovavano le strisce adesive estensibili.
-
Lascia che l'alcol imbeva l'adesivo per uno o due minuti.
-
Usa con delicatezza dei plettri di apertura per staccare la batteria dal case superiore.
-
-
-
Rimuovi la batteria.
-
Calibra la nuova batteria: caricala al 100% e poi tienila in carica almeno altre 2 ore. Quindi stacca l'alimentazione e usa il laptop normalmente per farlo scaricare. All'avviso di batteria in esaurimento, salva il tuo lavoro e tieni acceso il MacBook finché non si iberna perché è scarico. Aspetta almeno altre 5 ore, poi carica ininterrottamente al 100%.
-


Confronta la tua parte di ricambio con quella originale: potrebbe essere necessario il trasferimento di alcuni componenti o la rimozione di protezioni adesive dalla nuova parte prima di installarla.
Per riassemblare il tuo dispositivo, segui queste istruuzioni in ordine inverso.
Porta i tuoi rifiuti elettronici a un riciclatore certificato R2 o e-Stewards.
La riparazione non è andata secondo i piani? Vai sulla nostra comunità Risposte per trovare aiuto nella risoluzione dei problemi.
Annulla: non ho completato questa guida.
Altre 31 persone hanno completato questa guida.
Un ringraziamento speciale a questi traduttori:
100%
Daniele Carminati ci sta aiutando ad aggiustare il mondo! Vuoi partecipare?
Inizia a tradurre ›

9 Commenti
Well done article and I acheived my goal of changing out my very puffy old battery for the new one (still need to recycle the old… ASAP). Curiously, I had to open it again as I, somehow, didn’t get the battery cable pushed in far enough and it wasn’t working. Now, all is well. Strangely, even after a couple of attempts at resetting the SMC, my fan is running almost constantly. I’m kind of not sure what to do about that at this point (yes, I used the iFixIt guide to clean my fan as well). Anyway, thanks for the help.
great article, havent used it as yet, but just wanted to check the complexity before I purchased the battery
New battery is in and on 1st round of charging! Thank you very much!!!
As a note, I also purchased some Tesa tape with the battery as the shopping cart recommended it. I used that under the speakers before replacing them. The left & right sides of the batteries are kind of loose, but I’m not overly worried about that as it’s attached to metal backing.
Extremely pleased with this tutorial and the ifixit.com battery replacement kit. Since one of my USB-C ports died and the Apple certified folks told me to expect to pay over $500 to replace the port and battery I came here to sort it out myself. Happy to say with ifixit's awesome parts and tutorials that I have a fully functional Air again for about $150. I also recommend the magnetic project board as this was super helpful in keeping all of the various sized screws organized to the steps.
Great guide, except a small mistake in the required tools: we don't need a T4 screwdriver at all but we do need a T5 screwdriver.
There is no need to remove the logic board!!
Skip steps 16 through 28 and go to step 29 to release the trackpad cable from the battery. then follow steps to 30 through 33 to release the battery. The battery can be removed by slipping it counter-clockwise under the trackpad cable. The new battery can be slipped back in the same way.
Much easier!!
If the first thing you do is disconnect the battery, is it really an issue if you don’t (or can’t) disable auto-boot?
maccentric - Replica
I agree, why disable Auto-Boot when the lid is closed and the battery is disconnected immediately? – I've never had an issue since 2016 when the feature was introduced.
stevebsiegel - Replica
On my machine, the longest two screws were in the corners, while the other two long screws were in the middle. Perhaps previous service in the past had them replaced into the wrong place? In any case, the longest screws do seem to fit in either place. I guess 0.8mm is not very much of a difference. Seems like poor design if they could have used one size of screw.
johann beda - Replica
Just did one, and it also had longest screws in the corners.
maccentric -
Just did another, and the long ones were in the middle. Definitely poor design and quality control.
maccentric -