Salta al contenuto principale

Questa guida ha delle modifiche più recenti. Passa all'ultima versione non verificata.

MacBook Air 11" Mid 2013 I/O Board Replacement

Solo Prerequisita
Questa guida è destinata a essere usata solo come prerequisito per altre guide. Da sola è incompleta.

Cosa ti serve

  1. MacBook Air 11" Mid 2013 I/O Board Replacement, I/O Board: passo 1, immagine 1 di 3 MacBook Air 11" Mid 2013 I/O Board Replacement, I/O Board: passo 1, immagine 2 di 3 MacBook Air 11" Mid 2013 I/O Board Replacement, I/O Board: passo 1, immagine 3 di 3
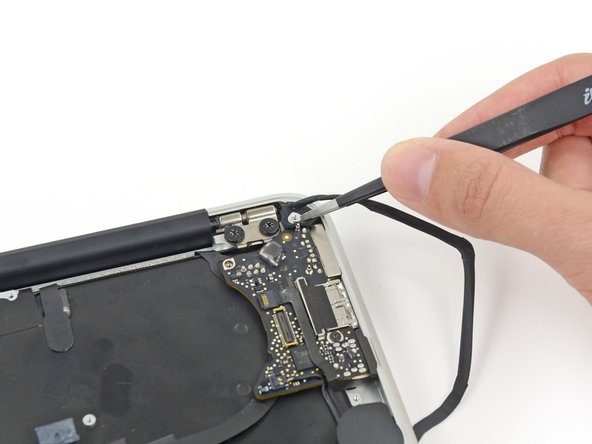
    • Remove the small rubber gasket from the corner of the upper case nearest the the I/O board.

    • Remove the gasket from the corner nearest display cable connector.

  2. MacBook Air 11" Mid 2013 I/O Board Replacement: passo 2, immagine 1 di 2 MacBook Air 11" Mid 2013 I/O Board Replacement: passo 2, immagine 2 di 2
    • If necessary, use tweezers to remove any tape covering the microphone cable ZIF connector.

  3. MacBook Air 11" Mid 2013 I/O Board Replacement: passo 3, immagine 1 di 3 MacBook Air 11" Mid 2013 I/O Board Replacement: passo 3, immagine 2 di 3 MacBook Air 11" Mid 2013 I/O Board Replacement: passo 3, immagine 3 di 3
    • Use the tip of a spudger to carefully flip up the retaining flap on the microphone cable ZIF socket.

    • Be sure you are prying up on the retaining flap, not the socket itself.

    • With a pair of tweezers, pull the microphone ribbon cable straight out of its socket.

  4. MacBook Air 11" Mid 2013 I/O Board Replacement: passo 4, immagine 1 di 3 MacBook Air 11" Mid 2013 I/O Board Replacement: passo 4, immagine 2 di 3 MacBook Air 11" Mid 2013 I/O Board Replacement: passo 4, immagine 3 di 3
    • Use the tip of a spudger to pry under the speaker cable near the connector, lifting it straight up from its socket.

    • De-route the cable from its notch in the logic board.

  5. MacBook Air 11" Mid 2013 I/O Board Replacement: passo 5, immagine 1 di 1
    • Remove the single 3.6 mm T5 Torx screw securing the I/O board to the upper case.

  6. MacBook Air 11" Mid 2013 I/O Board Replacement: passo 6, immagine 1 di 3 MacBook Air 11" Mid 2013 I/O Board Replacement: passo 6, immagine 2 di 3 MacBook Air 11" Mid 2013 I/O Board Replacement: passo 6, immagine 3 di 3
    • Carefully lift the I/O board by its power cable and pull it away from the edge of the case.

Conclusione

To reassemble your device, follow these instructions in reverse order.

Sam Goldheart

Membro da: 10/18/12

465.647 Reputazione

538 Guide realizzate

Team

iFixit Membro di iFixit

Staff

135 Membri

16.732 Guide realizzate

0 Commenti

Aggiungi Commento

Visualizza Statistiche:

Ultime 24 Ore: 0

Ultimi 7 Giorni: 0

Ultimi 30 Giorni: 0

Tutti i Tempi: 88