Questa versione può contenere modifiche errate. Passa all'ultima istantanea verificata.
Cosa ti serve
-
CompraAttrezzo utilizzato in questo passaggio:P5 Pentalobe Screwdriver Retina MacBook Pro and Air$5.99
-
Svita le seguenti dieci viti:
-
Due viti pentalobe da 8 mm
-
Otto viti pentalobe da 2,5 mm
-
-
Questo passaggio è privo di traduzione. Aiuta a tradurlo
-
Use the flat end of a spudger to pry both short sides of the battery connector upward to disconnect it from its socket on the logic board.
-
Bend the battery cable slightly away from the logic board so the connector will not accidentally contact its socket.
-
-
Questo passaggio è privo di traduzione. Aiuta a tradurlo
-
Remove the single 2.9 mm T5 Torx screw securing the SSD to the logic board.
So when i change my ssd in mac do i have to reinstall Mac OS
Correct, the SSD does not come with OS preinstalled. To install the OS you can completely clone your existing hard drive or you will need to create a bootable flash drive and format your SSD and create a partition in order to be able to install the OS.
-
-
Questo passaggio è privo di traduzione. Aiuta a tradurlo
-
Use a spudger to help lift the free end of the SSD just enough to grab it with your other hand.
-
Pull the drive straight out of its socket and remove it from the logic board.
I performed all the steps above and fitted a Transcend JetDrive 500 which was very easy however when I re-assembled and turned on all I get is a question mark in the middle of the screen, can you explain if I did anything wrong?
-
-
Questo passaggio è privo di traduzione. Aiuta a tradurlo
-
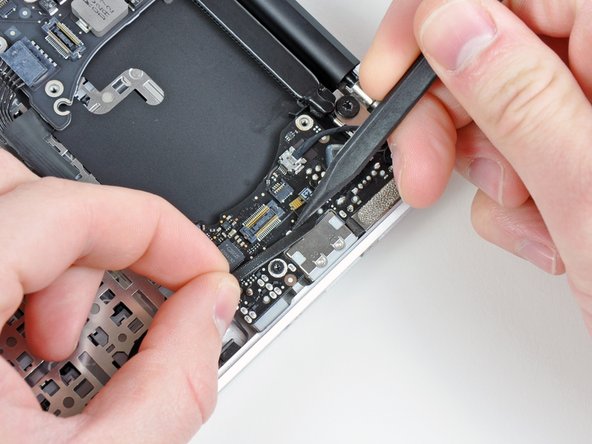
Use the flat end of a spudger to pry the I/O board cable connector upward out of its socket on the I/O board.
-
-
Questo passaggio è privo di traduzione. Aiuta a tradurlo
-
While gently pulling the I/O board cable upward near its connection to the logic board, use the tip of a spudger to pry upward on alternating sides of the connector to help "walk" it out of its socket.
-
Remove the I/O board cable.
-
-
-
Questo passaggio è privo di traduzione. Aiuta a tradurlo
-
Use the tip of a spudger to carefully flip up the retaining flap on the fan cable ZIF socket.
-
-
Questo passaggio è privo di traduzione. Aiuta a tradurlo
-
Remove the following three screws securing the fan to the upper case:
-
Two 5.2 mm T5 Torx screws
-
One 3.6 mm T5 Torx screw
-
-
Questo passaggio è privo di traduzione. Aiuta a tradurlo
-
Lift the fan out of the upper case and carefully pull the fan ribbon cable out of its socket as you remove it from the Air.
-
-
Questo passaggio è privo di traduzione. Aiuta a tradurlo
-
Remove the following five screws securing the battery to the upper case:
-
Two 5.2 mm T5 Torx screws
-
One 6 mm T5 Torx screw
-
Two 2.6 mm T5 Torx screws
-
-
Questo passaggio è privo di traduzione. Aiuta a tradurlo
-
Lift the battery from its edge nearest the logic board and remove it from the upper case.
-
-
Questo passaggio è privo di traduzione. Aiuta a tradurlo
-
Disconnect the I/O board by pulling the power cable away from its socket on the logic board.
-
-
Questo passaggio è privo di traduzione. Aiuta a tradurlo
-
Use the tip of a spudger to carefully flip up the retaining flap on the microphone cable ZIF socket.
-
Pull the microphone ribbon cable straight out of its socket.
-
-
Questo passaggio è privo di traduzione. Aiuta a tradurlo
-
Use the flat end of a spudger to pry the left speaker cable connector up and out of its socket on the I/O board.
-
-
Questo passaggio è privo di traduzione. Aiuta a tradurlo
-
Pull the camera cable parallel to the face of the I/O board toward the rear edge of the Air to disconnect it from its socket.
-
-
Questo passaggio è privo di traduzione. Aiuta a tradurlo
-
Remove the small rubber gasket from the corner of the upper case nearest the I/O board.
-
-
Questo passaggio è privo di traduzione. Aiuta a tradurlo
-
Remove the single 3.6 mm T5 Torx screw securing the I/O board to the upper case.
-
-
Questo passaggio è privo di traduzione. Aiuta a tradurlo
-
Carefully lift the I/O board from its edge nearest the logic board and remove it from the upper case.
-


Annulla: non ho completato questa guida.
Altre 15 persone hanno completato questa guida.

Un commento
Question. Im looking a replacing the I/O board on my MacBook air and am wondering if it matters whether I get the board for the 13” or the 11”? Are the two boards different? It seems that the 11” I/O board is cheaper so I just trying to figure out if it matters which one I get?
I recommend that one of the tools you obtain is a jeweler's loupe that mounts on your glasses. It makes things easier.
blairweaver - Replica
This is not correct. You need the pentalobe tool at this point.
Duane Hellums - Replica