Salta al contenuto principale

Mac Pro Late 2013 Fan Replacement

Cosa ti serve

  1. Mac Pro Late 2013 Fan Replacement, Outer Case: passo 1, immagine 1 di 2 Mac Pro Late 2013 Fan Replacement, Outer Case: passo 1, immagine 2 di 2
    • Slide the lock switch to the right, to the unlocked position.

  2. Mac Pro Late 2013 Fan Replacement: passo 2, immagine 1 di 3 Mac Pro Late 2013 Fan Replacement: passo 2, immagine 2 di 3 Mac Pro Late 2013 Fan Replacement: passo 2, immagine 3 di 3
    • Lift the outer case straight up off the Mac Pro.

    • It may help to push down on the center of the fan while lifting the case up.

  3. Mac Pro Late 2013 Fan Replacement, Fan Assembly: passo 3, immagine 1 di 3 Mac Pro Late 2013 Fan Replacement, Fan Assembly: passo 3, immagine 2 di 3 Mac Pro Late 2013 Fan Replacement, Fan Assembly: passo 3, immagine 3 di 3
    • Remove five 5.1 mm T10 Torx screws from around the outer perimeter of the fan assembly.

  4. Mac Pro Late 2013 Fan Replacement: passo 4, immagine 1 di 2 Mac Pro Late 2013 Fan Replacement: passo 4, immagine 2 di 2
    • The fan assembly is attached to the rest of the computer by two cables on the IO board side.

    • Tilt the assembly up away from the IO board.

    • Do not try to remove the fan assembly yet, as it is still attached by two cables.

  5. Mac Pro Late 2013 Fan Replacement: passo 5, immagine 1 di 1
    • While supporting the fan assembly with one hand, loosen the two T8 captive screws in the fan cable bracket.

    • These screws are captive in the Mac Pro. Do not try to remove these screws from your Mac Pro.

  6. Mac Pro Late 2013 Fan Replacement: passo 6, immagine 1 di 1
    • Use a pair of tweezers to pull the fan cable bracket away from the fan assembly.

  7. Mac Pro Late 2013 Fan Replacement: passo 7, immagine 1 di 2 Mac Pro Late 2013 Fan Replacement: passo 7, immagine 2 di 2
    • Use the flat end of a spudger to disconnect the fan assembly ribbon cable from the IO board.

  8. Mac Pro Late 2013 Fan Replacement: passo 8, immagine 1 di 1
    • Disconnect the fan assembly antenna cable from the IO board.

    • Remove the fan assembly from the Mac Pro.

  9. Mac Pro Late 2013 Fan Replacement, Fan Assembly Lid: passo 9, immagine 1 di 3 Mac Pro Late 2013 Fan Replacement, Fan Assembly Lid: passo 9, immagine 2 di 3 Mac Pro Late 2013 Fan Replacement, Fan Assembly Lid: passo 9, immagine 3 di 3
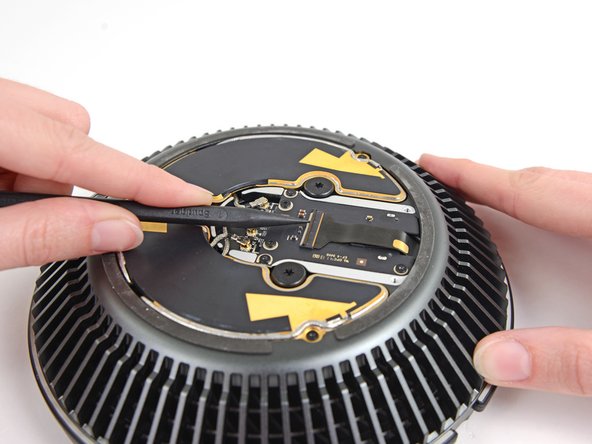
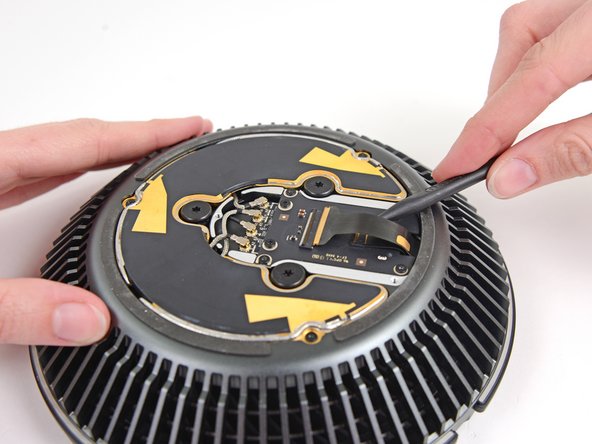
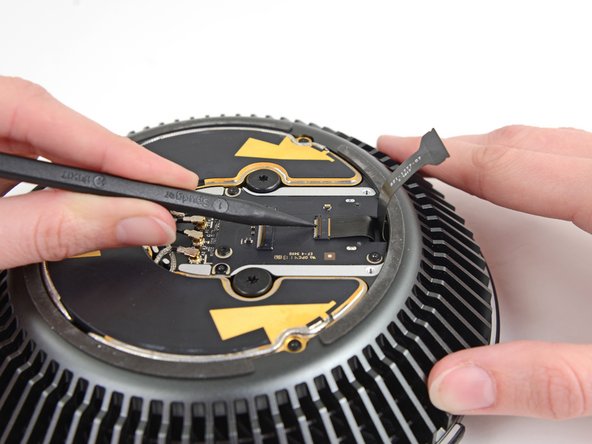
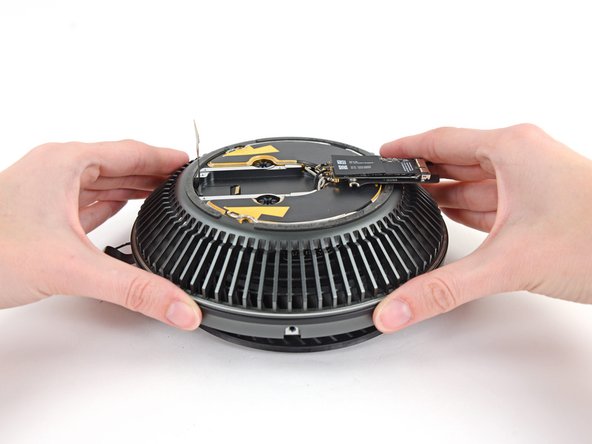
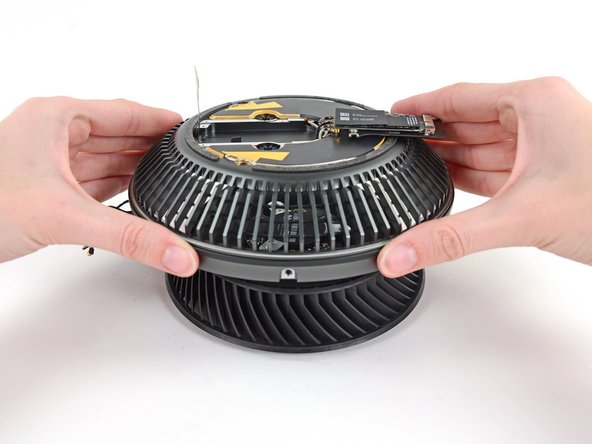
    • Use the flat end of a spudger to pry the fan assembly lid up off the fan assembly.

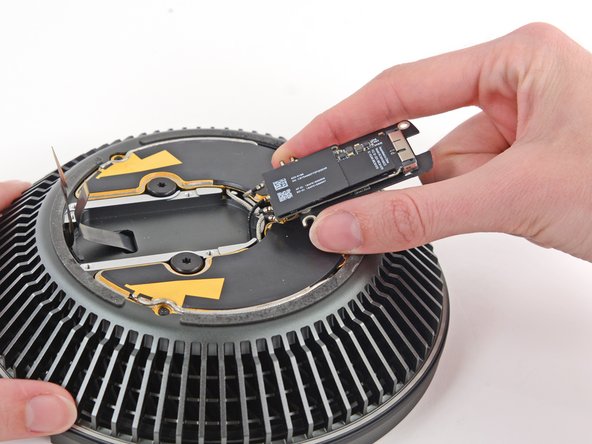
    • Remove the fan assembly lid.

  10. Mac Pro Late 2013 Fan Replacement, AirPort Board: passo 10, immagine 1 di 1
    • Remove the three 3.7 mm T4 screws securing the metal cover to the AirPort board bay.

  11. Mac Pro Late 2013 Fan Replacement: passo 11, immagine 1 di 1
    • Lift and remove the metal cover from the AirPort board bay.

  12. Mac Pro Late 2013 Fan Replacement: passo 12, immagine 1 di 3 Mac Pro Late 2013 Fan Replacement: passo 12, immagine 2 di 3 Mac Pro Late 2013 Fan Replacement: passo 12, immagine 3 di 3
    • Use the tip of a spudger to flip the ZIF retaining tab on the fan assembly ribbon cable connector.

    • Remove the fan assembly ribbon cable from its ZIF socket.

  13. Mac Pro Late 2013 Fan Replacement: passo 13, immagine 1 di 3 Mac Pro Late 2013 Fan Replacement: passo 13, immagine 2 di 3 Mac Pro Late 2013 Fan Replacement: passo 13, immagine 3 di 3
    • Use the tip of a spudger to flip the ZIF retaining tab on the fan ribbon cable.

    • Disconnect the fan ribbon cable.

  14. Mac Pro Late 2013 Fan Replacement, Fan: passo 14, immagine 1 di 1
    • Remove the three 3.7 mm T4 screws securing the fan bezel to the fan assembly.

  15. Mac Pro Late 2013 Fan Replacement: passo 15, immagine 1 di 2 Mac Pro Late 2013 Fan Replacement: passo 15, immagine 2 di 2
    • Remove the fan bezel.

  16. Mac Pro Late 2013 Fan Replacement: passo 16, immagine 1 di 1
    • Remove the following screws from the top of the fan assembly:

    • One 10.4 mm T10 screw

    • Three 3.7 mm T4 screws

  17. Mac Pro Late 2013 Fan Replacement: passo 17, immagine 1 di 2 Mac Pro Late 2013 Fan Replacement: passo 17, immagine 2 di 2
    • Flip the AirPort board over.

  18. Mac Pro Late 2013 Fan Replacement: passo 18, immagine 1 di 1
    • Remove the remaining two 10.4 mm T10 screws securing the fan to the fan assembly.

  19. Mac Pro Late 2013 Fan Replacement: passo 19, immagine 1 di 3 Mac Pro Late 2013 Fan Replacement: passo 19, immagine 2 di 3 Mac Pro Late 2013 Fan Replacement: passo 19, immagine 3 di 3
    • Lift the fan assembly up from the fan.

Conclusione

To reassemble your device, follow these instructions in reverse order.

Altre 14 persone hanno completato questa guida.

Team

iFixit Membro di iFixit

Staff

135 Membri

16.476 Guide realizzate

5 Commenti

using my iFixit bit set, I'd have to say that the tiny screws for Airport card & cover, as well as fan bezel, are actually T5, not T4 - came very close to stripping the heads on two of the Airport card screws with the recommended T4 bit, but firm pressure and a steady hand with T5 bit got them out. Thanks for the guide - many careful steps to get a scrap of scotch tape out of the fan where its gentle ticks-ticka was driving us crazy thinking something far worse was going wrong.....

vbob - Replica

Ha! I wondered what would happen if some tiny flotsam was dropped in through the top - terrible! Thanks for the tip!

Wagon Fixin - Replica

Likewise, I've had a random noise in the fan at startup, and finally took the fan assembly apart to grab it. It was some even tinier screw from somewhere that had lodged in part of the fan housing. All is very, very well now!!!!

Colin Wright - Replica

Hey Colin, I have same fan startup nois in my MP. Can you help me and tell how to fix in few steps?

Deny -

Using Macs Fan Control, I noticed the baseline fan speed of my “trashcan” slowly creeping up from 790 RPM (the usual) to 8 or 900 RPM. Using this guide I took the fan assembly off, and vacuumed and dusted everything with a vacuum, soft brush and canned air. It wasn’t necessary to disassemble the fan unit itself. That did the trick - fan speed is back down to 790 RPM after putting it back together.

PS - in Step 5, a Torx T8 screwdriver seemed to fit just fine for the fan cable bracket screws.

isonno - Replica

Aggiungi Commento

Visualizza Statistiche:

Ultime 24 Ore: 5

Ultimi 7 Giorni: 49

Ultimi 30 Giorni: 242

Tutti i Tempi: 25,901