Salta al contenuto principale

Mac Pro Late 2013 AirPort Antenna Array Replacement

Cosa ti serve

  1. Mac Pro Late 2013 AirPort Antenna Array Replacement, Outer Case: passo 1, immagine 1 di 2 Mac Pro Late 2013 AirPort Antenna Array Replacement, Outer Case: passo 1, immagine 2 di 2
    • Slide the lock switch to the right, to the unlocked position.

  2. Mac Pro Late 2013 AirPort Antenna Array Replacement: passo 2, immagine 1 di 3 Mac Pro Late 2013 AirPort Antenna Array Replacement: passo 2, immagine 2 di 3 Mac Pro Late 2013 AirPort Antenna Array Replacement: passo 2, immagine 3 di 3
    • Lift the outer case straight up off the Mac Pro.

    • It may help to push down on the center of the fan while lifting the case up.

  3. Mac Pro Late 2013 AirPort Antenna Array Replacement, Fan Assembly: passo 3, immagine 1 di 3 Mac Pro Late 2013 AirPort Antenna Array Replacement, Fan Assembly: passo 3, immagine 2 di 3 Mac Pro Late 2013 AirPort Antenna Array Replacement, Fan Assembly: passo 3, immagine 3 di 3
    • Remove five 5.1 mm T10 Torx screws from around the outer perimeter of the fan assembly.

  4. Mac Pro Late 2013 AirPort Antenna Array Replacement: passo 4, immagine 1 di 2 Mac Pro Late 2013 AirPort Antenna Array Replacement: passo 4, immagine 2 di 2
    • The fan assembly is attached to the rest of the computer by two cables on the IO board side.

    • Tilt the assembly up away from the IO board.

    • Do not try to remove the fan assembly yet, as it is still attached by two cables.

  5. Mac Pro Late 2013 AirPort Antenna Array Replacement: passo 5, immagine 1 di 1
    • While supporting the fan assembly with one hand, loosen the two T8 captive screws in the fan cable bracket.

    • These screws are captive in the Mac Pro. Do not try to remove these screws from your Mac Pro.

  6. Mac Pro Late 2013 AirPort Antenna Array Replacement: passo 6, immagine 1 di 1
    • Use a pair of tweezers to pull the fan cable bracket away from the fan assembly.

  7. Mac Pro Late 2013 AirPort Antenna Array Replacement: passo 7, immagine 1 di 2 Mac Pro Late 2013 AirPort Antenna Array Replacement: passo 7, immagine 2 di 2
    • Use the flat end of a spudger to disconnect the fan assembly ribbon cable from the IO board.

  8. Mac Pro Late 2013 AirPort Antenna Array Replacement: passo 8, immagine 1 di 1
    • Disconnect the fan assembly antenna cable from the IO board.

    • Remove the fan assembly from the Mac Pro.

  9. Mac Pro Late 2013 AirPort Antenna Array Replacement, Fan Assembly Lid: passo 9, immagine 1 di 3 Mac Pro Late 2013 AirPort Antenna Array Replacement, Fan Assembly Lid: passo 9, immagine 2 di 3 Mac Pro Late 2013 AirPort Antenna Array Replacement, Fan Assembly Lid: passo 9, immagine 3 di 3
    • Use the flat end of a spudger to pry the fan assembly lid up off the fan assembly.

    • Remove the fan assembly lid.

  10. Mac Pro Late 2013 AirPort Antenna Array Replacement, AirPort Board: passo 10, immagine 1 di 1
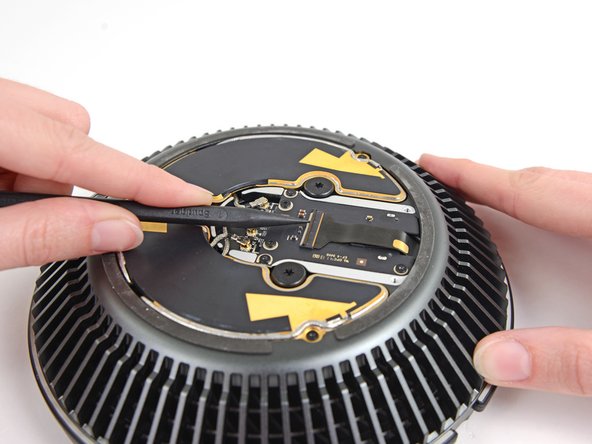
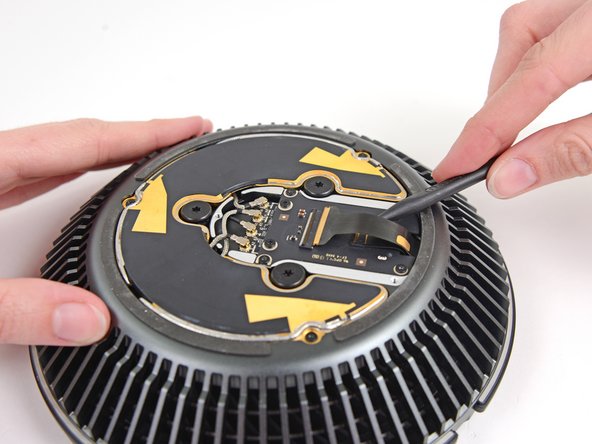
    • Remove the three 3.7 mm T4 screws securing the metal cover to the AirPort board bay.

  11. Mac Pro Late 2013 AirPort Antenna Array Replacement: passo 11, immagine 1 di 1
    • Lift and remove the metal cover from the AirPort board bay.

  12. Mac Pro Late 2013 AirPort Antenna Array Replacement: passo 12, immagine 1 di 3 Mac Pro Late 2013 AirPort Antenna Array Replacement: passo 12, immagine 2 di 3 Mac Pro Late 2013 AirPort Antenna Array Replacement: passo 12, immagine 3 di 3
    • Use the tip of a spudger to flip the ZIF retaining tab on the fan assembly ribbon cable connector.

    • Remove the fan assembly ribbon cable from its ZIF socket.

  13. Mac Pro Late 2013 AirPort Antenna Array Replacement: passo 13, immagine 1 di 3 Mac Pro Late 2013 AirPort Antenna Array Replacement: passo 13, immagine 2 di 3 Mac Pro Late 2013 AirPort Antenna Array Replacement: passo 13, immagine 3 di 3
    • Use the tip of a spudger to flip the ZIF retaining tab on the fan ribbon cable.

    • Disconnect the fan ribbon cable.

  14. Mac Pro Late 2013 AirPort Antenna Array Replacement, AirPort Antenna Array: passo 14, immagine 1 di 1
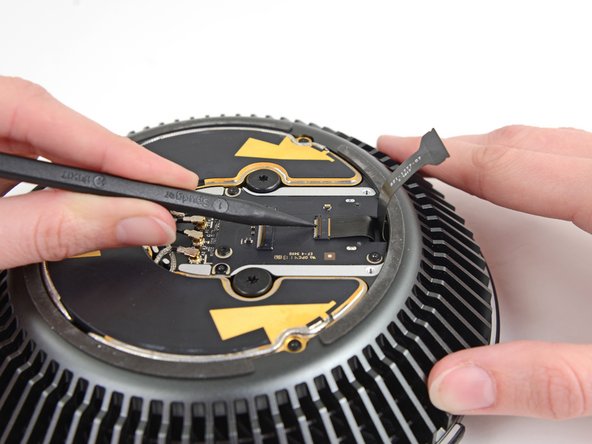
    • Remove the three 3.7 mm T4 screws securing the antenna array to the fan assembly.

  15. Mac Pro Late 2013 AirPort Antenna Array Replacement: passo 15, immagine 1 di 1
    • Remove the AirPort antenna array.

Conclusione

To reassemble your device, follow these instructions in reverse order.

Altre 3 persone hanno completato questa guida.

Team

iFixit Membro di iFixit

Staff

136 Membri

16.573 Guide realizzate

2 Commenti

having macpro 2013 bluetooth on issue, where is the bluetooth module locate?

Sanong - Replica

is bluetooth module part of (inside) airport board?

Sanong - Replica

Aggiungi Commento

Visualizza Statistiche:

Ultime 24 Ore: 1

Ultimi 7 Giorni: 9

Ultimi 30 Giorni: 51

Tutti i Tempi: 5,242