Salta al contenuto principale

MSI GT72 2QE Dominator Pro RAM Replacement

Cosa ti serve

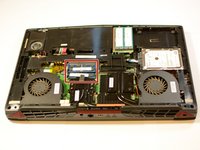
  1. MSI GT72 2QE Dominator Pro RAM Replacement, RAM: passo 1, immagine 1 di 1
    • Remove the 7 indicated 6mm Phillips #00 screws.

    • Same PH0 screwdriver can be used in all steps.

  2. MSI GT72 2QE Dominator Pro RAM Replacement: passo 2, immagine 1 di 1
    • With the screws out, remove the bottom door.

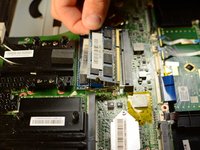
  3. MSI GT72 2QE Dominator Pro RAM Replacement: passo 3, immagine 1 di 2 MSI GT72 2QE Dominator Pro RAM Replacement: passo 3, immagine 2 di 2
    • Pull back clamps holding the RAM to remove it from the socket.

Conclusione

To reassemble your device, follow these instructions in reverse order.

Un'altra persona ha completato questa guida.

Nate

Membro da: 04/18/17

128 Reputazione

1 Guida realizzata

Team

Cal Poly, Team S17-G2, Banghart Spring 2017 Membro di Cal Poly, Team S17-G2, Banghart Spring 2017

CPSU-BANGHART-S17S17G2

5 Membri

7 Guide realizzate

Un commento

This guide is incomplete. There's 4 RAM slots, you've only shown the 2 on the near side of the motherboard.

luke - Replica

Aggiungi Commento

Visualizza Statistiche:

Ultime 24 Ore: 2

Ultimi 7 Giorni: 4

Ultimi 30 Giorni: 11

Tutti i Tempi: 2,402