Salta al contenuto principale
MSI GE72 6QF Apache Pro SSD Replacement

MSI GE72 6QF Apache Pro SSD Replacement

Tanmay Kumar

Tanmay Kumar e 4 altri collaboratori

Ultimo aggiornamento il November 17, 2022

10 minuti
Facile
Guida Studente in Evidenza

Introduzione

Vai al passo 1

This guide will teach you how to replace the SSD on your MSI GE72 6QF Apache Pro

Cosa ti serve

Kit di riparazione

Questi kit contengono tutti i ricambi e gli strumenti necessari per completare questa guida.

Ricambi

Strumenti

Mostra di più…

  1. MSI GE72 6QF Apache Pro SSD Replacement, Battery: passo 1, immagine 1 di 2 MSI GE72 6QF Apache Pro SSD Replacement, Battery: passo 1, immagine 2 di 2
    • Make sure the laptop is off and unplugged (not charging).

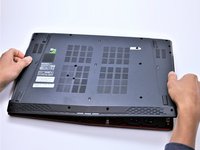
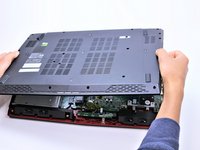
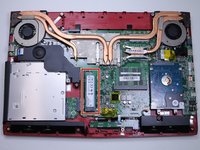
    • With the laptop closed and upside down, unscrew the nineteen 5.5mm Phillips #1 screws that keep the back cover in place.

  2. MSI GE72 6QF Apache Pro SSD Replacement: passo 2, immagine 1 di 1
    • Slide the optical drive out of the laptop.

  3. MSI GE72 6QF Apache Pro SSD Replacement: passo 3, immagine 1 di 1
    • Use a Phillips screwdriver to remove the three screws along the edge of the optical drive bay.

  4. MSI GE72 6QF Apache Pro SSD Replacement: passo 4, immagine 1 di 2 MSI GE72 6QF Apache Pro SSD Replacement: passo 4, immagine 2 di 2
    • Using your fingers, gently loosen the edges of all four sides of the back cover.

    • Gently pull off the back cover.

  5. MSI GE72 6QF Apache Pro SSD Replacement: passo 5, immagine 1 di 2 MSI GE72 6QF Apache Pro SSD Replacement: passo 5, immagine 2 di 2
    • Unscrew the single 5.5mm Phillips #1 screw keeping the battery secure.

  6. MSI GE72 6QF Apache Pro SSD Replacement: passo 6, immagine 1 di 2 MSI GE72 6QF Apache Pro SSD Replacement: passo 6, immagine 2 di 2
    • Grab the battery with your fingers and gently pull it up and away from the rest of the laptop.

  7. MSI GE72 6QF Apache Pro SSD Replacement, SSD: passo 7, immagine 1 di 2 MSI GE72 6QF Apache Pro SSD Replacement, SSD: passo 7, immagine 2 di 2
    • Remove the single 5.5mm Phillips #1 screw attaching the SSD to the laptop.

  8. MSI GE72 6QF Apache Pro SSD Replacement: passo 8, immagine 1 di 2 MSI GE72 6QF Apache Pro SSD Replacement: passo 8, immagine 2 di 2
    • Pull out the SSD by gently wiggling it from side to side until it comes out.

    • If the old SSD you removed contains the operating system, then the new SSD must also contain an operating system.

Conclusione

To reassemble your device, follow these instructions in reverse order.

Altre 7 persone hanno completato questa guida.

Tanmay Kumar

Membro da: 04/17/17

458 Reputazione

4 Guide realizzate

Team

Cal Poly, Team S14-G4, Banghart Spring 2017 Membro di Cal Poly, Team S14-G4, Banghart Spring 2017

CPSU-BANGHART-S17S14G4

4 Membri

8 Guide realizzate

0 Commenti

Aggiungi Commento

Visualizza Statistiche:

Ultime 24 Ore: 2

Ultimi 7 Giorni: 22

Ultimi 30 Giorni: 43

Tutti i Tempi: 8,071