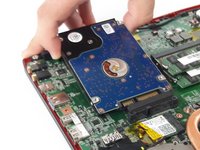
Salta al contenuto principale

MSI GE62 6QF Apache Pro Hard Drive Replacement

Cosa ti serve

  1. MSI GE62 6QF Apache Pro Hard Drive Replacement, Optical Drive: passo 1, immagine 1 di 1
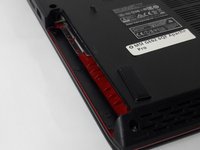
    • Use a Phillips screwdriver to remove the 5mm screw securing the optical drive to the bottom case.

  2. MSI GE62 6QF Apache Pro Hard Drive Replacement: passo 2, immagine 1 di 1
    • Slide Optical Drive out of the computer.

  3. MSI GE62 6QF Apache Pro Hard Drive Replacement, Bottom Case: passo 3, immagine 1 di 1
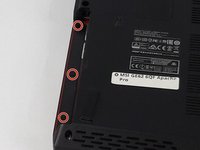
    • Use a Phillips screwdriver to remove the fourteen 5mm screws on the back of the laptop.

    • One of these screws is hidden under a sticker.

  4. MSI GE62 6QF Apache Pro Hard Drive Replacement: passo 4, immagine 1 di 3 MSI GE62 6QF Apache Pro Hard Drive Replacement: passo 4, immagine 2 di 3 MSI GE62 6QF Apache Pro Hard Drive Replacement: passo 4, immagine 3 di 3
    • Remove the three PH #0 2mm screws that were hidden underneath the optical drive.

  5. MSI GE62 6QF Apache Pro Hard Drive Replacement: passo 5, immagine 1 di 2 MSI GE62 6QF Apache Pro Hard Drive Replacement: passo 5, immagine 2 di 2
    • Use an opening tool to run along the seam of the case where the upper and bottom case meet.

    • Pry the bottom case and remove from the upper part.

  6. MSI GE62 6QF Apache Pro Hard Drive Replacement, Battery: passo 6, immagine 1 di 3 MSI GE62 6QF Apache Pro Hard Drive Replacement, Battery: passo 6, immagine 2 di 3 MSI GE62 6QF Apache Pro Hard Drive Replacement, Battery: passo 6, immagine 3 di 3
    • Remove the single PH #0 5mm screw holding the battery pack in place.

    • Remove the battery by sliding it away from the computer.

  7. MSI GE62 6QF Apache Pro Hard Drive Replacement, Hard Drive: passo 7, immagine 1 di 3 MSI GE62 6QF Apache Pro Hard Drive Replacement, Hard Drive: passo 7, immagine 2 di 3 MSI GE62 6QF Apache Pro Hard Drive Replacement, Hard Drive: passo 7, immagine 3 di 3
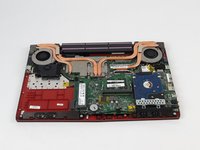
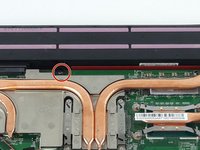
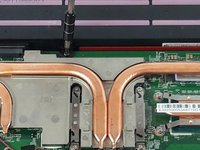
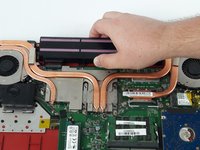
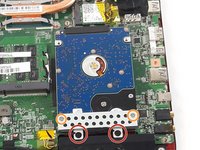
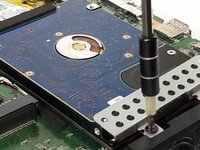
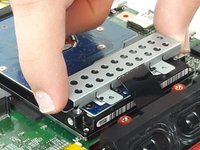
    • Unscrew the two black PH #0 2mm screws holding the lower part the hard drive plate

    • Unscrew the two PH #0 4mm screws holding the upper part of the hard drive plate

  8. MSI GE62 6QF Apache Pro Hard Drive Replacement: passo 8, immagine 1 di 2 MSI GE62 6QF Apache Pro Hard Drive Replacement: passo 8, immagine 2 di 2
    • Remove the hard drive by gently lifting up and pulling the drive out of the connection slot

Conclusione

To reassemble your device, follow these instructions in reverse order.

Altre 5 persone hanno completato questa guida.

Justice Owens

Membro da: 09/26/17

604 Reputazione

4 Guide realizzate

Team

USF Tampa, Team S2-G3, Passmore Fall 2017 Membro di USF Tampa, Team S2-G3, Passmore Fall 2017

USFT-PASSMORE-F17S2G3

3 Membri

5 Guide realizzate

4 Commenti

Saved my life, would have had no idea what to do without these instructions and would probably have broke something. My new 2tb ssd is working fine

Simon Porter - Replica

Upgraded the Memory to 32GB and the HDD to a 1TB SATA SSD.

Prabodha Elangasinha - Replica

Only issue I ran into was one of the optical drive screws was frozen in, stripped hard, and I had to fall back on Moodys to break it loose. Once done, everything else was cake.

Chuck Brewer - Replica

My ssd is working fine and the hdd has gone bad on mine... have not even opened mine yet but looking at the pics I wonder where the second drive is located?

Eric Jimenez - Replica

Aggiungi Commento

Visualizza Statistiche:

Ultime 24 Ore: 1

Ultimi 7 Giorni: 9

Ultimi 30 Giorni: 56

Tutti i Tempi: 8,247