Questa versione può contenere modifiche errate. Passa all'ultima istantanea verificata.
Cosa ti serve
-
Questo passaggio è privo di traduzione. Aiuta a tradurlo
-
Remove the batteries from the mouse.
-
Use a plastic opening tool to peel up the four mouse feet.
-
-
Questo passaggio è privo di traduzione. Aiuta a tradurlo
-
Remove the five 5.5mm Phillips #00 screws found underneath the mouse feet.
-
-
-
Questo passaggio è privo di traduzione. Aiuta a tradurlo
-
Pull the top of the mouse off of the bottom half.
-
Unplug the programmable buttons from the motherboard.
-
-
Questo passaggio è privo di traduzione. Aiuta a tradurlo
-
Remove the three 5.5mm Phillips #00 screws holding the button assembly to the mouse.
-
-
Questo passaggio è privo di traduzione. Aiuta a tradurlo
-
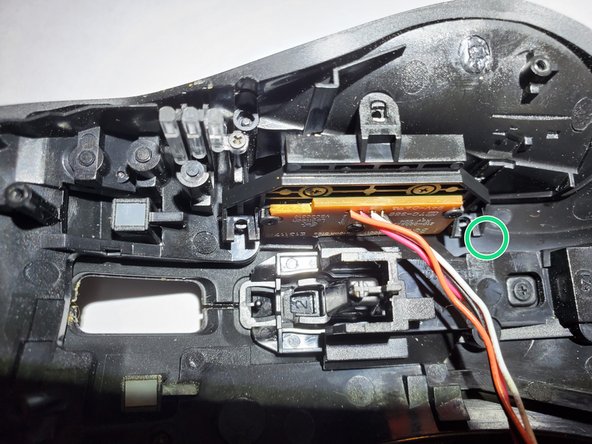
To remove the side button assembly:
-
First, unhook the cables from the cable guide so it won't get caught while popping the assembly out
-
The assembly is held in by some clip-in action from the screw posts on the top shell and screw holes on the assembly. The next step will explain in detail how to pop it out.
-
-
Questo passaggio è privo di traduzione. Aiuta a tradurlo
-
The screw hole near the left and button side seems to be easier to pop out first. Use thumbnail to pry under the marked location while simultaneously pushing on G7 to pop it out.
-
Repeat on the other side, pressing on G8.
-
The assembly should come loose. Push on the buttons and gently wiggle and pull it out.
-
There will still be a bit of friction between the PCB and the center post on the top shell but it won't take too much force. Try to gently persuade it out.
-


Annulla: non ho completato questa guida.
Un'altra persona ha completato questa guida.
Team

USF Tampa, Team S2-G3, Nance Spring 2018 Membro di USF Tampa, Team S2-G3, Nance Spring 2018
USFT-NANCE-S18S2G3
4 Membri
15 Guide realizzate
2 Commenti
Greetings, Is the quad side button assembly still avail. for replacement?
Doesn't appear when checking the parts item for this replacement build.
Thanks.