Salta al contenuto principale

Logitech G502 Lightspeed Feet Replacement

Cosa ti serve

  1. Logitech G502 Lightspeed Feet Replacement, Switch the mouse off: passo 1, immagine 1 di 2 Logitech G502 Lightspeed Feet Replacement, Switch the mouse off: passo 1, immagine 2 di 2
    • Before you begin, flip the power switch into the OFF position.

  2. Logitech G502 Lightspeed Feet Replacement, Heat the mouse feet: passo 2, immagine 1 di 2 Logitech G502 Lightspeed Feet Replacement, Heat the mouse feet: passo 2, immagine 2 di 2
    • Heat an iOpener and apply it to the mouse feet for one minute.

    • You may use a hair dryer or heat gun. If you do, set it to the lowest temperature setting and apply heat for 10 seconds.

  3. Logitech G502 Lightspeed Feet Replacement, Remove the front foot: passo 3, immagine 1 di 3 Logitech G502 Lightspeed Feet Replacement, Remove the front foot: passo 3, immagine 2 di 3 Logitech G502 Lightspeed Feet Replacement, Remove the front foot: passo 3, immagine 3 di 3
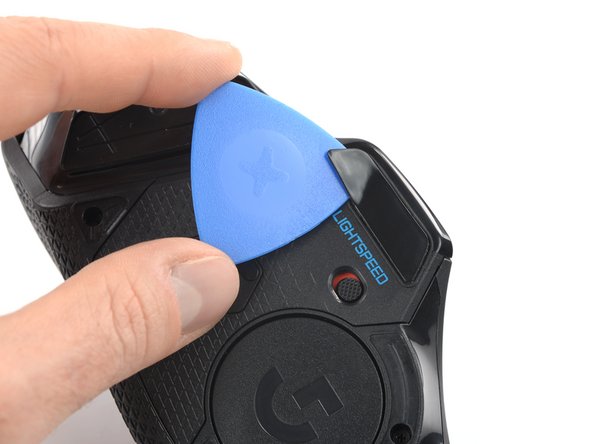
    • Insert the tip of an opening pick underneath the front foot at the gap in its recess.

    • The mouse feet are made of two layers. Make sure you insert the pick under the bottom layer to completely remove the foot.

    • When possible, grab with your fingers and slowly pull to peel it off completely.

  4. Logitech G502 Lightspeed Feet Replacement, Remove the front right foot: passo 4, immagine 1 di 3 Logitech G502 Lightspeed Feet Replacement, Remove the front right foot: passo 4, immagine 2 di 3 Logitech G502 Lightspeed Feet Replacement, Remove the front right foot: passo 4, immagine 3 di 3
    • Insert the tip of an opening pick underneath the tiny front right foot at the gap in its recess.

  5. Logitech G502 Lightspeed Feet Replacement, Remove the rear foot: passo 5, immagine 1 di 3 Logitech G502 Lightspeed Feet Replacement, Remove the rear foot: passo 5, immagine 2 di 3 Logitech G502 Lightspeed Feet Replacement, Remove the rear foot: passo 5, immagine 3 di 3
    • Insert the tip of an opening pick underneath the rear foot starting at the gap in its recess.

    • When possible, grab with your fingers and slowly pull to peel it off completely.

  6. Logitech G502 Lightspeed Feet Replacement, Remove the left foot: passo 6, immagine 1 di 3 Logitech G502 Lightspeed Feet Replacement, Remove the left foot: passo 6, immagine 2 di 3 Logitech G502 Lightspeed Feet Replacement, Remove the left foot: passo 6, immagine 3 di 3
    • Insert the tip of an opening pick underneath the left foot at the gap in its recess.

    • When possible, grab with your fingers and slowly pull to peel it off completely.

  7. Logitech G502 Lightspeed Feet Replacement, Remove the sensor foot: passo 7, immagine 1 di 2 Logitech G502 Lightspeed Feet Replacement, Remove the sensor foot: passo 7, immagine 2 di 2
    • Insert the tip of an opening pick under the front point of the sensor foot. Keep the pick at a steep angle relative to the mouse to get under the foot's adhesive.

    • Make sure to keep the sensor lens free of any adhesive.

    • Remove the sensor foot.

Conclusione

To reassemble your device, follow these instructions in reverse order.

Altre 2 persone hanno completato questa guida.

Tobias Isakeit

Membro da: 03/31/14

118.106 Reputazione

189 Guide realizzate

Team

3 Commenti

Any recommendations where can I get new feet and adhesive?

Aleš Ferlan - Replica

You can use a double-sided tape or if you want to buy a replacement, look for G502 Lightspeed Rubber Feet on the aftermarket that sells it

Nicholin V -

Www.feetglide.com

Rex Luscus - Replica

Aggiungi Commento

Visualizza Statistiche:

Ultime 24 Ore: 3

Ultimi 7 Giorni: 48

Ultimi 30 Giorni: 166

Tutti i Tempi: 5,592