Salta al contenuto principale

Linksys EA6900 USB Ports Replacement

Cosa ti serve

  1. Linksys EA6900 USB Ports Replacement, Linksys EA6900 Disassembly: passo 1, immagine 1 di 3 Linksys EA6900 USB Ports Replacement, Linksys EA6900 Disassembly: passo 1, immagine 2 di 3 Linksys EA6900 USB Ports Replacement, Linksys EA6900 Disassembly: passo 1, immagine 3 di 3
    • Remove the antennas by unscrewing them from the base.

    • Flip over the device and locate the four rubber feet on the bottom.

    • Remove the rubber feet with tweezers

  2. Linksys EA6900 USB Ports Replacement: passo 2, immagine 1 di 1
    • Remove the 0.4cm head screws from each slot with the #1 Phillips head Screwdriver.

  3. Linksys EA6900 USB Ports Replacement: passo 3, immagine 1 di 1
    • Use a blue plastic opening tool to remove the top cover.

    • Move the blue plastic opening tool gently underneath the top cover from side to side.

  4. Linksys EA6900 USB Ports Replacement: passo 4, immagine 1 di 3 Linksys EA6900 USB Ports Replacement: passo 4, immagine 2 di 3 Linksys EA6900 USB Ports Replacement: passo 4, immagine 3 di 3
    • Gently lift the motherboard and remove it from the case

    • Put the motherboard over a (preferably white) surface.

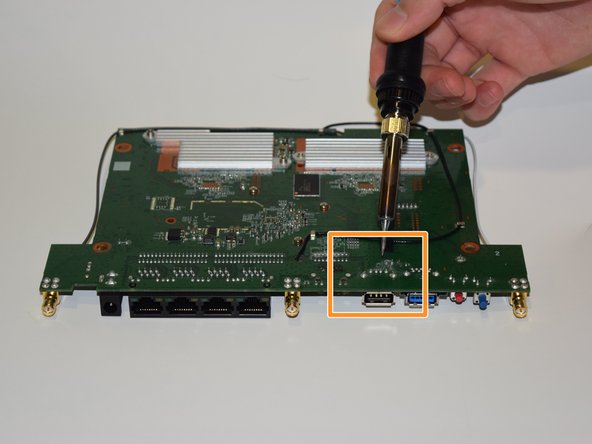
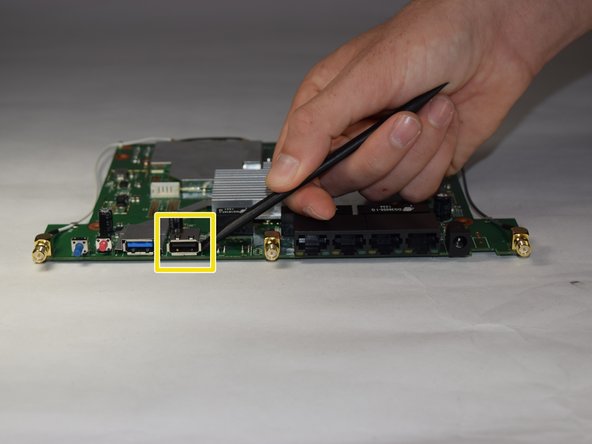
  5. Linksys EA6900 USB Ports Replacement, USB Ports: passo 5, immagine 1 di 3 Linksys EA6900 USB Ports Replacement, USB Ports: passo 5, immagine 2 di 3 Linksys EA6900 USB Ports Replacement, USB Ports: passo 5, immagine 3 di 3
    • Locate the USB ports on both sides of the router motherboard. There are six points on the reverse side where the USB ports are soldered onto.

    • Apply the soldering iron carefully to the six points to melt to solder. Touching the motherboard with the solder can damage the circuits.

    • Be careful with using the soldering iron, it is hot!

    • After the solder has melted and been removed, gently pry the USB port with a black spudger to separate it from the motherboard.

    • Confirm that all of the old solder has been removed after the USB port is detached from the motherboard.

Conclusione

To reassemble your device, follow these instructions in reverse order.

Altre 2 persone hanno completato questa guida.

Matt Tryon

Membro da: 09/20/16

152 Reputazione

1 Guida realizzata

Team

USF Tampa, Team 11-1, Blackwell Fall 2016 Membro di USF Tampa, Team 11-1, Blackwell Fall 2016

USFT-BLACKWELL-F16S11G1

4 Membri

12 Guide realizzate

0 Commenti

Aggiungi Commento

Visualizza Statistiche:

Ultime 24 Ore: 1

Ultimi 7 Giorni: 4

Ultimi 30 Giorni: 7

Tutti i Tempi: 397