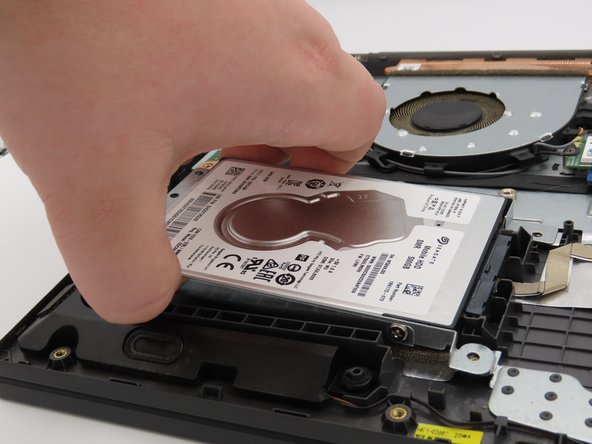
Salta al contenuto principale

Lenovo V15-ADA Hard Disk Drive (HDD) Replacement

Cosa ti serve

  1. Lenovo V15-ADA Hard Disk Drive (HDD) Replacement, Back Panel Assembly: passo 1, immagine 1 di 2 Lenovo V15-ADA Hard Disk Drive (HDD) Replacement, Back Panel Assembly: passo 1, immagine 2 di 2
    • Remove the 10 marked screws using a Phillips #1 screwdriver from the back plate.

    • M2.5 × 7 mm, Phillips-head (6) (RED circles)

    • M2.5 × 4 mm, Phillips-head (4) (ORANGE circles)

  2. Lenovo V15-ADA Hard Disk Drive (HDD) Replacement: passo 2, immagine 1 di 2 Lenovo V15-ADA Hard Disk Drive (HDD) Replacement: passo 2, immagine 2 di 2
    • After all 10 screws have been removed, insert a spudger between the bottom plate and the housing and slide across.

    • Repeat for all 4 sides until loose.

    • Pop off the back plate and set aside.

  3. Lenovo V15-ADA Hard Disk Drive (HDD) Replacement, Battery: passo 3, immagine 1 di 3 Lenovo V15-ADA Hard Disk Drive (HDD) Replacement, Battery: passo 3, immagine 2 di 3 Lenovo V15-ADA Hard Disk Drive (HDD) Replacement, Battery: passo 3, immagine 3 di 3
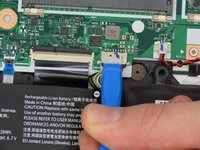
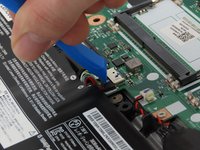
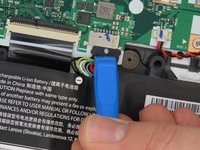
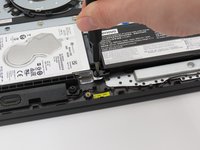
    • To start the removal of the battery, disconnect the ribbon cable connecting the battery to the computer.

  4. Lenovo V15-ADA Hard Disk Drive (HDD) Replacement: passo 4, immagine 1 di 3 Lenovo V15-ADA Hard Disk Drive (HDD) Replacement: passo 4, immagine 2 di 3 Lenovo V15-ADA Hard Disk Drive (HDD) Replacement: passo 4, immagine 3 di 3
    • The battery is held in place by 3 screws. Use the Phillips #0 screwdriver to remove the screws that secure the battery.

    • M2 × 6 mm, Phillips-head, nylok-coated (3)

  5. Lenovo V15-ADA Hard Disk Drive (HDD) Replacement: passo 5, immagine 1 di 1
    • Remove the battery from the device after completing steps 1 and 2.

  6. Lenovo V15-ADA Hard Disk Drive (HDD) Replacement, Hard-Disk Drive (HDD): passo 6, immagine 1 di 1
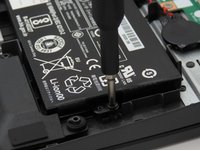
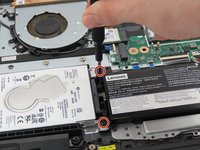
    • Attach a PH0 head onto the screwdriver and remove screw. (M2 × 6 mm, Phillips-head, nylok-coated)

  7. Lenovo V15-ADA Hard Disk Drive (HDD) Replacement: passo 7, immagine 1 di 1
    • Grasp the hard drive and lift up.

  8. Lenovo V15-ADA Hard Disk Drive (HDD) Replacement: passo 8, immagine 1 di 1
    • Pull the hard drive from its port.

  9. Lenovo V15-ADA Hard Disk Drive (HDD) Replacement: passo 9, immagine 1 di 1
    • The hard drive has been successfully taken out.

Conclusione

To reassemble your device, follow these instructions in reverse order.

Un'altra persona ha completato questa guida.

0Commenti sulla guida

Aggiungi Commento

Visualizza Statistiche:

Ultime 24 Ore: 2

Ultimi 7 Giorni: 6

Ultimi 30 Giorni: 43

Tutti i Tempi: 400