Salta al contenuto principale

Lenovo V15-ADA Battery Replacement

Cosa ti serve

  1. Lenovo V15-ADA Battery Replacement, Back Panel Assembly: passo 1, immagine 1 di 1
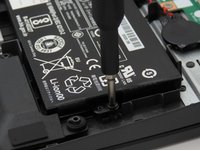
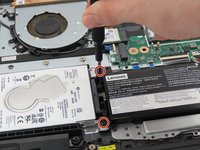
    • Remove the 10 marked screws using a Phillips #1 screwdriver bit.

    • M2.5 × 7 mm, Phillips-head (6) (RED circles)

    • M2.5 × 4 mm, Phillips-head (4) (ORANGE circles)

  2. Lenovo V15-ADA Battery Replacement: passo 2, immagine 1 di 1
    • Remove the 10 screws from the back plate.

  3. Lenovo V15-ADA Battery Replacement: passo 3, immagine 1 di 1
    • After all 10 screws have been removed, insert a spudger between the bottom plate and the housing and slide across.

    • Repeat for all 4 sides until loose.

  4. Lenovo V15-ADA Battery Replacement: passo 4, immagine 1 di 1
    • Pop off the back plate and set aside.

  5. Lenovo V15-ADA Battery Replacement, Battery: passo 5, immagine 1 di 3 Lenovo V15-ADA Battery Replacement, Battery: passo 5, immagine 2 di 3 Lenovo V15-ADA Battery Replacement, Battery: passo 5, immagine 3 di 3
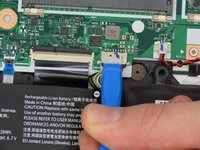
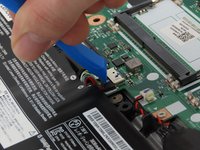
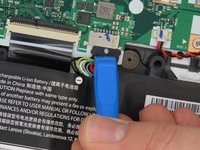
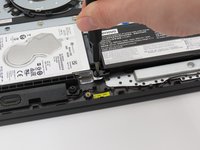
    • To start the removal of the battery, disconnect the ribbon cable connecting the battery to the computer.

  6. Lenovo V15-ADA Battery Replacement: passo 6, immagine 1 di 3 Lenovo V15-ADA Battery Replacement: passo 6, immagine 2 di 3 Lenovo V15-ADA Battery Replacement: passo 6, immagine 3 di 3
    • The battery is held in place by 3 screws. Use the Phillips #0 screwdriver to remove the screws that secure the battery.

    • M2 × 6 mm, Phillips-head, nylok-coated (3)

  7. Lenovo V15-ADA Battery Replacement: passo 7, immagine 1 di 1
    • Remove the battery from the device after completing steps 1 and 2.

Conclusione

To reassemble your device, follow these instructions in reverse order.

0 Commenti

Aggiungi Commento

Visualizza Statistiche:

Ultime 24 Ore: 0

Ultimi 7 Giorni: 3

Ultimi 30 Giorni: 20

Tutti i Tempi: 74