Salta al contenuto principale

Lenovo ThinkPad X1 Carbon (2nd Gen) Power Jack Replacement

Cosa ti serve

  1. Lenovo ThinkPad X1 Carbon (2nd Gen) Power Jack Replacement, Back Cover: passo 1, immagine 1 di 1
    • Using a Phillips #0 screwdriver, remove the seven 7mm screws holding the back cover onto your computer.

  2. Lenovo ThinkPad X1 Carbon (2nd Gen) Power Jack Replacement: passo 2, immagine 1 di 2 Lenovo ThinkPad X1 Carbon (2nd Gen) Power Jack Replacement: passo 2, immagine 2 di 2
    • Use a plastic opening tool or your fingers to pry off the cover.

  3. Lenovo ThinkPad X1 Carbon (2nd Gen) Power Jack Replacement, Battery: passo 3, immagine 1 di 2 Lenovo ThinkPad X1 Carbon (2nd Gen) Power Jack Replacement, Battery: passo 3, immagine 2 di 2
    • Using your fingers, disconnect the battery from the motherboard.

  4. Lenovo ThinkPad X1 Carbon (2nd Gen) Power Jack Replacement: passo 4, immagine 1 di 1
    • Using a Phillips #0 screwdriver, unscrew the five 4.3mm screws attaching the battery to the computer.

  5. Lenovo ThinkPad X1 Carbon (2nd Gen) Power Jack Replacement: passo 5, immagine 1 di 1
    • Remove the battery by pulling it directly towards you.

  6. Lenovo ThinkPad X1 Carbon (2nd Gen) Power Jack Replacement, Fan: passo 6, immagine 1 di 1
    • Use a Phillips #1 screwdriver to undo the four 5 mm screws attached to the heat sink.

  7. Lenovo ThinkPad X1 Carbon (2nd Gen) Power Jack Replacement: passo 7, immagine 1 di 1
    • Undo the black clasp that holds the ribbon cable, attached to the fan, in place and disconnect the ribbon cable.

  8. Lenovo ThinkPad X1 Carbon (2nd Gen) Power Jack Replacement: passo 8, immagine 1 di 1
    • Remove the fan by lifting it directly up.

  9. Lenovo ThinkPad X1 Carbon (2nd Gen) Power Jack Replacement, Motherboard: passo 9, immagine 1 di 2 Lenovo ThinkPad X1 Carbon (2nd Gen) Power Jack Replacement, Motherboard: passo 9, immagine 2 di 2
    • Disconnect all 10 of the ribbon cables attached to the motherboard.

  10. Lenovo ThinkPad X1 Carbon (2nd Gen) Power Jack Replacement: passo 10, immagine 1 di 2 Lenovo ThinkPad X1 Carbon (2nd Gen) Power Jack Replacement: passo 10, immagine 2 di 2
    • Disconnect the wire connecting the motherboard to the speaker.

  11. Lenovo ThinkPad X1 Carbon (2nd Gen) Power Jack Replacement: passo 11, immagine 1 di 1
    • Use a Phillips #1 screwdriver to unscrew the 4mm screw holding the metal covering over the power jack prongs.

  12. Lenovo ThinkPad X1 Carbon (2nd Gen) Power Jack Replacement: passo 12, immagine 1 di 1
    • Use a Phillips #1 screwdriver to unscrew the 4mm screw holding down the Micro-SD card tray.

  13. Lenovo ThinkPad X1 Carbon (2nd Gen) Power Jack Replacement: passo 13, immagine 1 di 2 Lenovo ThinkPad X1 Carbon (2nd Gen) Power Jack Replacement: passo 13, immagine 2 di 2
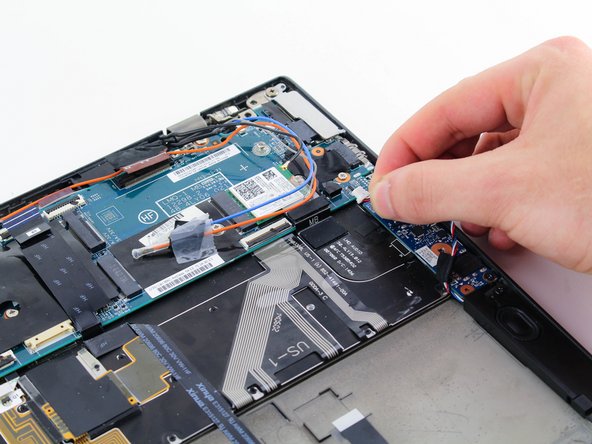
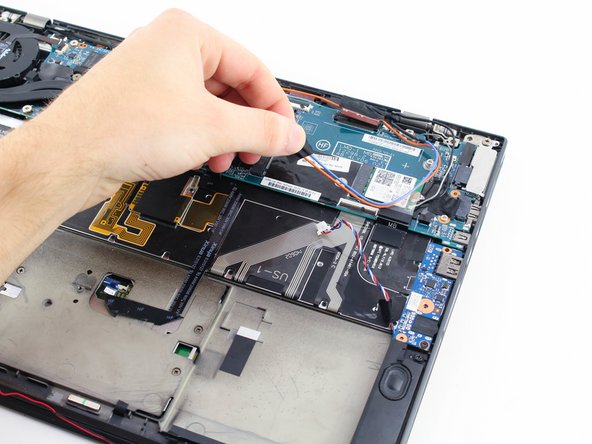
    • Un-tape the orange and blue wires from the motherboard.

  14. Lenovo ThinkPad X1 Carbon (2nd Gen) Power Jack Replacement: passo 14, immagine 1 di 1
    • Remove the black and grey wires from the cable comb on the motherboard.

  15. Lenovo ThinkPad X1 Carbon (2nd Gen) Power Jack Replacement: passo 15, immagine 1 di 2 Lenovo ThinkPad X1 Carbon (2nd Gen) Power Jack Replacement: passo 15, immagine 2 di 2
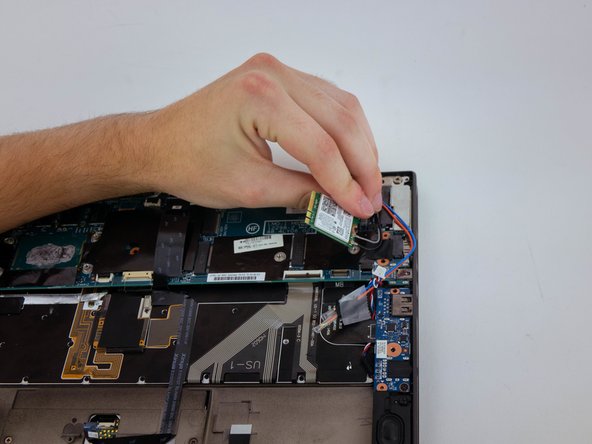
    • Use a Phillips #1 screwdriver to unscrew the 3.7mm screw holding down the wifi card.

    • Remove the wifi card.

  16. Lenovo ThinkPad X1 Carbon (2nd Gen) Power Jack Replacement: passo 16, immagine 1 di 2 Lenovo ThinkPad X1 Carbon (2nd Gen) Power Jack Replacement: passo 16, immagine 2 di 2
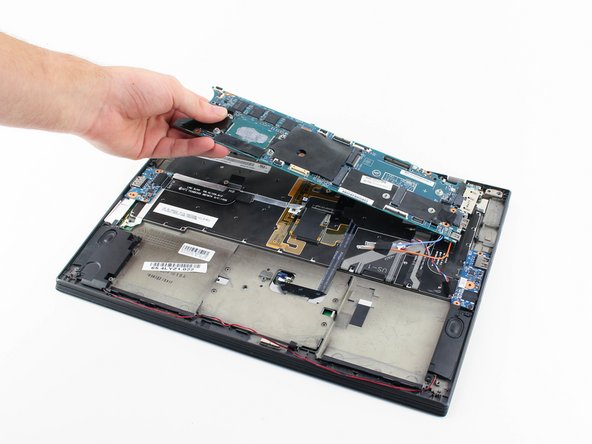
    • Carefully remove the motherboard by lifting it and pulling towards the left.

Conclusione

To reassemble your device, follow these instructions in reverse order.

Altre 4 persone hanno completato questa guida.

Eevee Murdock

Membro da: 01/23/20

1.086 Reputazione

6 Guide realizzate

Team

Cal Poly, Team S18-G4, White Winter 2020 Membro di Cal Poly, Team S18-G4, White Winter 2020

CPSU-WHITE-W20S18G4

4 Membri

7 Guide realizzate

2 Commenti

All going as described, until the final step trying to pull the motherboard out, and there is something still holding it in place. With a bit of a wiggle and pull, there is something about near the screw hole that was holding the wifi card down preventing the card from lifting there. Any clues?

Tim Ellison - Replica

Answering my own question: Removing the motherboard requires that you first pop the SIM card / MicroSD card holder out of the socket, otherwise it won’t lift out. Submitted an update to the guide to save others falling into the same trap.

Tim Ellison -

Aggiungi Commento

Visualizza Statistiche:

Ultime 24 Ore: 1

Ultimi 7 Giorni: 12

Ultimi 30 Giorni: 58

Tutti i Tempi: 3,634