Salta al contenuto principale

Lenovo Tab 2 A8 Volume & Power Button Sensor Replacement

Cosa ti serve

  1. Lenovo Tab 2 A8 Volume & Power Button Sensor Replacement, Removing the Back Panel: passo 1, immagine 1 di 3 Lenovo Tab 2 A8 Volume & Power Button Sensor Replacement, Removing the Back Panel: passo 1, immagine 2 di 3 Lenovo Tab 2 A8 Volume & Power Button Sensor Replacement, Removing the Back Panel: passo 1, immagine 3 di 3
    Attrezzo utilizzato in questo passaggio:
    Tweezers
    $4.99
    Compra
    • Place the tablet face down on a soft, stable surface that will protect the screen.

    • Next, Scrape off the seal over the screw in the back of the tablet with a Metal Spudger.

    • Use the Phillips #000 Screwdriver to remove the M1.4 × 2.5 screw.

    • If the seal covering the screw has already been removed, please proceed to the next step in the process.

    • As the screw is small, you may wish to extract it using a pair of tweezers.

  2. Lenovo Tab 2 A8 Volume & Power Button Sensor Replacement: passo 2, immagine 1 di 3 Lenovo Tab 2 A8 Volume & Power Button Sensor Replacement: passo 2, immagine 2 di 3 Lenovo Tab 2 A8 Volume & Power Button Sensor Replacement: passo 2, immagine 3 di 3
    • Starting on the side, work your way around the the tablet to pop off the back cover. You will want to utilize a metal Spudger for this.

    • Some force may be required initially to pry the back cover off.

    • Note that the button tabs for this device are loose inside the case and will fall out when opening.

  3. Lenovo Tab 2 A8 Volume & Power Button Sensor Replacement, Volume & Power Button Sensor: passo 3, immagine 1 di 2 Lenovo Tab 2 A8 Volume & Power Button Sensor Replacement, Volume & Power Button Sensor: passo 3, immagine 2 di 2
    Attrezzo utilizzato in questo passaggio:
    Tweezers
    $4.99
    Compra
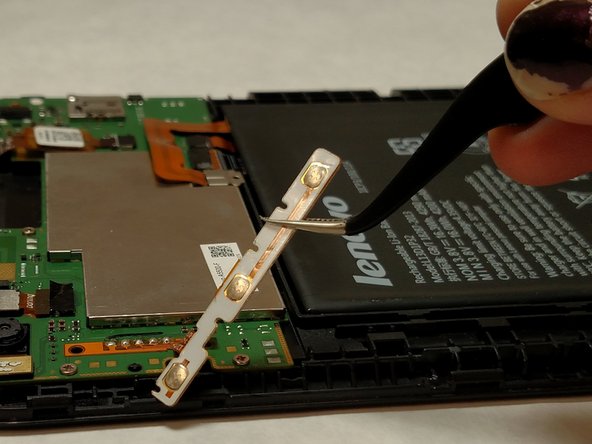
    • Use tweezers to gently lift the button panel away from the device. Be aware that pulling on the ribbon with too much force could tear the ribbon cable.

    • Carefully desolder the button strip contact point.

Conclusione

To reassemble your device, follow these instructions in reverse order.

Altre 3 persone hanno completato questa guida.

Taylor Smith

Membro da: 01/26/17

382 Reputazione

2 Guide realizzate

Team

IUPUI, Team 2-4, Baechle Spring 2017 Membro di IUPUI, Team 2-4, Baechle Spring 2017

IUPUI-BAECHLE-S17S2G4

4 Membri

9 Guide realizzate

0 Commenti

Aggiungi Commento

Visualizza Statistiche:

Ultime 24 Ore: 0

Ultimi 7 Giorni: 4

Ultimi 30 Giorni: 18

Tutti i Tempi: 2,721