Introduzione
This guide will show you how to remove the wireless card from your chromebook. You can replace the wireless card once you have removed it.
Cosa ti serve
-
-
Flip the Chromebook so that the bottom is facing up.
-
Use a Phillips #1 screwdriver to remove the six 6.6 mm screws on the bottom.
-
Use a spudger to remove each of the 4 rubber feet.
-
Use a Phillips #1 screwdriver to remove the four additional screws under the rubber feet.
-
-
-
Flip the Chromebook back over and open the screen.
-
Wedge the plastic opening tool between the keyboard and the bottom of the Chromebook.
-
Run the plastic opening tool along the seam between the keyboard and the bottom of the Chromebook until the keyboard moves freely. Several tabs will pop out.
-
-
-
-
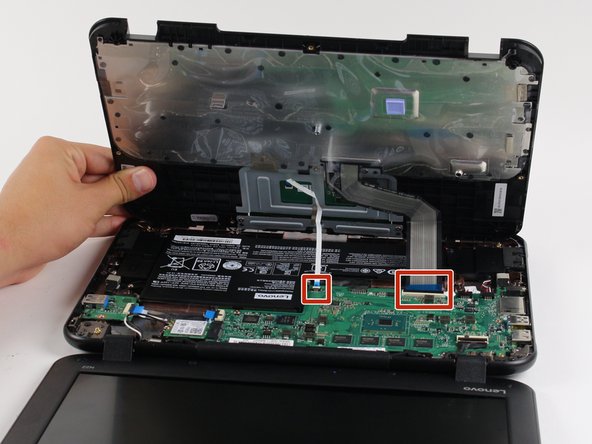
Lift the keyboard up and off the back panel, exposing the motherboard and battery.
Hmmm. So I found that once I had got the keyboard section off the motherboard/battery section that there was a metal plate which was holding the keyboard in place. I found a YouTube video, White Angel I think, and showed how you could get the plate off to be able to replace the keyboard.
There are screws under the rubber pads on the bottom that need to be taken out as well. I fix these as a school where we literally have hundreds of these. There is no metal plate as described in the comment above. Rubber pads have letters and are not interchangeable with the other corners.
Ed, he's talking about the metal plate fastened to the keyboard once you remove the palm rest assembly. You’re referring to removing the initial external bottom screws.
White Angel shows us how to replace the keyboard in the assembly, which saves you about $20 in parts vs. buying another full palm rest assembly.
The only issue is that she pops the plastic tabs largely holding the metal plate in place- and never repairs them. So the keyboard looks nonfastened and gerry-rigged.
Might be worth spending the extra $20 for the full assembly in the long run.
Cheers
-
-
-
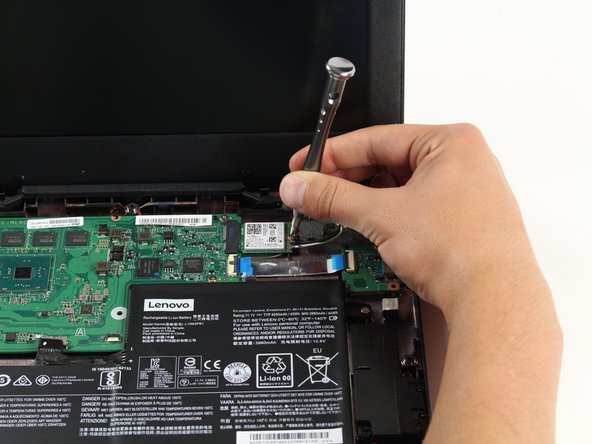
Use a Philips #1 screwdriver to remove the 3.6 mm screw from the back panel.
-


To reassemble your device, follow these instructions in reverse order.
To reassemble your device, follow these instructions in reverse order.
Annulla: non ho completato questa guida.
Altre 2 persone hanno completato questa guida.
Team

Cal Poly, Team S21-G1, Livingston Spring 2017 Membro di Cal Poly, Team S21-G1, Livingston Spring 2017
CPSU-LIVINGSTON-S17S21G1
4 Membri
14 Guide realizzate
Un commento
Very well explained and photographed. My first attempt at a laptop repair and this guide made it possible.
Thanks!
There is also a screw under each of the 4 rubber feet that must be removed.
Aaron Kurtz - Replica
Thank you for that little bit of important information. I almost torn apart the keyboard using too much force :)
Anthony Hillier -
@Aaron Kurtz, I just updated the guide. I’ll see if I can add any pictures later.
John Gillen - Replica
I feel like i’m doing something wrong. It’s hard to get the new keyboard pushed in. Im afraid i’m going to break it.
Jenna Bowman - Replica
I feel like I am doing something wrong. I got the keyboard off no problem. Put the replacement on and I feel like it’s going to break when I try to push it back in the frame.
Jenna Bowman - Replica
You should update the guide. As Aaron Kurtz told long time ago there are screews under the feet. It is said in the comments, but not in the guide. I’m afraid somebody may break the keyboard…
Andreu Rigo Gost - Replica