Salta al contenuto principale

Lenovo N22 Chromebook Wireless Card Replacement

Cosa ti serve

  1. Lenovo N22 Chromebook Wireless Card Replacement, Keyboard: passo 1, immagine 1 di 3 Lenovo N22 Chromebook Wireless Card Replacement, Keyboard: passo 1, immagine 2 di 3 Lenovo N22 Chromebook Wireless Card Replacement, Keyboard: passo 1, immagine 3 di 3
    • Power down the Chromebook before starting the repair.

    • Opening the Chromebook voids the manufacturer warranty.

    • Flip the Chromebook so that the bottom is facing up.

    • Use a Phillips #1 screwdriver to remove the six 6.6 mm screws on the bottom.

    • Use a spudger to remove each of the 4 rubber feet.

    • Use a Phillips #1 screwdriver to remove the four additional screws under the rubber feet.

  2. Lenovo N22 Chromebook Wireless Card Replacement: passo 2, immagine 1 di 3 Lenovo N22 Chromebook Wireless Card Replacement: passo 2, immagine 2 di 3 Lenovo N22 Chromebook Wireless Card Replacement: passo 2, immagine 3 di 3
    • Flip the Chromebook back over and open the screen.

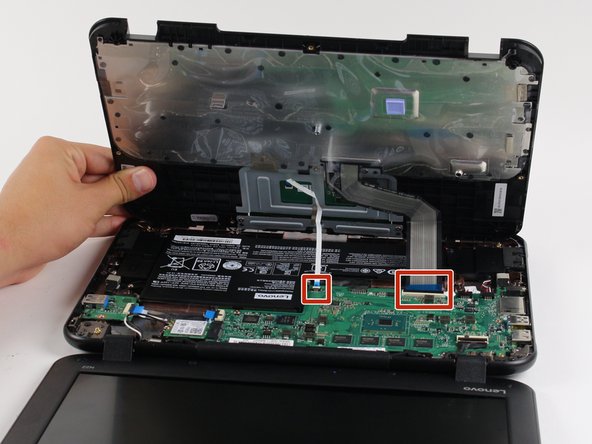
    • Wedge the plastic opening tool between the keyboard and the bottom of the Chromebook.

    • Run the plastic opening tool along the seam between the keyboard and the bottom of the Chromebook until the keyboard moves freely. Several tabs will pop out.

    • It is normal for the tabs to make a loud click when released. The corner tabs will be harder to release than the others and will make a louder click.

  3. Lenovo N22 Chromebook Wireless Card Replacement: passo 3, immagine 1 di 2 Lenovo N22 Chromebook Wireless Card Replacement: passo 3, immagine 2 di 2
    • Once the keyboard is released, grab the two top corners closest to the screen and slowly lift the keyboard up.

    • Do not lift the keyboard quickly or you might break the two cables that connect the keyboard to the motherboard.

    • Disconnect the cables by lifting up the retaining flaps on the black ZIF connectors.

    • Slowly pull the cables up and out of the connectors.

  4. Lenovo N22 Chromebook Wireless Card Replacement: passo 4, immagine 1 di 1
    • Lift the keyboard up and off the back panel, exposing the motherboard and battery.

  5. Lenovo N22 Chromebook Wireless Card Replacement, Wireless Card: passo 5, immagine 1 di 2 Lenovo N22 Chromebook Wireless Card Replacement, Wireless Card: passo 5, immagine 2 di 2
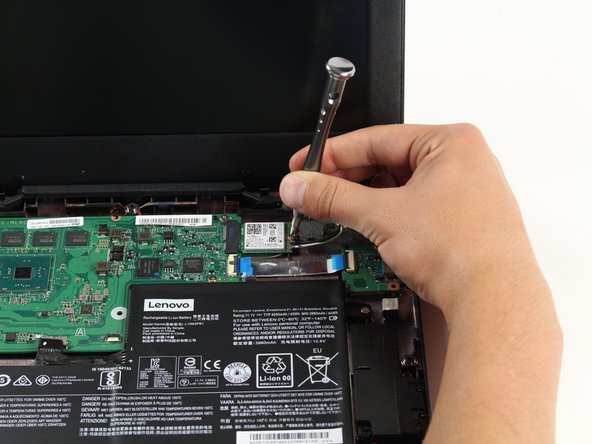
    • Use a Philips #1 screwdriver to remove the 3.6 mm screw from the back panel.

  6. Lenovo N22 Chromebook Wireless Card Replacement: passo 6, immagine 1 di 1
    • Gently slide the wireless card to the right to remove it from the standard socket on the motherboard.

  7. Lenovo N22 Chromebook Wireless Card Replacement: passo 7, immagine 1 di 2 Lenovo N22 Chromebook Wireless Card Replacement: passo 7, immagine 2 di 2
    • Grab the black and white wires as close to the antenna cable connectors as possible.

    • Gently pull the black and white wires away from the antenna cable connectors on the wireless card.

    • When reinstalling, place the wires on the antenna cable connectors and gently press straight down. The wires should snap back into the connector.

    • When reinstalling, make sure that the white wire and the black wire are put back in their original connectors.

Conclusione

To reassemble your device, follow these instructions in reverse order.

Altre 2 persone hanno completato questa guida.

Megan Louie

Membro da: 04/26/17

323 Reputazione

1 Guida realizzata

Team

Cal Poly, Team S21-G1, Livingston Spring 2017 Membro di Cal Poly, Team S21-G1, Livingston Spring 2017

CPSU-LIVINGSTON-S17S21G1

4 Membri

14 Guide realizzate

Un commento

Very well explained and photographed. My first attempt at a laptop repair and this guide made it possible.

Thanks!

Jeff Koskela - Replica

Aggiungi Commento

Visualizza Statistiche:

Ultime 24 Ore: 1

Ultimi 7 Giorni: 15

Ultimi 30 Giorni: 47

Tutti i Tempi: 3,827