Questa versione può contenere modifiche errate. Passa all'ultima istantanea verificata.
Cosa ti serve
-
Questo passaggio è privo di traduzione. Aiuta a tradurlo
-
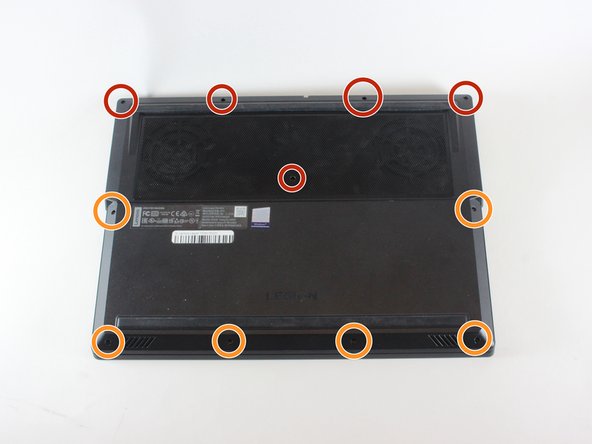
Use a PZ00 screwdriver bit to remove the eleven screws securing the back cover.
-
Five 7 mm screws
-
Six 4 mm screws
-
-
Questo passaggio è privo di traduzione. Aiuta a tradurlo
-
Carefully pry the back cover off the computer using an opening pick.
-
-
Questo passaggio è privo di traduzione. Aiuta a tradurlo
-
Use a Phillips screwdriver to remove the five 4 mm screws holding the battery in place.
-
-
Questo passaggio è privo di traduzione. Aiuta a tradurlo
-
Disconnect the battery cable from its motherboard socket by gently pulling it towards the battery.
-
-
Questo passaggio è privo di traduzione. Aiuta a tradurlo
-
Use a JIS #1 screwdriver to loosen the five spring screws located at the middle of the fan piece.
-
Remove the plastic covering after the screws have been loosened.
-
-
Questo passaggio è privo di traduzione. Aiuta a tradurlo
-
Use a JIS #1 screwdriver to remove four 4mm screws securing the fans to the device.
-
-
-
Questo passaggio è privo di traduzione. Aiuta a tradurlo
-
Unplug the wires connecting the two fans to the motherboard.
-
-
Questo passaggio è privo di traduzione. Aiuta a tradurlo
-
Lift the fans out of their positions and remove them from the device.
-
-
Questo passaggio è privo di traduzione. Aiuta a tradurlo
-
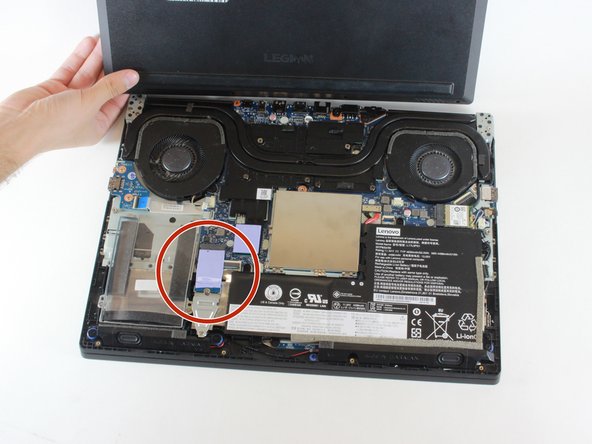
Remove one 4mm screw circled in orange in the second picture with a JIS #1 screwdriver.
-
-
Questo passaggio è privo di traduzione. Aiuta a tradurlo
-
Carefully remove the SSD from its connector.
-
-
Questo passaggio è privo di traduzione. Aiuta a tradurlo
-
Start by disconnecting the ribbon cable that is near the audio driver. It is recommended to use the iFixit Opening Pick to remove the ribbon cable.
-
-
Questo passaggio è privo di traduzione. Aiuta a tradurlo
-
Remove three 4mm screws using a JIS #1 screwdriver.
-
Remove the black cover the screws were holding down.
-
-
Questo passaggio è privo di traduzione. Aiuta a tradurlo
-
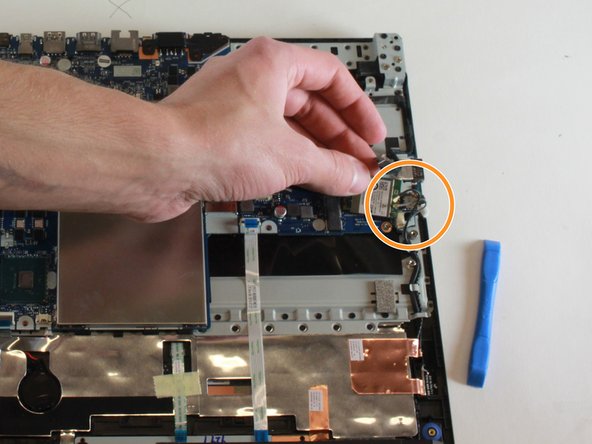
Remove the 4mm screw on top of the audio driver using a JIS #1 screwdriver.
-
Pull the audio cables gently off the audio driver.
-
Remove the audio driver from the motherboard.
-
-
Questo passaggio è privo di traduzione. Aiuta a tradurlo
-
Remove twelve 4mm screws circled in red using a JIS #1 screwdriver.
-
Peel off the Lenovo sticker and remove one 4mm screw with a JIS #1 screwdriver.
-
-
Questo passaggio è privo di traduzione. Aiuta a tradurlo
-
Remove two ribbon cables in the circled areas. Gently pull them out of their ports.
-
-
Questo passaggio è privo di traduzione. Aiuta a tradurlo
-
Remove the final ribbon cable by gently pulling it from its socket.
-
-
Questo passaggio è privo di traduzione. Aiuta a tradurlo
-
Gently lift the motherboard out of the housing.
-


Annulla: non ho completato questa guida.
Altre 4 persone hanno completato questa guida.

Team

Cal Poly, Team S7-G1, Regan Winter 2020 Membro di Cal Poly, Team S7-G1, Regan Winter 2020
CPSU-REGAN-W20S7G1
4 Membri
12 Guide realizzate
3 Commenti
Kaylie Klausing
I hope you burn in !&&*
You fckking piece of $@$*.
DON'T FOLLOW THIS.
FCKKKK YOUUUUU
What the hell is wrong with this guy?