Salta al contenuto principale

Lenovo IdeaPad U310 Keyboard Replacement

Cosa ti serve

  1. Lenovo IdeaPad U310 Keyboard  Replacement, Battery: passo 1, immagine 1 di 1
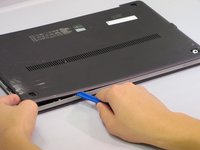
    • Flip the device over so the bottom panel is facing up.

    • Remove the rubber feet by pinching and pulling in an upward motion.

    • The rubber feet are missing from this photo, but will be located within the red markups.

  2. Lenovo IdeaPad U310 Keyboard  Replacement: passo 2, immagine 1 di 1
    • Remove the 4 screws securing the bottom panel to the device.

    • The screws are missing from this device and are not pictured. They will be located under the rubber feet within the red markups.

  3. Lenovo IdeaPad U310 Keyboard  Replacement: passo 3, immagine 1 di 2 Lenovo IdeaPad U310 Keyboard  Replacement: passo 3, immagine 2 di 2
    • Place the plastic opening tool between the bottom panel and device.

    • Pry around the device's outer edge until the bottom panel is no longer attached.

    • Lift the bottom panel up and away from device.

  4. Lenovo IdeaPad U310 Keyboard  Replacement: passo 4, immagine 1 di 2 Lenovo IdeaPad U310 Keyboard  Replacement: passo 4, immagine 2 di 2
    • Unplug the Battery from the circuit board by carefully prying the connector from its housing.

  5. Lenovo IdeaPad U310 Keyboard  Replacement: passo 5, immagine 1 di 2 Lenovo IdeaPad U310 Keyboard  Replacement: passo 5, immagine 2 di 2
    • Remove the 5.6 mm Screw with the PH1 screwdriver.

    • Remove the 4.6 mm screws with the PH1 screwdriver.

  6. Lenovo IdeaPad U310 Keyboard  Replacement: passo 6, immagine 1 di 2 Lenovo IdeaPad U310 Keyboard  Replacement: passo 6, immagine 2 di 2
    • Lift the strip tape away from the battery, being careful not to completely remove it.

  7. Lenovo IdeaPad U310 Keyboard  Replacement: passo 7, immagine 1 di 1
    • Remove the battery by lifting up and away from device.

  8. Lenovo IdeaPad U310 Keyboard  Replacement, Keyboard: passo 8, immagine 1 di 2 Lenovo IdeaPad U310 Keyboard  Replacement, Keyboard: passo 8, immagine 2 di 2
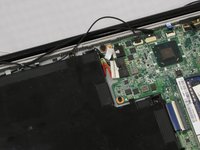
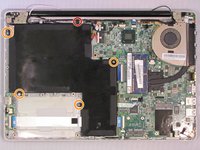
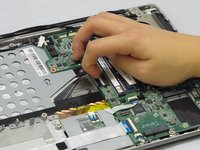
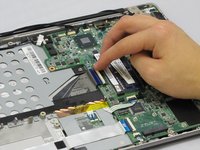
    • Remove the two 4.6 mm screws using PH1.

    • One is located next to the fan, the other at the corner of the battery.

  9. Lenovo IdeaPad U310 Keyboard  Replacement: passo 9, immagine 1 di 2 Lenovo IdeaPad U310 Keyboard  Replacement: passo 9, immagine 2 di 2
    • Pry up the hinge that houses the keyboard's ribbon cable.

  10. Lenovo IdeaPad U310 Keyboard  Replacement: passo 10, immagine 1 di 1
    • Remove the ribbon from its housing.

  11. Lenovo IdeaPad U310 Keyboard  Replacement: passo 11, immagine 1 di 1
    • Turn laptop upside down so the keyboard is facing up.

    • Place prying tool between the keyboard and the housing.

    • Move the prying tool around the keyboard's edge, releasing the tabs securing the keyboard.

    • There are larger tabs that cannot be pried at the bottom of the keyboard.

  12. Lenovo IdeaPad U310 Keyboard  Replacement: passo 12, immagine 1 di 1
    • Life the keyboard up and away from the device.

Conclusione

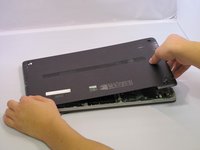
To reassemble your device, follow these instructions in reverse order.

Altre 2 persone hanno completato questa guida.

Un commento

Honestly, the best instructions for any task i ever made ⭐⭐⭐⭐⭐. Thank you

zakimsaleh - Replica

Aggiungi Commento

Visualizza Statistiche:

Ultime 24 Ore: 0

Ultimi 7 Giorni: 2

Ultimi 30 Giorni: 10

Tutti i Tempi: 3,579