Salta al contenuto principale

Lenovo IdeaCentre K410 Optical Drive Replacement

Cosa ti serve

  1. Lenovo IdeaCentre K410 Optical Drive Replacement, Side Panel: passo 1, immagine 1 di 1
    • Lay the computer down on its side as shown.

    • Remove the two 14mm screws shown. The screws are loose enough to unscrew with your hands.

  2. Lenovo IdeaCentre K410 Optical Drive Replacement: passo 2, immagine 1 di 1
    • Gently slide the side panel straight back and remove from the computer.

  3. Lenovo IdeaCentre K410 Optical Drive Replacement, Optical Drive: passo 3, immagine 1 di 2 Lenovo IdeaCentre K410 Optical Drive Replacement, Optical Drive: passo 3, immagine 2 di 2
    • Pull up on the three tabs shown

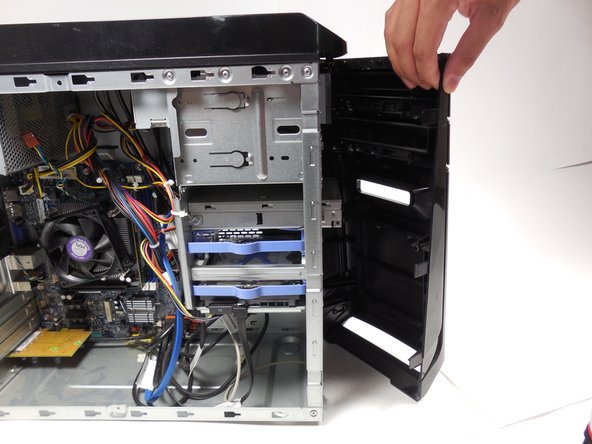
    • Swivel the front panel so the front is open, and gently pull the cover off

  4. Lenovo IdeaCentre K410 Optical Drive Replacement: passo 4, immagine 1 di 1
    • Push down on the button that says "push" while pulling the optical drive outward.

Conclusione

To reassemble your device, follow these instructions in reverse order.

Altre 2 persone hanno completato questa guida.

Timothy Grebe

Membro da: 10/19/14

1.634 Reputazione

9 Guide realizzate

Team

Cal Poly, Team 10-39, Amido Fall 2014 Membro di Cal Poly, Team 10-39, Amido Fall 2014

CPSU-AMIDO-F14S10G39

4 Membri

18 Guide realizzate

0 Commenti

Aggiungi Commento

Visualizza Statistiche:

Ultime 24 Ore: 2

Ultimi 7 Giorni: 10

Ultimi 30 Giorni: 17

Tutti i Tempi: 1,814