Salta al contenuto principale

LeapFrog LeapPad2 Explorer Front Camera Replacement

Cosa ti serve

  1. LeapFrog LeapPad2 Explorer Front Camera Replacement, Battery: passo 1, immagine 1 di 2 LeapFrog LeapPad2 Explorer Front Camera Replacement, Battery: passo 1, immagine 2 di 2
    • Before disassembling your LeapPad, ensure your device is shut off.

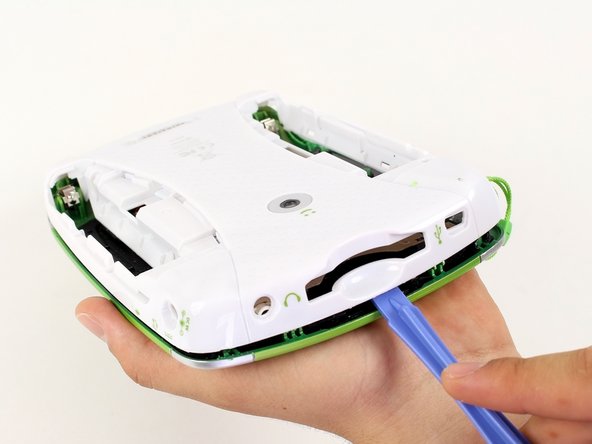
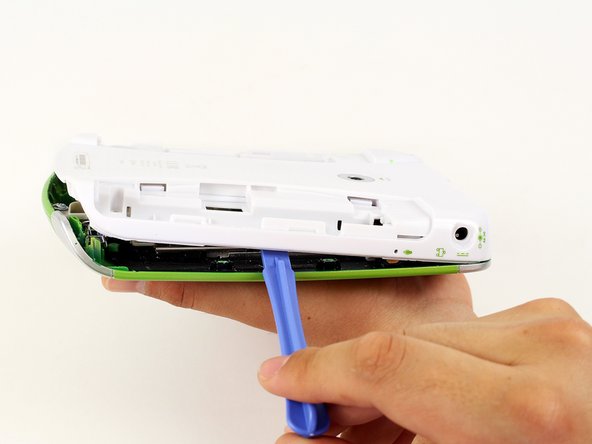
    • Push outward on the plastic side panels to remove and reveal battery.

    • The panels should detach fully from the main device.

  2. LeapFrog LeapPad2 Explorer Front Camera Replacement: passo 2, immagine 1 di 3 LeapFrog LeapPad2 Explorer Front Camera Replacement: passo 2, immagine 2 di 3 LeapFrog LeapPad2 Explorer Front Camera Replacement: passo 2, immagine 3 di 3
    • Push down from the positive end of the battery towards the negative end to pry the battery up out of its dispenser.

    • Remove all four AA alkaline batteries from the device.

  3. LeapFrog LeapPad2 Explorer Front Camera Replacement, Back Cover: passo 3, immagine 1 di 2 LeapFrog LeapPad2 Explorer Front Camera Replacement, Back Cover: passo 3, immagine 2 di 2
    • This step will void your device warranty.

    • Remove the following screws securing the back cover to the main device:

    • Two 10.0 mm Phillips screws

    • Four 4.0 mm Phillips screws

    • Three 3.0 mm Phillips screws

  4. LeapFrog LeapPad2 Explorer Front Camera Replacement: passo 4, immagine 1 di 3 LeapFrog LeapPad2 Explorer Front Camera Replacement: passo 4, immagine 2 di 3 LeapFrog LeapPad2 Explorer Front Camera Replacement: passo 4, immagine 3 di 3
    • Insert a plastic opening tool into the seam between the front and rear covers to detach the back cover from the rest of the device.

    • Move the plastic opening tool around the perimeter of the LeapPad2.

    • Lift up and remove the rear case from the tablet.

    • A butter knife can help when prying the device.

  5. LeapFrog LeapPad2 Explorer Front Camera Replacement, Front Cover: passo 5, immagine 1 di 2 LeapFrog LeapPad2 Explorer Front Camera Replacement, Front Cover: passo 5, immagine 2 di 2
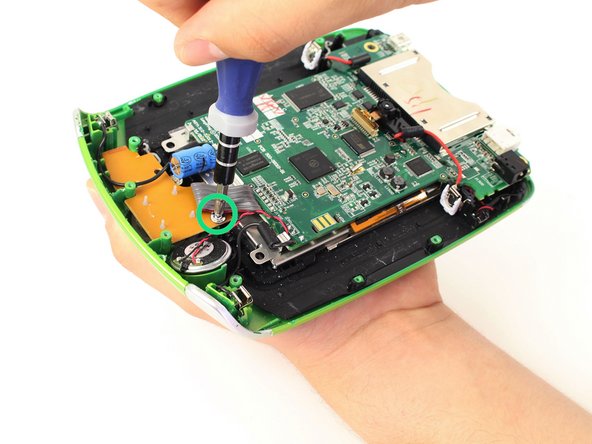
    • Remove the following screws securing the front cover to the main device:

    • Three 6.0 mm Phillips screws

    • Three 7.0 mm Phillips screws

    • Two 10.0 mm Phillips screws

    • Three 7.0 mm Phillips screws (bulkier screw head than other 7.0 mm Phillips screws)

    • The white plastic component holding the speaker must be removed to reach the third 7.0 mm Phillips screw. Refer to Step 2.

  6. LeapFrog LeapPad2 Explorer Front Camera Replacement: passo 6, immagine 1 di 2 LeapFrog LeapPad2 Explorer Front Camera Replacement: passo 6, immagine 2 di 2
    • Unscrew the white plastic piece to expose the third 7.0 mm Phillips screw mentioned.

  7. LeapFrog LeapPad2 Explorer Front Camera Replacement: passo 7, immagine 1 di 2 LeapFrog LeapPad2 Explorer Front Camera Replacement: passo 7, immagine 2 di 2
    • When unscrewing the game cartridge screws, you will find a loose black plastic component underneath the game cartridge.

    • Use tweezers to remove the piece.

    • In case the piece falls out unexpectedly, refer to this step to make sure you put this piece back in place during the reassembly of your device.

  8. LeapFrog LeapPad2 Explorer Front Camera Replacement: passo 8, immagine 1 di 2 LeapFrog LeapPad2 Explorer Front Camera Replacement: passo 8, immagine 2 di 2
    • Desolder the through hole-components in power plugs on both sides of the device where the batteries were once connected.

    • Do not refer to the pictures in this step for correct soldering and de-soldering techniques. They are solely for illustration purposes.

    • For proper soldering and desoldering techniques reference Come saldare e dissaldare componenti elettrici.

    • Soldering requires the iron to be at hot temperatures and can cause burns. Wear safety glasses as needed.

    • Be extremely careful with the cables in this step as they could melt, burn, or break.

  9. LeapFrog LeapPad2 Explorer Front Camera Replacement: passo 9, immagine 1 di 2 LeapFrog LeapPad2 Explorer Front Camera Replacement: passo 9, immagine 2 di 2
    • Pry the power cables from the device using your fingers or tweezers.

    • Now you should be able to lift up the front cover, leaving you with the motherboard and screen.

  10. LeapFrog LeapPad2 Explorer Front Camera Replacement, Front Camera: passo 10, immagine 1 di 3 LeapFrog LeapPad2 Explorer Front Camera Replacement, Front Camera: passo 10, immagine 2 di 3 LeapFrog LeapPad2 Explorer Front Camera Replacement, Front Camera: passo 10, immagine 3 di 3
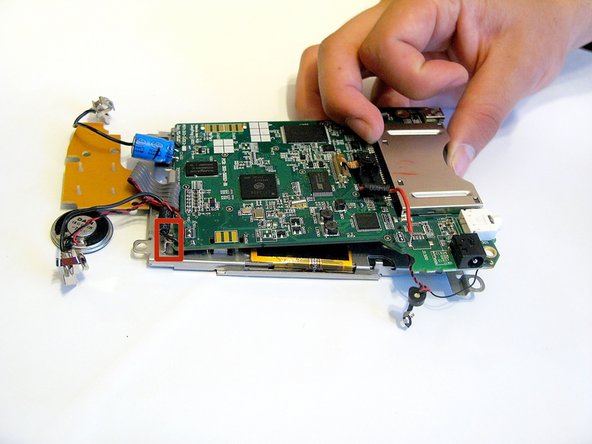
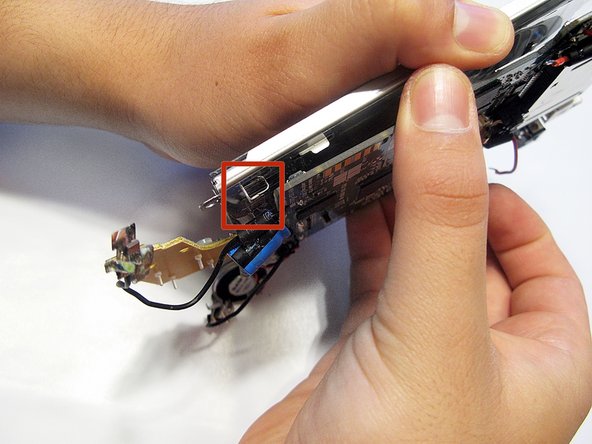
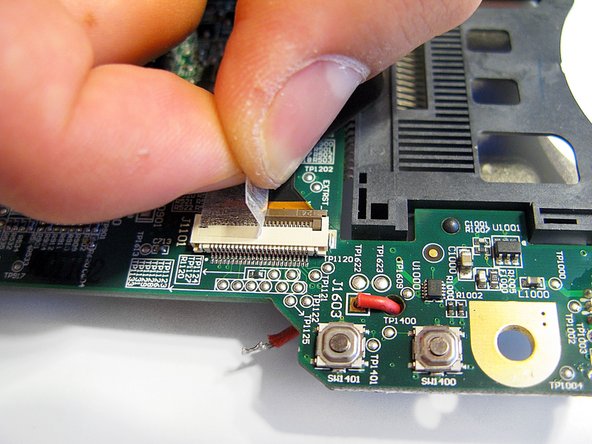
    • Lift the screen from the motherboard by pulling the board out from the three metal tabs.

    • Do not be too aggressive when separating the components, as the parts are still connected.

  11. LeapFrog LeapPad2 Explorer Front Camera Replacement: passo 11, immagine 1 di 1
    • Separate the screen from the motherboard and lay the device's components flat open like a book.

    • Do not be too aggressive when separating the components, as the parts are still connected.

  12. LeapFrog LeapPad2 Explorer Front Camera Replacement: passo 12, immagine 1 di 2 LeapFrog LeapPad2 Explorer Front Camera Replacement: passo 12, immagine 2 di 2
    • Peel off tape covering the camera's connection ribbon to the circuit.

  13. LeapFrog LeapPad2 Explorer Front Camera Replacement: passo 13, immagine 1 di 1
    • To safely remove the ribbon cable, you must first pull up the retaining flap.

    • Failing to do this step could result in damage to the cable and/or connector.

  14. LeapFrog LeapPad2 Explorer Front Camera Replacement: passo 14, immagine 1 di 1
    • Gently pull outward, to remove the ribbon from the socket on the circuit board.

    • If the flap is up as shown in the picture, no force should be required to remove the ribbon cable.

Conclusione

To reassemble your device, follow these instructions in reverse order.

Nupur Garg

Membro da: 04/12/14

867 Reputazione

7 Guide realizzate

Team

Cal Poly, Team 8-10, Regan Spring 2014 Membro di Cal Poly, Team 8-10, Regan Spring 2014

CPSU-REGAN-S14S8G10

4 Membri

16 Guide realizzate

0 Commenti

Aggiungi Commento

Visualizza Statistiche:

Ultime 24 Ore: 0

Ultimi 7 Giorni: 0

Ultimi 30 Giorni: 1

Tutti i Tempi: 440