Salta al contenuto principale

LeapFrog LeapPad Platinum Screen Replacement

Cosa ti serve

  1. LeapFrog LeapPad Platinum Screen Replacement, Battery: passo 1, immagine 1 di 1
    • Place your tablet on a flat surface with the screen facing down.

    many thanks for this, but can you tell me where to buy a replacement screen please?

    Helen - Replica

  2. LeapFrog LeapPad Platinum Screen Replacement: passo 2, immagine 1 di 2 LeapFrog LeapPad Platinum Screen Replacement: passo 2, immagine 2 di 2
    • Using a plastic opening tool, pry off the plastic border by inserting it in the space between the green bumper and the white plastic on the edge of the tablet.

    • The border snaps into place, so don't be too worried if you hear a cracking noise while prying it off.

  3. LeapFrog LeapPad Platinum Screen Replacement: passo 3, immagine 1 di 2 LeapFrog LeapPad Platinum Screen Replacement: passo 3, immagine 2 di 2
    • Remove the 11 Phillips screws (8.0 mm) located around the edge of the back cover with a Phillips screwdriver.

  4. LeapFrog LeapPad Platinum Screen Replacement: passo 4, immagine 1 di 1
    • Pull the back cover off of your device.

  5. LeapFrog LeapPad Platinum Screen Replacement: passo 5, immagine 1 di 3 LeapFrog LeapPad Platinum Screen Replacement: passo 5, immagine 2 di 3 LeapFrog LeapPad Platinum Screen Replacement: passo 5, immagine 3 di 3
    • Wedge a plastic opening tool underneath the battery and lift the battery up.

    • The battery is held in place by an adhesive strip, so it can be difficult to pry off.

    How do you get that little black loop that the battery wires are wrapped in, out? Does it just pop out? Iโ€™m afraid to pull to hard

    Casey Payton - Replica

  6. LeapFrog LeapPad Platinum Screen Replacement: passo 6, immagine 1 di 1
    • The battery has red, black, and white wires that are all connected to the motherboard through a plastic clip. Unplug this plastic clip to fully remove the battery from your device.

  7. LeapFrog LeapPad Platinum Screen Replacement, Motherboard: passo 7, immagine 1 di 2 LeapFrog LeapPad Platinum Screen Replacement, Motherboard: passo 7, immagine 2 di 2
    • Locate the white ribbon cable connected to the motherboard.

    • Disconnect the cable by flipping up the metal tab on the connector and sliding the cable out.

  8. LeapFrog LeapPad Platinum Screen Replacement: passo 8, immagine 1 di 2 LeapFrog LeapPad Platinum Screen Replacement: passo 8, immagine 2 di 2
    • Locate the black ribbon cable which is connected to the motherboard.

    • Disconnect the cable by flipping up the metal tab on the connector and sliding the cable out.

  9. LeapFrog LeapPad Platinum Screen Replacement: passo 9, immagine 1 di 2 LeapFrog LeapPad Platinum Screen Replacement: passo 9, immagine 2 di 2
    • Remove the three 4.0 mm Phillips screws located in the corners of the motherboard.

  10. LeapFrog LeapPad Platinum Screen Replacement: passo 10, immagine 1 di 1
    • Lift up the front edge of the motherboard.

    • Lift the volume-control button out of the device and set it aside.

  11. LeapFrog LeapPad Platinum Screen Replacement: passo 11, immagine 1 di 1
    • Gently tug upwards on the red and black twisted wires located near the button you just removed to release the black rubber base they are connected to from the device.

    • This does not take much force, so it is likely that this piece will pop out of place when initially lifting the motherboard.

  12. LeapFrog LeapPad Platinum Screen Replacement: passo 12, immagine 1 di 2 LeapFrog LeapPad Platinum Screen Replacement: passo 12, immagine 2 di 2
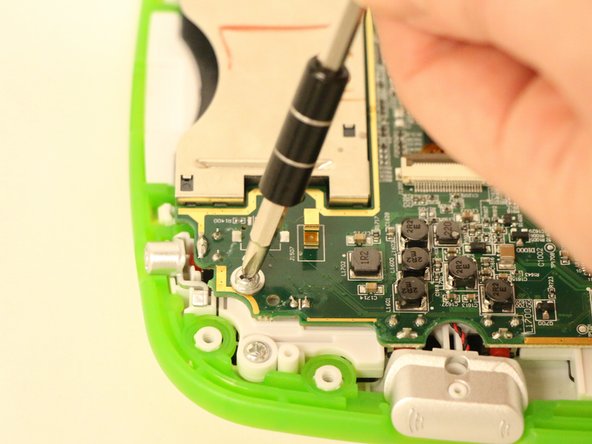
    • Rotate your device 180 degrees so the the motherboard is on your right-hand side and gently lift the front edge of the motherboard to reveal an orange sheet of plastic.

    • Disconnect the orange sheet from the motherboard by lifting the metal tab on the connector (as you did for the cables in steps 1 and 2), and lift the motherboard completely out of the device.

  13. LeapFrog LeapPad Platinum Screen Replacement, Speaker: passo 13, immagine 1 di 2 LeapFrog LeapPad Platinum Screen Replacement, Speaker: passo 13, immagine 2 di 2
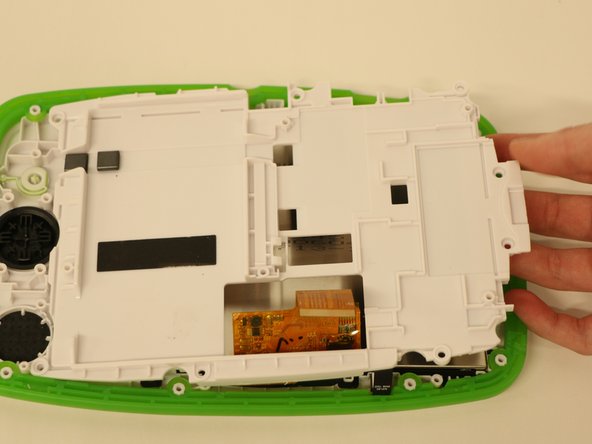
    • Remove the brown speaker board located on the left side of the LeapPad by removing the following screws holding it in place:

    • Four 3.0mm Phillips screws

    • One 7.0mm Phillips screw

  14. LeapFrog LeapPad Platinum Screen Replacement: passo 14, immagine 1 di 2 LeapFrog LeapPad Platinum Screen Replacement: passo 14, immagine 2 di 2
    • Locate the circular plastic speaker cover, remove the two 5.0mm Phillips screws holding it in place, and gently lift the cover away from the device.

  15. LeapFrog LeapPad Platinum Screen Replacement: passo 15, immagine 1 di 1
    • Lift up the speaker board and locate the white ribbon attached to its underside.

    • Fully remove the speaker board from the device by gently pulling the ribbon cables out of the slot.

    • Be gentle when working with the ribbon as it can be damaged easily.

    • Tweezers or a pointed plastic spudger will help guide the ribbon back through the black tabs when reassembling your device.

  16. LeapFrog LeapPad Platinum Screen Replacement, Touch Screen: passo 16, immagine 1 di 1
    • Remove the power and the volume buttons from their cradles.

    • This does not require any tool, just lift them out and put them in a secure place.

  17. LeapFrog LeapPad Platinum Screen Replacement: passo 17, immagine 1 di 2 LeapFrog LeapPad Platinum Screen Replacement: passo 17, immagine 2 di 2
    • Remove the eight 4.0 mm screws for the plastic backing that covers the screen.

    • Be certain to keep track of your screws.

    • The directional pad is now loose and can also be removed.

  18. LeapFrog LeapPad Platinum Screen Replacement: passo 18, immagine 1 di 2 LeapFrog LeapPad Platinum Screen Replacement: passo 18, immagine 2 di 2
    • Carefully lift out the plastic plate and set it aside.

  19. LeapFrog LeapPad Platinum Screen Replacement: passo 19, immagine 1 di 2 LeapFrog LeapPad Platinum Screen Replacement: passo 19, immagine 2 di 2
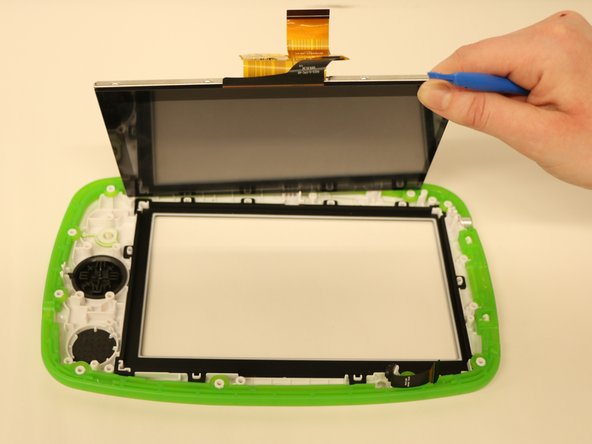
    • The screen is now completely accessible and can be lifted out of its cradle. Use the plastic spudger to safely and carefully lift the screen up.

    • Screens are very fragile so be sure to have a safe and secure place to put it, safely away from any magnetic devices.

    Hi there i got screen damage on this model did you know any part number or place where can buy replacment ? Wojciech.kuczaj@gmail.com

    Wojciech Kuczaj - Replica

Conclusione

To reassemble your device, follow these instructions in reverse order.

Altre 2 persone hanno completato questa guida.

David Lee

Membro da: 02/01/16

151 Reputazione

1 Guida realizzata

Team

UW Tacoma, Team 1-5, Rose Winter 2016 Membro di UW Tacoma, Team 1-5, Rose Winter 2016

UWT-ROSE-W16S1G5

4 Membri

8 Guide realizzate

2 Commenti

Where can i get a replacement screen?

Lucien Dixon - Replica

Where can i purchase a new screen from?

craig lad - Replica

Aggiungi Commento

Visualizza Statistiche:

Ultime 24 Ore: 0

Ultimi 7 Giorni: 1

Ultimi 30 Giorni: 8

Tutti i Tempi: 6,502