Salta al contenuto principale

LG Optimus 3D Screen Replacement

Cosa ti serve

  1. LG Optimus 3D Screen Replacement, Back Cover Removal: passo 1, immagine 1 di 2 LG Optimus 3D Screen Replacement, Back Cover Removal: passo 1, immagine 2 di 2
    • Pry the back cover off of the phone with your fingernail. There is a notch located at the bottom of the phone for improved leverage.

  2. LG Optimus 3D Screen Replacement, Battery Removal: passo 2, immagine 1 di 3 LG Optimus 3D Screen Replacement, Battery Removal: passo 2, immagine 2 di 3 LG Optimus 3D Screen Replacement, Battery Removal: passo 2, immagine 3 di 3
    • The battery is the large black rectangle towards the bottom half of the phone.

    • There is a semi-circular notch at the bottom edge of the battery. Press against and up on the battery to pop it out.

  3. LG Optimus 3D Screen Replacement, Screw Removal: passo 3, immagine 1 di 2 LG Optimus 3D Screen Replacement, Screw Removal: passo 3, immagine 2 di 2
    • Remove 9 screws from the phone. The locations of these screws are circled in the picture.

    • 5.5mm length PH00 screws

    • 4mm length PH00 screws

  4. LG Optimus 3D Screen Replacement, Bottom Cover Removal: passo 4, immagine 1 di 2 LG Optimus 3D Screen Replacement, Bottom Cover Removal: passo 4, immagine 2 di 2
    • Gently pull down on the bottom cover to remove it.

  5. LG Optimus 3D Screen Replacement, Mid-Cover Bezel Removal: passo 5, immagine 1 di 3 LG Optimus 3D Screen Replacement, Mid-Cover Bezel Removal: passo 5, immagine 2 di 3 LG Optimus 3D Screen Replacement, Mid-Cover Bezel Removal: passo 5, immagine 3 di 3
    • Using a plastic opening tool, gently pry around the perimeter of the device.

    • The ribbons behind the buttons and ports are very delicate. Make sure you do not run your plastic opening tool too deep into the bezel, as you could damage them.

    • The button covers rest under the Mid-Cover Bezel. Remove them and set aside.

  6. LG Optimus 3D Screen Replacement, Ribbon Cable Disconnection: passo 6, immagine 1 di 2 LG Optimus 3D Screen Replacement, Ribbon Cable Disconnection: passo 6, immagine 2 di 2
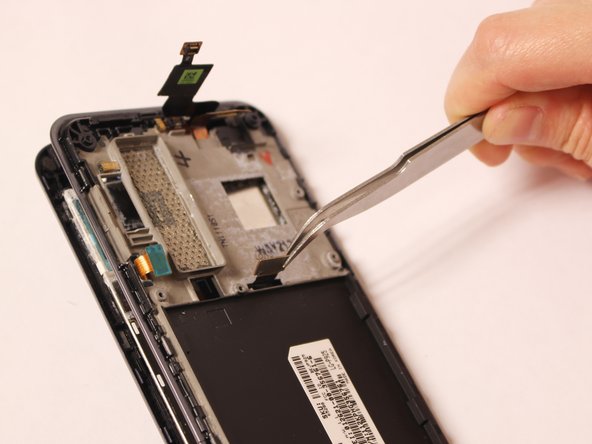
    • Using a spudger or plastic opening tool, gently disconnect the ribbon cable attached to the black SIM card board.

  7. LG Optimus 3D Screen Replacement, Adhesive Loosening: passo 7, immagine 1 di 1
    • Use a hair-dryer on high, or a heat-gun on low to heat the device and loosen the adhesive which holds down the SD/SIM Card Board.

    • Evenly heat the device in short intervals for about one minute.

    • Do not heat the device for more than 30 seconds at a time to prevent over-heating.

  8. LG Optimus 3D Screen Replacement, SD/SIM Card Board Removal: passo 8, immagine 1 di 3 LG Optimus 3D Screen Replacement, SD/SIM Card Board Removal: passo 8, immagine 2 di 3 LG Optimus 3D Screen Replacement, SD/SIM Card Board Removal: passo 8, immagine 3 di 3
    • Gently pry the board up to release it from the now soft adhesive. Make sure you pry up the little tab connected to the camera unit as well.

    • If the board is too difficult to separate than more heating may be required.

  9. LG Optimus 3D Screen Replacement, Disconnect Ribbon Cables: passo 9, immagine 1 di 2 LG Optimus 3D Screen Replacement, Disconnect Ribbon Cables: passo 9, immagine 2 di 2
    • Using a spudger or plastic opening tool, gently lift the ribbon cables connected to the motherboard.

    • The button tabs, highlighted in orange, are held in with a light adhesive. Gently lift them out of the body of the phone with a spudger.

  10. LG Optimus 3D Screen Replacement, Disconnect Antenna: passo 10, immagine 1 di 2 LG Optimus 3D Screen Replacement, Disconnect Antenna: passo 10, immagine 2 di 2
    • Remove the antenna cable by disconnecting both ends.

    • One end connects to the motherboard and the other connects near bottom of the phone.

  11. LG Optimus 3D Screen Replacement, Remove Motherboard: passo 11, immagine 1 di 2 LG Optimus 3D Screen Replacement, Remove Motherboard: passo 11, immagine 2 di 2
    • Using a spudger gently lift the motherboard assembly out of the case.

    • Make sure the motherboard does not get snagged on the camera's ribbon cable.

  12. LG Optimus 3D Screen Replacement, Ribbon Cable Disconnection: passo 12, immagine 1 di 1
    • Using the plastic opening tool disconnect the ribbon cable connected to the headphone jack assembly.

  13. LG Optimus 3D Screen Replacement, Headphone Jack Removal: passo 13, immagine 1 di 2 LG Optimus 3D Screen Replacement, Headphone Jack Removal: passo 13, immagine 2 di 2
    • Separate the Headphone Jack from the body of the phone. It should pop off relatively easily.

  14. LG Optimus 3D Screen Replacement, Front Bezel Removal: passo 14, immagine 1 di 2 LG Optimus 3D Screen Replacement, Front Bezel Removal: passo 14, immagine 2 di 2
    • Using a pry tool, carefully remove the front bezel of the phone.

    • There are many clips holding it together, so take your time and be patient.

    • Do not poke too far into the phone while prying, as you may damage the LCD from the side.

  15. LG Optimus 3D Screen Replacement, Pull Ribbon Cable End Through: passo 15, immagine 1 di 2 LG Optimus 3D Screen Replacement, Pull Ribbon Cable End Through: passo 15, immagine 2 di 2
    • There is a ribbon cable coming from the front portion of the phone that fits through a slot in the back.

    • Pull this ribbon cable through the slot to fully separate the halves.

  16. LG Optimus 3D Screen Replacement, LCD Removal: passo 16, immagine 1 di 2 LG Optimus 3D Screen Replacement, LCD Removal: passo 16, immagine 2 di 2
    • Gently pry the LCD from the phone half.

    • Don't touch the front of the LCD panel or the back of the digitizer (the clear panel).

    • If the glass on your phone is broken, be careful to avoid getting cut by any shards that may fall apart.

  17. LG Optimus 3D Screen Replacement, Note on Reassembly: passo 17, immagine 1 di 2 LG Optimus 3D Screen Replacement, Note on Reassembly: passo 17, immagine 2 di 2
    • When you are putting the front and back portions of the phone back together, make sure you don't forget to pull the LCD ribbon cable through the corresponding slot to connect back to the motherboard.

Conclusione

To reassemble your device, follow these instructions in reverse order.

Altre 2 persone hanno completato questa guida.

Team

USF Tampa, Team 10-6, Brown Fall 2014 Membro di USF Tampa, Team 10-6, Brown Fall 2014

USFT-BROWN-F14S10G6

3 Membri

6 Guide realizzate

0 Commenti

Aggiungi Commento

Visualizza Statistiche:

Ultime 24 Ore: 0

Ultimi 7 Giorni: 1

Ultimi 30 Giorni: 3

Tutti i Tempi: 1,176