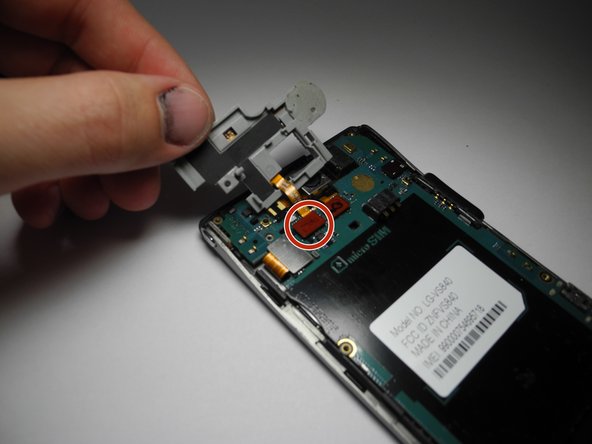
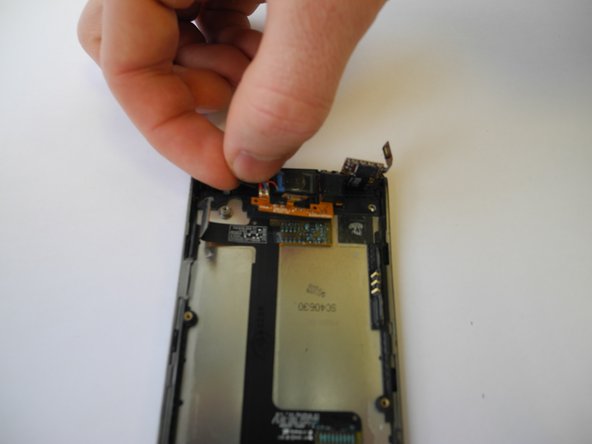
Salta al contenuto principale

LG Lucid 4G Headphone Jack Replacement

Cosa ti serve

  1. LG Lucid 4G Headphone Jack Replacement, Battery: passo 1, immagine 1 di 3 LG Lucid 4G Headphone Jack Replacement, Battery: passo 1, immagine 2 di 3 LG Lucid 4G Headphone Jack Replacement, Battery: passo 1, immagine 3 di 3
    • Turn off the phone by pressing the power button, then press "Power Off", then press "OK" when notified that your phone will shut down.

  2. LG Lucid 4G Headphone Jack Replacement: passo 2, immagine 1 di 2 LG Lucid 4G Headphone Jack Replacement: passo 2, immagine 2 di 2
    • Flip the phone so that its back plate is facing upward.

    • Use your fingernail or prying tool to lift the back plate of the phone open by using the notch at the bottom.

  3. LG Lucid 4G Headphone Jack Replacement: passo 3, immagine 1 di 2 LG Lucid 4G Headphone Jack Replacement: passo 3, immagine 2 di 2
    • Using the notch located near the bottom center, remove the battery with a prying tool or your fingernail.

  4. LG Lucid 4G Headphone Jack Replacement, Headphone Jack: passo 4, immagine 1 di 1
    • Remove the 7 ph000 screws found on the back of the phone.

  5. LG Lucid 4G Headphone Jack Replacement: passo 5, immagine 1 di 2 LG Lucid 4G Headphone Jack Replacement: passo 5, immagine 2 di 2
    • Once all the screws are removed, use a plastic opening tool to lift off the plastic cover. There are notches on the left side by the micro SD port.

    • It may be difficult to pry the plastic over off. You may need to use some force.

  6. LG Lucid 4G Headphone Jack Replacement: passo 6, immagine 1 di 1
    • Next, remove another screw located in top left quadrant of phone.

  7. LG Lucid 4G Headphone Jack Replacement: passo 7, immagine 1 di 2 LG Lucid 4G Headphone Jack Replacement: passo 7, immagine 2 di 2
    • Remove SIM card holding by prying it with opening tool. As you are lifting it, disconnect the ribbon that is connecting the sim card holding and the rest of the phone.

  8. LG Lucid 4G Headphone Jack Replacement: passo 8, immagine 1 di 2 LG Lucid 4G Headphone Jack Replacement: passo 8, immagine 2 di 2
    • Disconnect the 5 ribbon cables connected to the motherboard.

    • Remove the motherboard.

  9. LG Lucid 4G Headphone Jack Replacement: passo 9, immagine 1 di 2 LG Lucid 4G Headphone Jack Replacement: passo 9, immagine 2 di 2
    • Lift the additional ribbon in the top right quadrant.

    • Once that ribbon is lifted, the audio jack can easily be removed.

Conclusione

To reassemble your device, follow these instructions in reverse order.

Will Bonner

Membro da: 02/07/17

101 Reputazione

1 Guida realizzata

Team

Ohio State, Team 1-1, Wilder Spring 2017 Membro di Ohio State, Team 1-1, Wilder Spring 2017

OSU-WILDER-S17S1G1

4 Membri

8 Guide realizzate

0 Commenti

Aggiungi Commento

Visualizza Statistiche:

Ultime 24 Ore: 0

Ultimi 7 Giorni: 0

Ultimi 30 Giorni: 1

Tutti i Tempi: 202