Salta al contenuto principale

LG K7 Rear Facing Camera Replacement

Cosa ti serve

  1. LG K7 Rear Facing Camera Replacement, Battery: passo 1, immagine 1 di 2 LG K7 Rear Facing Camera Replacement, Battery: passo 1, immagine 2 di 2
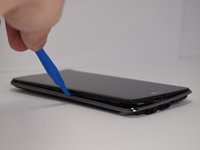
    • Place a fingernail in slot at in the bottom edge of the phone.

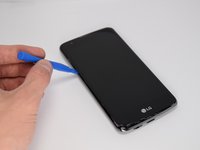
    • Pull up on the back panel while holding down the rest of the phone steady with your hand.

    • Do not to pull too hard on the back panel or you may break it.

  2. LG K7 Rear Facing Camera Replacement: passo 2, immagine 1 di 2 LG K7 Rear Facing Camera Replacement: passo 2, immagine 2 di 2
    • Place a fingernail in the slot at the bottom edge of the battery.

    • Pull the battery out.

  3. LG K7 Rear Facing Camera Replacement, Rear Facing Camera: passo 3, immagine 1 di 3 LG K7 Rear Facing Camera Replacement, Rear Facing Camera: passo 3, immagine 2 di 3 LG K7 Rear Facing Camera Replacement, Rear Facing Camera: passo 3, immagine 3 di 3
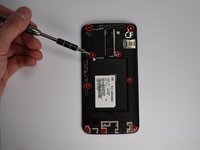
    • Remove the 9 frame screws with a JIS #00 screwdriver.

    • The bottom three screws release the port cover at the bottom of the phone. The cover should lift off easily once the screws are out.

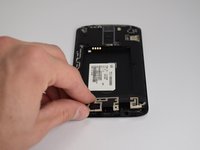
    • Pop the camera button frame off with a spudger. The home button should come off along with the frame.

    • Be gentle with the frame when removing it. The plastic is very thin and can easily break.

  4. LG K7 Rear Facing Camera Replacement: passo 4, immagine 1 di 2 LG K7 Rear Facing Camera Replacement: passo 4, immagine 2 di 2
    • Use a plastic opening tool to separate the screen from the outer frame.

    • Do not to bend the outer frame or the screen to when separating them. This can severely damage the phone.

  5. LG K7 Rear Facing Camera Replacement: passo 5, immagine 1 di 1
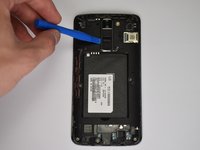
    • Insert the edge of a plastic opening tool underneath the camera connector that is attached to the camera by a flat, thin, and flexible sheet.

    • Slowly lever the connector free by pressing down on the opening tool's handle. The connector should be fairly solid and pop out by levering just one edge.

    • Be careful not to break or bend the connector or any part of the device you may be levering against.

Conclusione

To reassemble your device, follow these instructions in reverse order.

Un'altra persona ha completato questa guida.

James Ngo

Membro da: 01/19/18

461 Reputazione

4 Guide realizzate

Team

Cal Poly, Team S21-G5, Banghart Winter 2018 Membro di Cal Poly, Team S21-G5, Banghart Winter 2018

CPSU-BANGHART-W18S21G5

4 Membri

8 Guide realizzate

0 Commenti

Aggiungi Commento

Visualizza Statistiche:

Ultime 24 Ore: 0

Ultimi 7 Giorni: 0

Ultimi 30 Giorni: 2

Tutti i Tempi: 398